
mortesv
-
Posts
774 -
Joined
-
Last visited
Content Type
Profiles
Forums
Gallery
Everything posted by mortesv
-
Why, what happens to him?? OMG you spoiled the movie for me! Great scene though - I like that you got the greebling on the wall in there too - could use a bit more light though Oh and the wall almost looks like it was in in Legos (looking at the movie shot)
-
I must say, I really like you recreation of this scene. It looks real cozy - especially considered all the terrible things that happened here. I mean Watto being a slave owner, blowing up slaves left and right - and very possibly being the real farther of Darth Vader - sorry Shmi, but I don't buy that virgin Mary midiclorian story... But I digress... This is really well made and something I would't mind having on my shelf - even though TPM isn't my very favorite SW documentary
-
UCS 10221 Mod Episode II: The Modder Strikes Bottom
mortesv replied to mortesv's topic in LEGO Star Wars
There are several bricks from the existing bottom that you can use – especially the 12 x 3 wedge plates and a few of the 2 x 4 snot plates. DISCLAIMER: Below is a parts list with ROUGH numbers. Right now I don’t have the time to make an accurate list (tear the model apart), but with the bricks below you should be able to recreate all the bottom plates (the two large ones and the two small ones in the back), and extend the A-frame a bit. If you order all the bricks you may end up with some spares of the cheaper/smaller bricks - I tried to err on the side of getting a few spares rather than running out . I based the parts list by looking at the model and the pics posted here, so please re-check those blurry pics if you want a completely accurate list Plates: 1 x 2 (20) 1 x 3 (6) 1 x 4 (16) 1 x 6 (8) 1 x 8 (6) 1 x 10 (8) 1 x 12 (10) 2x2 (16) 2x3 (10) 2x4 (20) 2x6 (10) 2x8 (6) 2x10 (6) 2x12 (8) 4x4 (4) 4x6 (at least a dozen – get some of them with on studs only on the edges – for decorative reasons) 4x8 (4) 6x10 (4) 6x12 (preferable with studs only on the edges - just two is needed) Wedge plates: 6 x 3 (8: 4 left, 4right) 3 x 2 (4: 2 left, 2right) IMPORTANT: A lot of flat hinges - look below: You need 30 of the top one. 10 of the middle one and 20 of the bottom one. The you should have a few spares and enough to angle the bottom engines. If you have any questions just fire away -
I'm sad to hear this and I second everything that has been said here. He will continue to be a true inspiration in many years to come
-
UCS 10221 Mod Episode II: The Modder Strikes Bottom
mortesv replied to mortesv's topic in LEGO Star Wars
I have sent you some more detailed pics and suggestion of what bricks you need. If anyone else needs it I can send it your way - or alternatively post it in this thread. Cheers Morten -
I like both versions, but there is always something extra cool about a brickbuilt creation - especially one so skillfully crafted as this one You have caught the features of the dewback superbly and most importantly retained the creature's charm. Looking very much forward to your instructions - this is simply made for the 'droid escape' set
-
UCS 10221 Mod Episode II: The Modder Strikes Bottom
mortesv replied to mortesv's topic in LEGO Star Wars
Thanks And while it may look subtle in profile it looks much better in real life - since the model now actually looks finished I used some time to come up with the final solution - and I modded it almost to a degree where it could be considered a MOC/Mod hybrid But I think the bottom itself could be recreated by looking at my pics. If you need a parts list or some more screens please let me know. I dont think you actually need an actual instruction manual for it. Just remember that the hinges are the key. Some of the parts needed for the new bottom can be taken from the old - you just need a number of extra plates - and hinges -
Good Job! and MUCH easier than building a new bottom
-
LEGOLAND Windsor - Star Wars Miniland Experience Mini-Raffle
mortesv replied to XimenaPaulina's topic in LEGO Star Wars
70 I want inspiration to further develop my UCS mods -
This is absolutely excellent, and something I would very much like to buy However, I agree that this set could use a bottom hatch and a lading pad for a mini Falcon - in DS TIE advanced style - perhaps something like this: - but with a big fat seat where the cockpit is where Han/Lando could sit (perhaps I'll just mock one up for you). The landing pad itself could just protrude over the side of the set - I wouldn't mind that Other than that I think the torture room and prison could be combined and the free room could be used as the "Ugnaugth/conveyor belt" room. I think your overall proportions are fine and you sholdn't be afraid of having "protruding parts" Good Job
-
While your idea is not without merit, may I remind you that pom-poms are not very aerodynamic and that they would most certainly catch fire when "turned on". Thus I cannot endorse this construction - it is simple too unrealistic and hazardous! In other words, I like it! Good job!
-
Hehe, I'm glad you mentioned this yourself, because I really like this MOC, but I felt I needed to bring this to your attention - and now I don't have to Great job and very nice hallway detail - can't wait to see your take on the corridor. Perhaps you can find inspiration here
-
Great sense of scale and detail in this one! Your window and doors are beautiful - how does the doors open/close?
-
How many and what kind of figs do you use to enhance your Death Star
mortesv replied to moop's topic in LEGO Star Wars
Well, I view the Death Star as the ultimate macho doll house. Thus people can fill with anything they like - as long as it is Lego and NOT pink -
UCS 10221 Mod Episode II: The Modder Strikes Bottom
mortesv replied to mortesv's topic in LEGO Star Wars
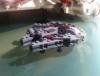
As promised, here is a pic of an additional tweak to the engine section: The diffence is that the detailing between the center engines now slopes downward to almost meet with the bottom plate - more in line with the real thing thing -
UCS 10221 Mod Episode II: The Modder Strikes Bottom
mortesv replied to mortesv's topic in LEGO Star Wars
Thanks for the nice comments guys! Just had another look at the real thing and got inspired to do an additional tweak to the engine section (what else ) I have just finished and I'll take some pics and post them tomorrow. I hope that you'll be able to tell the difference... -
UCS 10221 Mod Episode II: The Modder Strikes Bottom
mortesv replied to mortesv's topic in LEGO Star Wars
Woot! I got blogged, thanks And... I dedicate this Mod to the memory of Fallenangel - may he find happiness whereever he wanders -
Great MOC - and very swooshable! One nerdy comment though. Lego's blockade runners tend to use an engine design reminiscent of the corellian corvette seen in EP III. However if you want to mimic the Tantive IV engines, I would suggest using a slope brick that is one stud shorter on the outer engines reference.
-
Well he hijacked his own thread By the way, the Falcon is based Rogue Bantha's design. Search flikr and you can see his instructions
-
UCS 10221 Mod Episode II: The Modder Strikes Bottom
mortesv replied to mortesv's topic in LEGO Star Wars
Thanks But why did he get banned? He was so kind and helpful - and a Rebel blogger? - And, more importantly - who will now post my mods and the blog?!? But seriously - I'm gonna miss him -
Very good job! It looks like something you would pick up and swoosh around while making humming sounds - the hallmark of a good lightsaber replica
-
Wow that looks nice in LDD, good job! Regarding the hatches you can use these - they are used in lego's official mini falcon and has a great print (the official model does not look that great though )
-
UCS 10221 Mod Episode II: The Modder Strikes Bottom
mortesv replied to mortesv's topic in LEGO Star Wars
Where is Fallen? I made this for him! Perhaps Aeroeza will make the compariason pic - although his render is orthographic - so he will need to make a new one with perpective for it to make sense By the way I am still tweaking some engine parts of the mod - I'll post an additional shot soonish And regarding the length of the ship - Aeroeza insists on 17,6km - however it doesn't have any effect on the model - because the proportions are the same -
Cool article! However it was the second Death Star that (according to canon) is 160km in diameter. The first Death Star is "only" 120km in diameter...
-
Yeah I have noticed the bley technic axle as well. I think the model would look cool tiltted - but you could aslo choose just to make a new bottom for the model - I have just posted a solution here