EpicNinja423
-
Posts
21 -
Joined
-
Last visited
Content Type
Profiles
Forums
Gallery
Everything posted by EpicNinja423
-
Uploaded to stud.io, but the wheels can't link to axles?
-
Hello I haven't been here for a while, but can someone make the following torsos as decals? The lime one recolor all lime to standard lego green, and the white one recolor the blue bits to bright pink Thanks in advance! :)
-
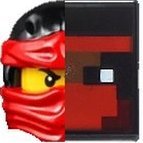
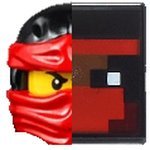
I think best to give an easier description of what I want. I wanted the base to be black and all the decorations red (bright red). Curious to know what I am making? the answer is MYSELF Do you have a rebrickable account? Can you tell me your email plz?
-
Uhh... I meant change the dark red, tan, and silver ALL into red. Not dark red to tan. Also the tan-ish scarf and belt need to be red
-
Hey Project Black Brick, good job. Now for color scheme changes, change all red to black, and all dark red, tan, and silver to red. Good luck
-
Hi Project Black Brick, I am currently facing issues opening Minecraft so start with the other figure for now. I was planning to update the color scheme as well but if you want, finish making the design and then I will tell you what to make each color. Thank you again
-
Hey man I am attatching my minecraft skin file to this post can someone plz turn it into a decal? Also, can I have kai's ninjago crystallized suit decal? Front torso and legs only

-
Probably tomorrow when I already need to print a document. Thanks again!
-
You nailed it! Thank you so much
-
Hello. You almost got it right but the belt sash should be dark purple (as in the actual lego color dark purple) and also the eyebrows on the happy face are slightly, uh how do I put this into words, slightly awkward. They need to still be bushy and not flat on the top. Good job so far
-
The face should have the wrinkles in light gray with dark gray eyebrows. Also, the face needs to be dual sided - the face you made and a smile Reference - Good job so far
-
1 - Your welcome 2 - Regular torso. If you want, you can send me a 4 arm as one as an extra challenge but the only one I really need is a regular 2 arm torso. Also, this time I need the face and legs for the figure 3 - Yes. I am going to be using white paper.
-
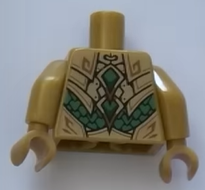
Absolutely perfect! Except one thing - the color. I left you the regular gold but I found the gold for the decorations is wrong, the color code for the decorations is 582A12 Color codes all needed - Pearl gold (for the background) - AA7F2E Reddish brown (for the decorations) - 582A12 Green - 237841 Black - 000000 For all LEGO Colors, visit https://rebrickable.com/colors/ You did a very good job. You should make LEGO Decals, print them, and sell them
-
Hello, my name is EpicNinja423 and I am a crazy Lego and minecraft player. I build MOCs mainly from ninjago and I just registered here on eurobricks.
-
Lol my name is also Adam
-
Thank you. It looks like the front is done! now I gave you the reference for the back and that should help for the back decal. I will post this on my rebrickable workbench and note at the bottom that the decal was made by you. You have done a very good job after a lot of effort. I would hire you as my decal designer if I could but I don't think that's a job but maybe I will make that job and the salary would be $2 - $3 for one decal or more for more complicated ones. And about the application process I use HP Smart printing. My printer makes colors a bit faded but this should be good enough to match the colors on my figure. I bought a 4 arm torso and started modifying the shape and color for your decal. Anyway, thanks again!
-
I mean you used yellow instead of gold, and for the decorations you used an orangish color instead of dark gold. The background gold color code is AA7F2E and the decoration gold is B48455. I hope this helps you out. EDIT: I just realized that your original plan backfired - you said you took my request because it seemed simple but it is not, you missed something each time. At least now the only problem is the color
-
OK good enough. If anything I can do the final adjustments on my own as well as fixing the color slightly. Apologies if you think I have been a bit demanding or bossy.
-
No that is not it. Look at Lego figures like most garmadon figures for the accuracy. If you want the measurement then it is 2.4cm tall. Not the height of 2 Lego torsos. Apologies for taking more of your time with the misunderstanding. And no, making the six pack into an eight pack is wrong, it is supposed to be the height and shape stretched and adjusted. Another thing I would suggest is finish designing the front torso decal to be perfect first, then work on the back because if you work on both, then you have to keep editing both. Finish the front until it is good and then work on the back to save your time
-
Hello, Thank you for taking the challenge but oni lloyd is different now - I just got the set with him so instead of making all of it, just do the torso for him but adjust the size to fit on a torso that has 4 arms (I think you see what I am doing here) and for Garmadon, the back torso reference you can find in a speed build of set 71775: Nya's Samurai X Mech. I let you know this because if I try to screenshot it for you, my computer screenshots are always very blurry and will cause a lot of difficulty for you. For lloyd, I snapped a photo with my phone and it came out better and I managed to give you a reference. Remember to also make the back taller and modified for 4 arm torso's. Lloyd's back torso reference is here: Anyway, thanks
-
Hello, I am trying to make a crystallized final battle MOC but I need the front and back torso decal prints, and the leg decals of the following minifigures: Thank you to anyone who can make these. As I stated above, I need the front and back prints for the torso and the leg prints. I also need Garmadon's standard angry face for I snapped the neck on mine inwards and it will not go on anymore.