
carpandean
-
Posts
45 -
Joined
-
Last visited
Content Type
Profiles
Forums
Gallery
Everything posted by carpandean
-

[M4-22 - Brick Built Creature] – Beware the Rancor
carpandean replied to Mandalorianknight's topic in Watto's Junkyard
I picked the ingot because his nostrils are more vertical slits than round holes. However, not having actual slits, just indents, it may not look right. I look forward to seeing the renders. Now that I use Studio, I wanted to just jump over and swap them myself. -
[M4-22 - Brick Built Creature] – Beware the Rancor
carpandean replied to Mandalorianknight's topic in Watto's Junkyard
I love the design! The only very minor thing is it's like one of those drawings that if you look at it one way you see an old man's face, but another way you see an old woman's whole body (just as an example.) If I look quickly, the nose looks like two eyes, which clearly gives the wrong impression. However, if I look at his actual eyes and tell myself that those are the eyes and the nose is his nose, it looks perfect. Did you try a "Plate, round 1 x 2 with open studs" (part #35480) instead of the two "Plate, round 1 x 1 with open stud" (part #85861) to give the impression that they are one nose, rather than two eyes? Another option is the "Minifigure, Utensil Ingot / Bar" (part #99563). Again, just a very minor optical illusion. The actual eyes are great. -
Classic moment in Star Wars.
-
[M4-22 - Brick Built Creature] – Like a Bantha
carpandean replied to Danny_Boy4's topic in Watto's Junkyard
Really well done, especially the head! I agree that the beard turned out really well. -
[M4 - 22 - 12x12 Vignette] "Is your foot all right?"
carpandean replied to CrappyMocMaker's topic in Watto's Junkyard
Ha! This makes me laugh ... in a good way! Well done! -
[M4-22 - 12x12 Vignette] The place where Luke's hand fell
carpandean replied to Sérgio's topic in Watto's Junkyard
Funny and awesome idea. -
Save $100+ by going with an alternate paint scheme ...
-
Very cool! Meesa thinkin' yousah be needin' Jar-Jar Beeenks in that'n firstuh one. And Obi-Wan hanging in the hole for the second.
-
Well, I made it work. It's not perfect, but good enough. Now, it's time to figure out what scheme to build for real.

-
Cool, cool. Just wanted to make sure. I've reached a point where I'm not sure I can continue. Getting the angles right on the fuselage sides from 262 and 279 of the white model has been a pain, and I still don't have it correctly done. Then, getting the piece made in 286 to fit inside in 287 just isn't working. Would be so much easier with actual (physical) parts. The wings are done (I jumped ahead for the laser cannons), so I can mess with paint schemes on those. I'll probably go back to try the rest again, but may end up building what I can to get a feel for what I can do with the paint scheme. Then, I'll part it out to see what I need to buy to actually build it ...
-
I could see that ... especially once you're confident in what will actually work! P.S.: Let me know if you want me to delete the photo that I posted above.
-
No matter how I move it, once I turn collisions back on, some are the parts turn to grayed out, black lined versions indicating there's a collision. I can live with it, since it's on the inside, so I'll just move on to the rest. My plan is to make visual tweaks before building, not to mess with Jerac's internals, so it should be sufficient.
-
That's what I tried, but always ended up with some kind of collision. Perhaps my angle ("hinge") is off.
-
I can understand and appreciate that. You deserve the credit and $ for your hard work. No worries. Mostly, I had trouble getting the blue part to fit inside without hitting something: I'll probably just end up skipping it, since it doesn't actually have to function. Either way, I promise not to share it.
-
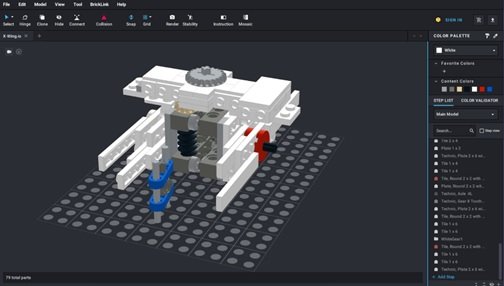
@Jerac I ended up purchasing the plans for your great design and have some interesting ideas for color schemes. Do you, by any chance, have this built in Studio? I imported the parts, but couldn't even get through the first 50 steps (gear box) without a lot of difficulty in getting things aligned. Even with manual adjustment and hinging, it wasn't quite working. Plus, there were like 300 more steps I'm just looking for something to swap parts in to see how it will look. If not, no biggie. I can always just build the wings and exterior of the fuselage to play with. Note: I'm new to Studio, so if there's something that I missed in the files provided that tells it how to put it together, let me know.
-
I'm a little late in seeing this, but it's so well done that it deserves a bump. Crazy MOC!
-
As others have said, great job on both of the extremes: smooth curves on the nose and accurate greebling on the body.
-
[MOC] N1-Starfighter (Royal and Modified)
carpandean replied to Rustinidiel's topic in LEGO Star Wars
Even though I wasn't particularly happy about the choice of new ship for "Mando" -- not an issue with the N-1 design itself, which I actually like, just a bad replacement for the Razorcrest -- your MOC design is great! -
Great MOC! While that's one of my least-favorite Lego colors, it's totally accurate for the ship. Your design is really clean and well done. The one small tweak that I would suggest is something different at the front of the concussion missile launchers to make them a little wider.
-
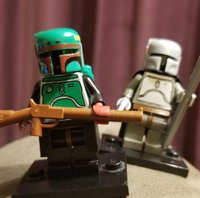
Old-school Fett helmet/backpack/armor updated for end-of-season-2 Mandalorian Din Djarin and Boba Fett. Din Djarin: Pearl Light Gray Jetpack/Helmet (X50, factory second Jango Fett without print), original Jengo Fett torso, Dark Gray arms, Light Gray hands, Dark Gray legs w/ Brown waist, black cape, Pearl Light Gray spear, and Pearl Light Gray revolver. Boba Fett: Boba Fett Jetpack/Helmet with Dark Red detail, original Boba Fett torso, Black arms, Sand Red hands, Black legs w/ Brown waist, Black Anti-Blast kama, and Reddish Brown rifle. I prefer the old style for some reason, but wanted the newer characters (or versions thereof.) I have 20 of the all-gray helmets that I bought back in 2009, which made it all possible, even if it did mean purchasing an expensive Jango torso. I need to take a better pic, because this one doesn't do the matching of the helmet, armor, spear and pistol justice.
.jpg.2c1aa6a671ae254491aa1fee7af443c0.jpg)