
Wurger49
-
Posts
378 -
Joined
-
Last visited
Content Type
Profiles
Forums
Gallery
Everything posted by Wurger49
-
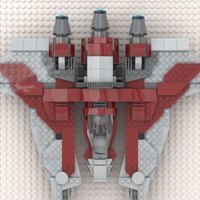
 The V-19 Torrent starfighter was used by the Republic Navy during the early stages of Clone Wars, it was eventually succeeded by the Alpha-3 Nimbus-Class V-Wing. The V-19 was a sturdy, fast and long-range space superiority fighter. It possessed a flat, broad and roughly square shaped fuselage with a cockpit mounted towards the back of the hull, various curved bricks and slopes are used to build up the hull so it’s tall enough to sit a minifigure inside. The large domed canopy provided pilots with great view of their surroundings. The starfighter also possessed two powerful ion engines that are mounted in nacelles located port and starboard that also contain the connections and control mechanisms for the fighter's primary S-foils. Furthermore, a third engine is housed in a vertical stabilizer, they made the V-19 very fast and nimble. The vertical stabilizer can rotate up and down via an axle connection on a technic beam and bricks, as it is quite heavy, I had to design a mechanism to hold it up while the ship is landed. I used one rotatable lime 1x2 technic beam on the back of the cockpit and one on the stabilizer; they interlock to hold it up, and in-flight mode, you can rotate the beams to release the stabilizer. Another lime 1x2 technic beam at the underside of the ship is used to keep the stabilizer at 90 degrees angle when rotated down. After trying a few other methods including illegal connections, I feel this is the best way. I also want to point at this vertical stabilizer is half brick-built, combined with technic beams and plates. The two foldable S-foils are plate-built, the angle of the fold down is set up 2 technic pins inside the engine nacelles; and the angle of fold up is set by the slope built on the wing roots. A pair of large wingtip-mounted lasers cannons are built using spring-loaded shooters for their bulkiness, plus some other pieces include long bars. I used the same design features I deployed on my Nu-Class Attack Shuttle, but that rotatable vertical stabilizer with lock mechanism sure took some designing, and it’s structurally sound as it’s half brick-built. The rest of ship is also very solid including the S-foils won’t snap off when the folding down, a problem I encountered and fixed on my Nu-Class already, it passed the swooshability test from my son. The V-19 is another cool Republic-era starfighter from the Clone Army, especially with its folding and rotating features and two large laser cannons, making it a fine addition to any LEGO Star Wars collection. Instructions are on Rebrickable: https://reb.li/m/211421
 -
The Colonial Viper is the primary space superiority fighter deployed by the Colonial Fleet, originally developed on Caprica, at least a decade before the 1[sup]st[/sup] Cylon War. The viper is built around 3 powerful engines behind a long nose with a distinctive three-pointed silhouette. I started designing the triple engine mounts, the massive white wheel pieces created some troubles which I had to design around, I even thought of taking them out of the design at one stage, but felt the engines would be too short. In the end, I love how they turned out as the side cooling intakes and check out the top intake with curved bricks! No sizable gaps are visible around where the cockpit is connected to the engines, and I tried many different engine layouts with the cylinder and barrel pieces. The final version chosen has the dark red round brick lined up with the dark red stripes on the wing, the grey technic axle was just a tad too long for the engine, luckily I was still able to connect the trans-dark pink round plate as exhausts. The stabilization fin was brick-built, compared to the plate-built wings, I have to say that brick-built just feels special. Dark red plates and tiles are used to create stripes on the wings, two laser canons are mounted on the forward wing tips. The small anhedral wings are optimized for space flights where maneuvering is done by thrusters. The Viper can still hold its own in atmosphere with its high wing load using its great speed and acceleration. The 1x12 bricks made the nose design a breeze, the dark red pieces are all just the right length to cover up the entire nose, with a white slope mounted vertically on a bracket as the tip. Even the light bluish grey pieces are the right length for the underside of the nose. I never get that in other alternate builds. There are enough technic beams and pins to build a stand with 2 angles to display the model; I would not recommend swooshing the model around on this stand as the 4 stud connection isn’t strong enough. However, the main fuselage of the model is rock solid, you can hold the Viper by the inverted curved bricks on the underside for play. While this is not a Star Wars starfighter, I believe this Colonial Viper will be loved by our community and many of us have watched Battlestar Galactica, plus the Viper is just a cool fighter! So say we all! Instructions are on Rebrickable: https://reb.li/m/212719
-
cheers mate, the ARC-170 gave so many opportunities
-
The 75402 ARC-170 has many long wedge plates and long bricks, so I thought it was possible to build a Venator around that. I followed the same design philosophy of the 75404 Acclamator where there is just the top angled hull and a central core. The White Queen was launched! The Venator-Class Republic Attack Cruiser had a hull characterized by two wedge shapes and a dorsal superstructure near the aft containing two bridge towers. The port tower was the starfighter operations command bridge, while the starboard tower served as a primary helm and command bridge. I started with designing the hull by trialling out different wedge arrangements, finding the right balance between the front and back hulls. The central core was built up quickly using long bricks like the 1x12 ones. For once there is enough dark red tiles for the central hangar roof, and the republic insignia sticker really helped to complete the Venator look. The hull plates are connected via pin hole plates, I tried different ways to lock in their angle. In the end, the hulls are locked in on top from the superstructure; technic beams, and inverted slopes and wedges held it up from the bottom. I tried to keep the underside of the ship as clean as possible, keeping symmetry and serving its structural function. With its simple design philosophy, the model is extremely solid around the core and hulls. The dorsal superstructure was mainly built with slopes and bricks, with two wedge plates mounted on brackets to give the side walls a bit more layering and detail. The cut-out slopes gave the best angles for the front wall, more traditional slopes were used for the back wall. Four clip plates represent the defensive laser cannons; they also have the function of locking the hull plates’ angle, if only LEGO gave me two more of those clip plates! At the stern of the ship, there are four primary thrusters and four secondary thrusters, mounted beside the pronounced hyperdrive tail. I had to use 3x3 barrels to represent the big thrusters, the fact that all 4 thruster types are built differently clearly showcased the many workarounds I had to pull out in alternate builds. The stand is built using wheel and cylinder pieces held together by bushes on an axle rod. The stand can rotate 360[sup]o [/sup]and the ship won’t fall over. I can also grab the stand and swoosh the Venator around with no concerns, the stand connection point is right beneath two sloped wedges, gives more support to the fingers that is holding the model. I am very happy with the size and shape of the White Queen, using less than 400 pieces from mid-sized LEGO set. This Venator scales well with other midi-scale ships like the Invisible Hand and Acclamator, making it another fine addition to anyone’s LEGO Star Wars collection! Instructions are on Rebrickable: https://reb.li/m/212121
-
The Alpha-3 Nimbus-Class V-Wing was a stubby, wedge-shaped starfighter. The wedge shaped fuselage is similar to the Delta-7 that was manufactured by the same company Kuat Systems Engineering. This design feature was later carried to the Rebel A-wing. The V-Wing featured radiator wings similar to those fitted on Eta-2 interceptors, when landing, the wings rotate downward to form as landing gear. The radiator wings are rotated vertically while flying, giving its distinguishing look like the future Tie-fighter. The wings are connected to the technic cylinders which allow for their rotation, the cylinders do come loose with play as there is no friction from the axle inside and the pieces are tightened to position via a technic bush and a round axle hole plate on each end. You just need to push the pieces back to tighten them again. The twin laser cannons are nestled between the wings and hull, connected to another technic cylinder, they are designed to rest on the fuselage to reduce unwanted movement as the cylinders rotate independently from the ones that connect the radiator wings. A small wedge is connected onto the back of the cylinder like source material. There is a white central spine for the wedge-shaped hull. From the wedge sloped nose, I used a variety of tiles and slopes leading up to the single seat cockpit. Inverted pieces are used to complete the sloped underside of the ship. The dark red curved bricks are placed below the windscreen like the source material. I only used an astromech head sitting behind the cockpit. Flanking the astromech are two deflector shield heat sinks, they can open up from the 2 pin hole plates. At the tail of the fighter, there are two vertically stacked ion engines. The technic stand can display the model in 2 different angles, I would recommend to swoosh the V-Wing around on the stand. While the body of the V-Wing is rock solid, the technic cylinder will come loose with play, but it’s very easy to push them against the fuselage to tighten. My son was immediately drawn to this version of the V-Wing like the Jedi Bob’s version, unfortunately as I expected, as the cylinders rotate independently it was hard for him to get them in the right position in relation to each other. He didn’t mind as he was swooshing it around but I would categorise this one as a more of a display model, another fine additional to any LEGO Star Wars Collection. Instructions are on Rebrickable: https://reb.li/m/211412
-
After doing the Z-95 and the Razor Crest, I thought of taking a low hanging fruit of the N-1 Starfighter as it shared many features of the other two. The clone pilots patrolling on Naboo got a squadron of N-1 on their hands and definitely preferred the N-1 over the Z-95 due to its great handling and capability to take an astromech. Things were going smoothly with engines pods done quickly, then I hit a roadblock on the wingspan of the N-1. There are plenty of 3x8 wedge plates with only two 3x6 wedge plates; the 16-stud wide wing was definitely too wide, so I built the ship with 14-stud wide wing and it was still too wide in relation to the cockpit and fuselage. I was about to give up with I saw the two pieces of 2x6 wedge plates, bingo! I got my 12-stud wide wing. I also wanted to build 2 starfighters as there are 3 windscreens from the ARC-170, so I was building the N-1 with minimum amount of pieces with the hope to leave enough pieces for the second ship. After I finished designing the wings and nose, I realized that I will get a half-arsed N-1 and another shoddy model. So, I scraped the 2 ship idea and concentrated on building the best N-1 alternate. I didn’t build an astromech slot as it took up too much space, just used the dome head piece behind the cockpit. The rear finial was connected to jumper plates and curved slope. The dark red wedge plates created the pattern leading to the flat silver grille pieces, they represented the laser cannons grooves. Spring loaded shooters have been built into the belly of the ship for play functionality. If you handle the model around the fuselage and wings, the structure is very sturdy, just be careful with engines and rear finial. The technic stand can display the model in 4 difference angels, small changes are made to the one in the A-Wing. The end product is a nice sleek Republic N-1 Starfighter, it’s much more minifigure scale compare to the massively oversize LEGO official Mandalorian N-1, will make a fine addition to any LEGO Star Wars collection. Instructions are on Rebrickable: https://reb.li/m/210609
-
[WINNERS] Eurobricks Alt-Build Contest 2025
Wurger49 replied to Clone OPatra's topic in Special LEGO Themes
congrats to the winners! -
[MOC] RZ-1 A-Wing Starfighter - Alternate Build of 75402 ARC-170
Wurger49 replied to Wurger49's topic in LEGO Star Wars
thank you! It really could have needed some more slopes and curved wedges, but that's the fun of the challenge. -
After finishing my triple gunship alternate builds, I decided to switch back to starfighters. It had the right windscreen and a couple of 4x4 cylinder pieces, but hardly any slopes and curved wedges, could lead to some challenges. The dark red and white pieces points to the famous A-Wing, the wedge shaped strike fighter manufactured by Kuat Systems Engineering. The A-Wing was essentially a cockpit with two engines and a hyperdrive, it was faster and more maneuverable compared to the X-Wing. The iconic dark red centre stripe down the wedge nose was 4 studs wide, ideally I would have preferred a 6 studs wide red stripe. The lack of curved wedges really showed up on the white flanks that connected the laser cannons, some non-continuous corners stuck out, I tried to soften the look by layering wedge plates and tiles to create the sloped hull. There were two laser cannons flanking the A-Wing hull, my technic connections allowed for a 360° rotation, I even managed to build the targeting lasers on top of the cannons as there were plenty of technic pieces inside the 75402. The 4x4 cylinder pieces were perfect for engines, even though I wished there were 6 instead of 4 inside the set, the difference in length was filled in using 3x3 barrels with the 4x4 red round brick as the engine outlet with pink exhausts. The stabilizer fins were easily connected to the holes on the cylinders, I was really pleased to say that I locked down the angle of each fin with 2 slopes, that had to be done as there were no friction on the engine axle connections. The model was one of my most solid builds, thus great for playing and swooshing around. I didn’t have to make too many changes to the stand I made for the Z-95, with the A-Wing being a more compact ship, the stand can display the model in 4 different angles. For my preferred angle of display, I placed red tiles on the port side and green tiles on the starboard side stand. So yeah, I had to break up my Z-95 to make this as the A-Wing had a much smaller footprint to display, and easier on the hand to swoosh around. One might be surprised that the piece count of both models was nearly identical as the A-Wing was a solid wedge at the front. This A-Wing alternate build will make a fine addition to any LEGO Star Wars collection. Instructions are on Rebrickable: https://reb.li/m/209923
-
After doing 4 alt builds on the ARC-170, I got around to update my Venator alternate build. The superstructure is now one plate lower, and the rear hull wedge is one stud shorter, rearranged hull plates, while maintaining the original length. These changes create a slimmer profile. My goal is to create the best possible Venator alternate build using only one Acclamator set.
-
After I completed my other two gunship designs from the 75402 ARC-170, I really liked the idea of transport ships with a bunch of laser cannons. I looked through the various starships, and the Razor Crest jumped out to me, I can’t believe I haven’t done a Razor Crest alternate build yet. The Razor Crest was an ST-70 assault ship manufactured by the Corellian Engineering Corporation, who also built the famous Tantive IV. Its military usage predated the rise of the Galactic Empire, so it would be perfectly feasible to see the Razor Crest in red and white colours of the Grand Republic Army. Jon Favreau’s design brief to Lucasfilm was the A-10 Thunderbolt “Warthog”, with the two big turbo-fan engines. The unusual location of the engines decreases ingestion risk and also allows the engines to run while the aircraft is serviced and rearmed by ground crews, reducing turn-around time. The Razor Crest had top-mounted wings with massive engines at the wingtips, they gave the Razor Crest great speed and maneuverability to mingle with much smaller starfighters. The engines were connected via blue technic friction axle pins, there are also tan non-friction pins inside the set, I was genuinely surprised how much extra stability the friction ridges gave to the engine parts and went back to change the pins inside my Republic Attack Shuttle’s wings. Two large laser cannons were bult up using various pieces like plates and slopes. The cannons are strong enough to be effective against larger opponents. I used different tiles on the fuselage of the ship to showcase its heavy armour, combined with powerful deflector shields gave the ship great protection. The dorsal escape pod was represented by greebling, based on the source material. My ship can sit one pilot, a small interior was designed at the back of the ship with a load ramp and fold-down side panels. When it’s opened, you can see the R4 astromech standing inside the ship, acting as a support column. You can stand and sit clones inside but it’s quite hard to place them with adult fingers. The model is very solid, making it great for swooshing around. Along with my other two gunships, this Republic Gunship will make a great addition to any Star Wars collection. Instructions are on Rebrickable: https://reb.li/m/209439
-
[Alt-Build Contest] Krennic's Shuttle (75389 Dark Falcon)
Wurger49 replied to codyaner's topic in LEGO Star Wars
Turned a round ship into a angular one with full interiors, that's next level of design work! Well done! -
Cheers, your Shuttle looks amazing too!
-
[ENTRY TOPIC] Eurobricks Alt-Build Contest 2025
Wurger49 replied to Clone OPatra's topic in Special LEGO Themes
Nu-class Republic Attack Shuttle (75402 ARC-170 Starfighter) Medium Category -
The LEGO ARC-170 has an ingenious technic system for its S-foils, while I can’t hope to design another mechanism like that, it may be possible to design a folding wing Republic Attack Shuttle. The shuttle left quite an impression on my younger self when I first saw the angular nosed ship on Clone Wars. The Nu-class was a faster, long-ranged supplementary design to the LAAT gunship, designed by Cygnus Spaceworks. The class had heavier armor and shielding from the dorsal fin, it also housed a hyperdrive for long distance travel. As it performed the role of an armored transport, it had seats for up to 30 clone troopers, while lacking the missile launchers of the LAAT gunship. It was designed with fold-down wings, similar to fighters like the V-19 Torrent and it was the predecessor to the famous Lambda-Class. Its boarding hatch was located at the nose of the shuttle, right below the cockpit. My alternate build is Midi scale to sit a single pilot in the cockpit, unfortunately the passenger cabin is just a shell with no flooring, no trooper can be seated inside. I had to use the plates for other parts of the ship. There are 2 swivel mounted laser cannons on the cheeks of the cockpit, plus 2 fixed laser cannons on the front of the wing joints. The cockpit is one heavy module hanging off the pin hole hinge, achieving the angled cockpit effect. Folding wing mechanism is achieved by technic beams, axles and connectors. A round connector is used on each wing to limit the angle which the wings can fold down, and a 1x2 slope is used to limit the angle which the wings can fold up. You can pick up the model from the dorsal fin and swoosh it around holding the technic beams underneath the passenger cabin. I would recommend using your hands to soften the movement of the wings folding down, as they had snapped off in my prototype designs. I have reinforced the wings in the released version where they didn’t snap off from playing, but better safe than sorry. As the attack shuttle comes to land, the wings fold up smoothly and I built 4 landing gears using more technic pieces. While it’s unfortunate that this model has no troop-carrying capability, I think I captured the essence of the Nu-class very well and it is a perfect addition to the Grand Army of Republic’s fleet of spaceships. Instructions are on Rebrickable: https://reb.li/m/208832
-
[ENTRY TOPIC] Eurobricks Alt-Build Contest 2025
Wurger49 replied to Clone OPatra's topic in Special LEGO Themes
Republic Gunship Midi Scale (75402 ARC-170 Starfighter) Medium Category -
The ARC-170 has 3 windscreens and round engines pieces, that’s enough for me to start on another Republic Gunship after doing the Z-95. The Midi gunships have been my most popular designs. I started with the idea of doing the stepped canopy layout like the actual Gunship, but ran into problems with the height generated and didn’t have enough plates for the wings and fuselage. I had to scrap that idea and restart with a flush canopy layout like the F-14 Tomcat. The cockpit is very spacious with pilot at the front and wizzo at the back with different controller slopes. 4 clone troopers can stand inside the cargo bay. I played with pin hole plates to get the right angles for the frame of the gunship. The R4 astromech is a permanent member of the ship as it acts as the support column among the technic beams and bricks. Go R4! For easier building, I have broken the whole thing down into 11 manageable sections: 2 missile launcher wings, 4 side panels, a 2-seater cockpit, a back ramp, a spine, and a base. Snapping them together on studs is a breeze. The back ramp does open, but the R4 astromech standing tall blocking the entrance. The wings are connected on technic axles and held in the right angle supported by slopes. In terms of handling this model, I would recommend picking it up from the spine and swooshing it around holding the cargo bay floor or front side panels. If you would like to hold it on the back panels, have the pressure points on the area where they connect to brackets. Do not try to pick up from wings and the cockpit area. This gunship packs a punch. There are two posable nose mounted laser cannons, the swivel plates are perfect for small scale models. There is a missile launcher on each wings, I tried a few different layouts before settling on the final design. This gunship is an evolution of my different gunship alternate builds from different sets, it’d be a fantastic addition to any LEGO Star Wars collection! Instructions are on Rebrickable: https://reb.li/m/208423
-
thank you! having the correct canopy and engine pieces are so important!
-
thank you! being built from the ARC-170 really helped!
-
Hope you likes the build and it's sturdy enough! thanks guys!
-
Good pieces to utilise from the ARC-170, ahh, thank you, you are too kind, Agent Kallus!
-
[ENTRY TOPIC] Eurobricks Alt-Build Contest 2025
Wurger49 replied to Clone OPatra's topic in Special LEGO Themes
3 Star Wars Alternates from me! (Medium Category) -
We had to wait 15 years for LEGO to release the new ARC-170, it would be fitting for it to get Z-95s to accompany them for the long strikes. As they are both produced by Incom, they shared many design components, making sense to do an alternate build from the ARC-170. The model has twin engines on the delta wings, flanking the canopy behind its long nose. I kept the two technic cylinders apart with four barrels to give the wings maximum stability. Unfortunately, the two-plated wings sag under its own weight from the 2 technic pin connections on the engines. On the bright side the technic pins will keep the wings in place even with heavy play. Spring loaded shooter are placed on the wingtips for play, my 5 years old son tested them out straight away even though the model is slightly big for him. The 10 stud long curved bricks made the long nose, the half round plate made the perfect canards. The generator hump behind the cockpit is a bit of a challenge to build, I used one tan slope with white curved bricks and wedge slopes to get the best shape possible. There are enough technic beams and pins to build a stand with 2 angles to display the model; making this a great display model while strong enough to play. Instructions are on Rebrickable: https://reb.li/m/207779
-
V1.3 09/03/2025 Taking another break after 11 alt builds on ARC-170, I managed to lengthen the nose and front wedge of the hull by 2 studs, making the ship sleeker. A lot of people were hoping for a Venator Midi Scale model in 2025, but we ended up in getting the Acclamator, which we first saw in the “Attack of the Clones”. The model itself is great and has all printed pieces including republic insignia and the 4 striped tile. There is no question on an alternate build to the Venator, it’s whether I use two sets of just the one. In the end, I wanted to keep the parts wastage down as LEGO SW is getting very expensive and gave myself a challenge by using just the one set of 75404. I think I got there in the end, it also used highest percent of the included pieces out of all my alternate builds, close to 100% including the spare pieces. The result is a stubby version of the Venator, maybe the Fat V before the design got transitioned to the Imperial-class Star Destroyer. I wanted to make the front wedge longer and the back wedge narrower but was hampered by the limitation of the pieces available, its’ very important for me that the model to be sturdy and swooshable and use the all of the printed tiles. The wedge hull plates are mostly three plates thick for strength. I kept the hull ramp design on each side where it opens up showing a row of white 1x1 round plates denoting clone troopers, it’s a nice touch by LEGO. The Venator-Class Republic Attack Cruiser had a hull characterized by two wedge shapes and a dorsal superstructure near the aft containing two bridge towers. The port tower was the starfighter operations command bridge, while the starboard tower served as a primary helm and command bridge. To build that superstructure, I had to pillage parts from across the model including even the display stand to achieve its significant sloped presence. Roller skates are used to represent the heavy turbolaser turrets flanking the bridge. The model’s central dark red hangar roof is tapered gradually towards to nose. Grey wedge plates are built around it. I am so happy LEGO included printed tiles for the insignia! At the stern of the ship, there are four primary thrusters, two secondary thrusters, mounted beside the pronounced hyperdrive tail. Hopefully I delivered a satisfactory alternate build model to add the ever growing number of Midi scale LEGO SW ships. Instructions are on Rebrickable: https://reb.li/m/207288
-
2024 has been a great year for my LEGO designer journey, delivering many successful designs. One of my most popular designs is the Colonial Viper from the 75388 Jedi Bob’s Starfighter. While enjoying the Christmas and New Years break and browsing through other LEGO designs, I thought it may be possible to design a Rebel Starfighter taking inspiration from the Cylon Raider using the 40755 battlepack. The raiders resembled a large flying wing with two forward firing laser cannons sitting between the inner and outer wings. Two engines were widely spaced to provide extra lift and vents in between. My Rebel Starfighter tried to incorporate all those features, achieved with some difficulty due to lack of large wedge plates. It's always been a balancing act for me to get the wing shape right while making the model strong enough for play. There is a protruding nose leading to a spacious cockpit for a single pilot, flaps on top of the round engine nacelles, 45 degree slopes allowed for unique shapes to be created on the body and wings, with rounded bottom plates at the underside of the starfighter. Sit back and enjoy more space opera crossovers! Instructions are on Rebrickable: https://reb.li/m/206361