

mihao
-
Posts
141 -
Joined
-
Last visited
Content Type
Profiles
Forums
Gallery
Everything posted by mihao
-
[MOC] Aston Martin Vulcan
mihao replied to mihao's topic in LEGO Technic, Mindstorms, Model Team and Scale Modeling
Just improved the instructions by: 1) fixed some part issues, including the universal joint and shock absorber. Studio.io seems breaking them apart when importing from LDD, so I have to manually replace them with the built-in parts in studio.io. 2) use a different color as the part outline, so it is easier to know where the new parts go in each step. 3) break down steps which seem to be over complicated. I manually verified each step to make sure all new part are visible one way or the other. Honestly, sometimes it is really tricky to find a good angle for a certain step. Let me know if you find any other issue. Below is the link of the instructions https://photos.google.com/share/AF1QipOgNjFTYIbAkVcHX9Iw0sE9J_GxHUxzYmq5Utr7mfdn9KHw4ZeHCMTsCR9yBaSXmw?key=RnVjcXc0X09qMGVmZ3pqWkNaSEg4Uzhxc1k4SkpB Yes, I used LDD before, and the main issue is sometimes part can't be put in the desired location even though there is enough space. Must a bug in LDD. While studio.io doesn't have this issue, and I have to give a thumb-up to the render function of studio.io. -
[MOC] Aston Martin Vulcan
mihao replied to mihao's topic in LEGO Technic, Mindstorms, Model Team and Scale Modeling
yes, I can do it, but then I need to find a way ingest those cord pictures into the pdf, another hassle to deal with. -
[MOC] Aston Martin Vulcan
mihao replied to mihao's topic in LEGO Technic, Mindstorms, Model Team and Scale Modeling
Does anyone know a best tool to upload images to google photo? It is very hard for me to control the order uploading initially, and when moving photos around in the album, photos nearby randomly move by themselves, which drives me crazy. -
[MOC] Aston Martin Vulcan
mihao replied to mihao's topic in LEGO Technic, Mindstorms, Model Team and Scale Modeling
Just noticed that steps around 192 have some rendering issue, at least the battery is missing there. I guess that there is some bugs in Studio.io. I am currently trying to improve the instructions, will post them when I'm done. BTW, thank you for following the instructions and please share a photo of your build when you finish. (You are not very far to the end!) -
[MOC] Aston Martin Vulcan
mihao replied to mihao's topic in LEGO Technic, Mindstorms, Model Team and Scale Modeling
Finally, Finally, someone points this out. Thanks! When I created the instructions, I was thinking if I should put full steps on symmetric sides or I can just put full steps on one side and skip steps on the other. (Most of the time, I personally prefer to build the second side by checking the first side already built than following the instructions again, which gives me chances to understand the module a bit more.) I'll fix the instruction soon. -
[MOC] Aston Martin Vulcan
mihao replied to mihao's topic in LEGO Technic, Mindstorms, Model Team and Scale Modeling
Pls show me your idea how flex axle is fit here if you get a chance, and looking forward to seeing your stuff coming out. Cheers. -
[MOC] Aston Martin Vulcan
mihao replied to mihao's topic in LEGO Technic, Mindstorms, Model Team and Scale Modeling
I don't think flex axle can help. The front wheel arch of Aston Martin Vulcan is actually constructed partially by the hood. When the hood opens, the arch splits (as below.) This is what I achieved in the current design. Makes sense? Good point! Will use a different color next time. Thanks for pointing it out.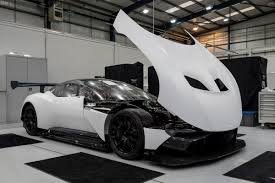
-
[MOC] Aston Martin Vulcan
mihao replied to mihao's topic in LEGO Technic, Mindstorms, Model Team and Scale Modeling
Yes, I have my own build in real life to verify everything is working. I like building car in this scale, anything bigger with full body seems to have some difficulty when being driven by 2 L-motors. -
[MOC] Aston Martin Vulcan
mihao replied to mihao's topic in LEGO Technic, Mindstorms, Model Team and Scale Modeling
Just added the part list into the instruction album. Thanks. -
[MOC] Aston Martin Vulcan
mihao replied to mihao's topic in LEGO Technic, Mindstorms, Model Team and Scale Modeling
Just fixed the link. Permission issue previously. -
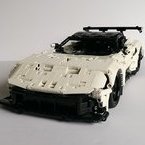
This Lego car is designed based on Aston Martin Vulcan, and following features are included:· - 2 Large motors for driving· - 1 servo motor for steering· - Steering wheel rotates when steering· - Independent suspension on each wheel· - Openable front hood· - Openable back trunk· - Openable doors· - Workable front lights (turning on with driving)· - Workable rear lights (turning on with steering)· - Adjustable side mirrors· - Adjustable spoilerMore pictures and the instructions (with the part list) can be found at https://photos.google.com/share/AF1QipOgNjFTYIbAkVcHX9Iw0sE9J_GxHUxzYmq5Utr7mfdn9KHw4ZeHCMTsCR9yBaSXmw?key=RnVjcXc0X09qMGVmZ3pqWkNaSEg4Uzhxc1k4SkpB Thanks.
