
.jpg.0b9bc5eefabee17beee55ed8049b9219.jpg)
Lego_GBC_NL
-
Posts
91 -
Joined
-
Last visited
Content Type
Profiles
Forums
Gallery
Everything posted by Lego_GBC_NL
-
.thumb.jpg.928651f7baca633ccb101add234f3ed2.jpg) No problem at all. Thanks for your reply, at least I now know what my options are. Need to think about it as removing the passenger seat is not really a preferred solution, so I might reconsider investing in a BuWizz afterall (and new phone ). Then I can simply follow the instructions and build the original MOC without having to make changes. Already purchased a new 42056-1 set, so that's a good starting point.
No problem at all. Thanks for your reply, at least I now know what my options are. Need to think about it as removing the passenger seat is not really a preferred solution, so I might reconsider investing in a BuWizz afterall (and new phone ). Then I can simply follow the instructions and build the original MOC without having to make changes. Already purchased a new 42056-1 set, so that's a good starting point. -
This looks awesome! Can't wait to start building this. Also nice to see such successful collaboration between different people designing, making photo sequence and video instructions, building the model digitally, pdf instructions, uploading all to Rebrickable, making the renders, people testing and providing corrections to make it all perfect! That's so nice to see! Also I really like Lego MOCs that combine electrical and pneumatic functions. Thanks to everyone for making this available to all of us Lego fans out there, must have been a lot of work you put into this project! I don't own an official Lego 42056-1 set yet, so I'll need to buy one first and then use the functionality on Rebrickable to know which additional parts to order from Bricklink. I've got one question regarding the use of the BuWizz. I have lots of unused Power Functions parts lying around and my phone is from the year 350 A.D. I'm pretty sure my phone won't be compatible with the BuWizz software (also didn't work with SBrick) and I noticed that a BuWizz isn't cheap. I read a comment from Thorsten50 on Rebrickable saying it's possible to replace the BuWizz with a PF rechargeable battery box and two IR receivers, then using the normal PF remote controls instead of a phone. Has this been tested by anyone who designed/(re)built the model? Is it possible? I'm considering both space limitations as well as functionality. Seems the BuWizz is 8x4x3, while a PF battery box is 8x4x4, so there's already a difference there. Then, we also have the two extra IR receivers, taking up even more space. Where should the receivers be placed? On top of the battery box? I guess the black roof panel will be in the way, should this part of the roof be constructed differently so the receivers will fit and the roof can still be closed? Also thinking about the extra cables (from receivers to battery box). In terms of functionality I guess there'll be no issue with regards to driving (2x XL) and steering (servo), but I'm a bit worried when it comes to the 4 speed sequential gearbox (M motor). Will this work when using an IR receiver and IR remote control? Does this have the same impact as a BuWizz or is the BuWizz/software used in a different way (programming, giving commands, speed, rotation/degrees etc.). Sorry to ask, but I have no experience/knowledge when it concerns a BuWizz and I'd like to be sure before starting to buy parts Looking forward to the opinions of the experts! Thanks again for this wonderful piece of machinery!!
-
Just uploaded a video on YouTube showing my builds of Akiyuki's Lego GBC "Zigzag Stairs". I decided to simultaneously show both his early version (yellow colored - around 2011) as well as the improved version he created later on (gray/white colored - not sure about the year). Instructions for version 1 were created by David Manley and I also used some of the improvement ideas posted in this thread some time ago. Instructions for version 2 were made by Courbet. The lifting mechanisms underneath follow the same basic principle, but still they're different in terms of building approach. Especially the movements of the v1 mechanism remind me of the old Titanic engines Although both versions work fine, I do have to say that v2 is much more reliable (guess that's why Akiyuki designed a 2nd version of this module). Version 2 makes less noise, balls make their way easier towards the output, the mechanism underneath has proven to run more reliably, it simply looks better imho and it also matches better with the other Akiyuki modules (input/output...). Whenever I'm gonna set up another GBC layout, I would definitely go for v2 as I'm not sure how long v1 would last. Thanks to everyone who contributed on this one!
-
I wouldn't worry too much about the colors, it looks amazing!! Very reliable design and interesting to watch, great job again! Must be difficult with all those GBC modules around to come up with something new. I'm sure I couldn't create something like this... Thanks for sharing!
-
I think you're right about the motors. The EV3 set was quite expensive indeed and as I'm planning to build more modules in the future using EV3 equipment, it's better to be economical and not overload them. 70% speed is fast enough seeing that the module can easily process the number of balls coming from the spiral lift. Concerning the program, I understand. I'm definitely not criticizing your program as it worked perfectly for me and at this point in time I couldn't even write something like that myself! I was just curious Still very happy that you shared the instructions and program file with everybody! For the ball counter it just hit me that Mogwai also shared his program file, so I could have studied that before asking here Let's see if I can reproduce it...
-
Finally found some time to build the Fast Ball Sorting Robot. YouTube video below. I must say it was a great build, another fantastic GBC module by Akiyuki! I enjoyed this one especially as it was my first experience with Mindstorms/EV3. As for the building instructions and EV3 program file made by Courbet: 100% accurate (as usual)! Built it in one go without any mistakes Thanks again! At first I used a normal PF M-motor to operate the spiral lift, accordingly the instructions. This worked perfectly. Later on I built in a 2nd EV3 large servo motor to see if this worked as well (it was included in the EV3 Lego set anyway). Besides the extra motor I obviously had to make some minor changes to the EV3 program, as predicted by Courbet The horizontal movement of the arm was slightly off for my build, so I made minor changes to the number of rotation degrees of the B motor (played around with this until I noticed the best results) Added a new block at the beginning containing the extra D motor (inverted direction - power 7). I guess the power value is quite low as I didn't use all the gears that were needed with the PF M-motor. The EV3 large servo motor has a more or less direct connection to the mechanism below the spiral lift. What I was wondering: @Courbet noticed that B&C motors are now at 75% power in your program file. Did you test at 100% using this setup? I'm a bit afraid to test, don't want to mess up things 75% is fast enough for me, just asking out of curiosity to see if you tried already... I noticed in Akiyuki's original video that the robot arm only moves to the middle whenever the color sensor has detected a ball/color. Otherwise the arm remains at the left side. Also in Akiyuki's video the arm moves "automatically" to its starting position next to the EV3 brick as soon as the balls stop coming. Any specific reason why this wasn't included in the program? Did the others, who built this module, also have to manually push back the arm to its original starting position each time the program was restarted (both horizontally and vertically)? How exactly can we add a ball counter, like Mogwai did? My knowledge of the EV3 software is still very limited
.jpg.f71c2ea0d896fd7631a3c1b30e2c2a37.jpg)
.jpg.e5f4dfec6539f0f205cf36db2b9142b1.jpg)
-
is it just me or is the Bucket Wheel Tower in that video taller than Akiyuki's original design (1 extra pair of buckets on each side)? maybe I'm mistaken, but I'm really counting 7 instead of 6 pair of buckets on each side of the tower (not that it's a problem or whatever, guess the extra height has a reason)
-
no, I haven't started yet I did order and receive all parts from BrickLink, but I didn't find the time yet to start building (usually quite busy when I'm working, so most of the time building Lego during holidays only) will keep you updated once I've started
-
OK - need to learn a lot about EV3 and the software interface, but I'm willing to invest time in that. It's just too cool to not use Mindstorms if you're a GBC fan Guess I'll just have to start buying pieces and get things rolling. At least I do have the two programs as a starting point. Thanks again for your input !
-
@Courbet, thanks a lot for your answers! Very helpful OK - good to know that the same part in another color is stronger. OK OK - have a few hoses laying around in flat silver, but now I know which lengths to buy extra. Perfect - those cables/lengths are included in the official EV3 sets, if I would go for that option. Yes, maybe it is the better option. Seems that the rechargeable battery is included in the official EV3 core set (45544) as well as the complementary power adapter (45517). Hmm I need to think about this, maybe I'm making things too difficult for someone without any experience with EV3 I've got two train regulators and plenty of plain PF (rechargeable) battery boxes, so won't be an issue. I downloaded both EV3 program files, so yours and Mogwai's. So if I understood correctly, the programs are not completely the same and depending on how I decide to power the M-Motor (through EV3 or PF), I'll know which of the two programs to use ? Is that correct or am I putting things too simply now ? No problem, I'll look/ask around some more on the net or perhaps someone else will still reply to the question here. Thanks again!
-
Hi all, I've built around 12 GBC modules (mostly Akiyuki), but none of them contained any NXT/EV3 parts. I'm now thinking of building the Fast Ball Sorter as clear instructions and the program file have been beautifully created and shared here on eurobricks. Big thanks for that! I had a few questions, though, before starting to order parts. I hope some of you who already built the Fast Ball Sorter (Courbet, Mogwai, Goggel...) would be willing to help me with my questions below. Technic, Shock Absorber: is part # 2909c03 correct (Technic, Shock Absorber 9.5L, Complete Assembly (Soft Spring)) ? In one parts list it says 2909c02 (Hard Spring), so just to be sure. Rubber Belt: is this the same red rubber belt as used in the Ball Factory, so part # x37 (Rubber Belt Medium (Round Cross Section) - Approx. 3 x 3) ? Ribbed Hoses: same length as used in the spiral lift in the Ball Factory, meaning 11L (part # 78c11) ? EV3 cables: how many EV3 cables do we need for building the Ball Sorting Robot and in which length(s) ? I guess at least 4 (Color Sensor & 3 Motors), but to avoid unnecessarily long cabling, which lengths would be most efficient ? I noticed these cables come in 25/35/50 cm (10/14/20 inches). Powering the EV3 brick: what do you use for powering the EV3 brick: 6 AA batteries or the 2050 mAh lithium ion rechargeable battery ? The rechargeable battery seems quite expensive, so I just wondered if it makes any difference when building the Ball Sorter. Powering the M-Motor: is it correct, for powering the M-Motor, that we have the choice between the normal PF power supply options and the Converter Cable for Mindstorms (part # 8528-1) ? I noticed this cable is very expensive and not offered a lot on BrickLink. Think Akiyuki uses one in his video. If I would use the cable, does the M-Motor automatically start when the EV3 program is executed ? I mean, is this also part of the EV3 program file or how does this work exactly ? EV3 (general): I don't own any EV3 equipment yet, so I was wondering what would be the best approach to purchase this. Buying parts separately or a complete official EV3 Lego set, like set # 45544 or 31313. I'm a bit worried, because besides the brick, motors, sensors, cables and power supply, I guess I'll also be needing the software and the USB cable that connects the EV3 brick to a PC. Any advice from people having experience with purchasing EV3 parts ? Some guidance would be greatly appreciated Thanks in advance for any support that might be helpful ! Can't wait to start building this one!
-
Just two small questions out of curiosity 1. Was the spiral lift originally desgined by Akiyuki ? I don't mean in particular the module "Spiral Lift" (#8 in this thread), but I'm more referring to the smaller spiral lifts that Akiyuki uses in his Ball Factory, Cup to Cup and Step Module. I guess it's his creation, but I was just wondering as I see lots of videos/pictures of other GBC modules built by other designers that also use this spiral lift technique. For example the new module "Pneumatic Ball Factory" by Quanix. Okay, this is a new module, but I've also seen some older ones. 2. For the ones who built the Spiral Staircase (real bricks I mean): did someone ever managed to find "Brick, Modified 2 x 2 with Grooves and Axle Hole" (part # 90258) in white color ? It comes in white in the .pdf instructions and it also seems that Akiyuki found this piece in white, but I used a black piece in my build as I couldn't find it in white. Still at this moment it's only available on BrickLink in black and DBG. Obviously doesn't impact functionality, but for the eye it would look better seeing that the complete external part of the tower is in white.
-
[GBC] To and Fro
Lego_GBC_NL replied to Splat's topic in LEGO Technic, Mindstorms, Model Team and Scale Modeling
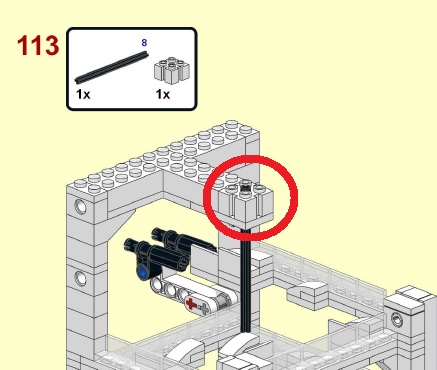
Thanks for commenting on my comments and answering my questions OK, didn’t realize you used official Lego balls as well. So far I have only been using the soccer/basket balls that a lot of people use, so I didn’t recognize the type you use as being Lego parts. I must admit the spanner wrenches / screwdrivers look more spectacular, but of course it’s more important that the module runs smoothly without jams or balls jumping around the room Concerning the 1x9 black liftarm: I totally agree it works fine if built as shown in the digital file. In the end, to prevent the lower part of the liftarm from moving too much, I decided to connect the liftarm (8th pin hole) to the available hole in part # 48989, using a 4 axle with stop and two bushes to hold it all in place. This could be easily added without taking apart any other parts. Oh, and next time I’ll set up a new GBC layout, your “To and Fro” will certainly be proudly part of it! It runs reliably, so it’s a great addition to my collection of GBC modules. Thanks again! -
[GBC] To and Fro
Lego_GBC_NL replied to Splat's topic in LEGO Technic, Mindstorms, Model Team and Scale Modeling
Hi Splat / slfroden, I finally found some time to build your awesome "To and Fro" Lego GBC module. It was still on my to-do-list, but I had a few other MOCs to finish first, so that’s why it took a while. I really liked the complete set when I first saw the video on YouTube some months ago together with all pictures and the LDraw/MLCAD file here on eurobricks.com, but after having built it myself, it’s even more fantastic! LDraw/MLCAD file: I used your LDraw/MLCAD file for guiding me through the build. The instructions are 100% accurate, but I have to agree with something you mentioned in an earlier post : partially it’s more about submodels rather than step by step building instructions that one can follow in sequence. Like you said, the drivetrain, frame and electricals are shown separately, but when building, of course everything needs to be integrated. Nevertheless the quality of the file was great, so I could easily understand how everything should fit together. Balls: As I’m using the original Lego basket/soccer balls, I was a bit worried it wouldn’t work as you use other balls (other weight, size…). Luckily this worked out just fine. Timing: You made this part quite easy When I watched your video and read all your comments on eurobricks.com I didn’t even realize the aid you made using the differential and worm gear in order to set up the timing between the different parts. Very handy, ‘cause there’s no need to take apart any gears or whatever to get the timing right. Also great to see how you used the wheels/tires as a counterweight in the waterfall section, also very easy to make adjustments here by moving the wheels/tires along the axles and/or adding those 3x3 black disks. Automatic Motor Shutoff and Alarm System: Great, great, great! Works exactly as described. When I was testing the module and not all was running in a smooth manner yet, I actually had a bal getting jammed and the motor shutoff and alarm system did its job properly Unfortunately not captured on film… Cranks – pulleys – strings – rubber bands: I consider this the pearl of your module. Works really well and looks superb as well Although I had some rubber bands laying around, I first tried to build it without them and it turned out to work quite beautifully using the strings only. In the beginning I was struggling with the strings, but then I found out it was because the strings I was using were simply too thick. I was using the strings from Technic set 42009, part # x77cc250 (medium thickness). When looking more closely to your video, I noticed I had to use thinner strings, so eventually it worked with part # x77ac50 (thin). Issue with the thicker strings was that the ladder was not coming down far enough to pick up any balls. By the way, to avoid having to tie knots all the time when adjusting the length of the strings (my hands are too big for those tiny things ), I used 2 extra round plates 1x1 (part # 4073). After pulling the strings through part # 15100 at the top of the ladder, I attached part # 4073 to it to keep the strings from moving. I hope it’s clear otherwise I can provide a picture later on. Besides a few color changes, I made a few minor changes to get things working as smoothly as possible. Two questions below, please note this is not criticism, but simply curiosity - Is there any specific reason why you used the 2 little screwdrivers (part # 4006) to stop the balls before entering the ladder section ? My issue was that these screwdrivers weren’t really firmly attached to the DBG Technic cams (part # 6575) and the balls would move the screwdrivers just a little bit each time they were touching. At some point balls would slip away underneath the screwdrivers, so I decided to use plain 3L axles instead (better connection to the cams). - In the hopper section you used this 1x9 black Technic liftarm that was placed vertically in order to support 4 axles. Why did you use a 9L liftarm instead of a 5L ? Isn’t this creating unnecassary instability ? Or did you still connect the 9L liftarm somewhere at the bottom which is not shown in the LDraw/MLCAD file ? Now it looks like the 4 lower pin holes are unused. Well, enough said, I made a short video and took some pictures. Apologies for the terrible video quality (too dark and unclear... I know). I still need to purchase a decent camera and fix the lighting in the room where I shoot my videos. If you wish that I remove the video from YouTube, just let me know. Just uploaded it so I could share it here on the forum I gave credits to your original video and the forum thread here on eurobricks.com. Thanks again for your creation and for sharing with us. Hope to see more of your modules in the future! -
[GBC] To and Fro
Lego_GBC_NL replied to Splat's topic in LEGO Technic, Mindstorms, Model Team and Scale Modeling
Awesome GBC module! I like the complete package : functionality, appearance, the alarm!, use of chains and strings etc. Can't wait to build this myself! Also great work done on the CAD file, showing all submodels. This gives a good view of how things work in this module and how everything's connected. Reminds me of Blakbird's work done for Akiyuki's Ball Factory. Thanks for sharing! -
Hi everyone, I've been lurking around this thread for a while now, but I thought it was about time to say thanks. I'm located in The Netherlands and I started to be interested in Lego GBC around October 2015. Through some The ReBricker instruction videos on rebrickable.com I ended up here on this forum and I followed all posts made in the Akiyuki project ever since. So far I’ve built 10 Akiyuki GBC modules and I’ll build a few others for sure. I won’t name all 10, but my top favorites will certainly be the ball factory, train module and invisible lift. I had a lot of fun buying the parts for these modules (thank you BrickLink), building them, watching videos online and keeping an eye on this thread and Akiyuki’s work. I think I also lost some weight while chasing Lego balls through our living room So hereby I’d like to thank of course Akiyuki as he’s simply a genius! His Lego GBC modules are like awesome machines, really amazing what this guy can do with Lego! Besides that I’d really like to thank all contributors to this forum thread; such accurate, beautiful and easy to follow instructions! Blakbird, Courbet, The ReBricker and all others, thanks for all the hard work done and for making this possible! Below a first simple video from my side. Sorry for the low quality and darkness. Also the Fork to Fork was giving me a hard time… guess it needs some maintenance. It’s a layout of 6 Akiyuki modules on our dinner table. The story is that I was planning to build the Train Module, but couldn’t decide on which loading station to go for. Obviously the crane loader had to be built, but I liked the other one as well, so I built both of them and found a way to incorporate both in a layout. Hope you like the vid