
Sven J
-
Posts
789 -
Joined
-
Last visited
Content Type
Profiles
Forums
Gallery
Everything posted by Sven J
-
Thank you very much @LEGO Train 12 Volts! I'm impressed you spotted that! You seem to be really sharp-eyed.
-
@Brickwill Studio Thank you! Yes, those comics seem to be a bit out of fashion. But they are an important part of my childhood, so I will never forget them.
-
@Corydoras Thank you!
-
Thanks a lot @Feuer Zug and @scarface_le_fou!
-
Oh, I'd love to see your version parked in front of Donald's house! And maybe the Money Bin in the same scale?
-
Thank you very much for your appreciation, @Jack Sassy, @hikouki, @Henning M. and @Max_Lego! Actually I tried that part at first, but due to its angular shape, the transition to the curved hood looked quite awful. Apart from that, 4625 + windscreen would be too high to install the convertible roof.
-
Thank you! Thank you for your appreciation, Toastie, you're always too kind! If you build your own 313, I'd be more than happy to see some pictures, of course. Thank you! I think you're right regarding the mudguards, but I don't see how to build them in a different way at this scale. The wheels are kind of jammed in the wheel arches, but it's no big deal for me, as the cars are intended as display models andnot as toys) anyway. @_TLG_ Thank you, too!
-
Hello everyone, Five years ago, I had already made an attempt at Donald Duck's famous "Belchfire Runabout," better known as "313," which received a lot of positive feedback but also some (justified) criticism regarding the proportions. Designed to suit garden railway models in 1:22.5 scale, the car was actually considerably too bulky, especially in relation to the Lego Donald Duck minifigure. Reason enough to try again now — with new ideas and new parts — this time in 1:32 (6w) and designed from the outset to be consistent with the minifigure. And to be honest, I'm quite proud of the result. I think the rounded, organic shapes of the "prototype" (if I may use that word for a car from a comic strip) are captured quite well. But judge for yourself: The rumble seat is, of course, foldable, even in this small size: And since it occasionally rains even in Duckburg, Mr Duck keeps an emergency roof in his garage. Donald's secret alter ego... ...shouldn't have to walk, of course. So I had to build the Duck Avenger superhero version as well. Both versions side by side: The building instructions for this little car are available for free at Rebrickable. As always, I'm open to feedback, questions, and constructive criticism. Thanks for stopping by! Best regards, Sven
-
This is extremely cute! And like @LEGO Train 12 Volts, I think the Vespa is a perfect addition. Ok, so I hope you don't mind one question: Wouldn't it be possible to use a transparent brick/panel for the rear window instead of just leaving a hole?
-
1936 Opel P4 and 1938 Opel Olympia in 1/32 scale (6w)
Sven J replied to Sven J's topic in Special LEGO Themes
Thank you @Jack Sassy, @Shiva and @Max_Lego! These cars are so narrow, it must have been difficult to sit there with two persons in the real thing, too... -
Hi all, as matching accessories for my next gauge 1 locomotive project, I built two small 1930s cars that I’d like to share with you. With 6 studs width, they also match Speed Champions style. Both models share the same basic design, resulting from the need to combine a 6w front section with a 5w passenger cabin. If you’re interested in details of this design, the .io files are available on Rebrickable. So first, here’s the Opel P4 – one of Germany’s first affordable mass-market cars. It’s shown in its updated 1936 version: With one of my modified Jack Stone figures: And this is the 1938 Opel Olympia, slightly larger than the P4 and the company’s first car of unibody design: Finally, two "family shots": Hope you like them. Comments and remarks are, as always, most welcome! Best regards, Sven
-
@Toastie & @LEGO Train 12 Volts Watch out, the Purist Police is close on your heels... (Have to admit that occasionally I also use BB parts when the original Lego ones aren't available in the needed colour, or for old moulds that are just too expensive - and last autumn I built an entire Peterbilt truck from clone bricks, just to test them... )
-
Very nice model, and quite an interesting choice of prototype! Fully understandable and very likeable.
-
@bentobrick That's definitely a big step in the right direction!
-
Some of my locomotives have 4-wide frames, others have 5-wide ones. In terms of mounting the drivetrain, 5w is more convenient as it allows vertically mounting an L-motor inside the frame, working directly on an axle with minimum frictional loss. However, engines with 5w-frames can't easily be converted to run on Lego track. I run my trains with one BuWizz as power supply (only exception is the engine you showed above, it has 2 BuWizzes for extended running time) and 1-2 PF L motors. See what one single L-motor can haul:
-
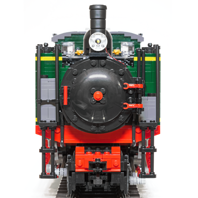
Thank you, but I'm afraid it's 14 studs wide... It's a narrow gauge locomotive (3.5 ft gauge) in 1/22,5 scale, so in this case Technic figures could be appropriate (at least if your engine crew should be almost 2 m tall... ).
-
Technic figures would be way too big for 12-wide trains. They are more than two times the size of a normal minifig, their scale (compared to a real human) is ca. 1/20. So matching trains would have to be 18-20 studs wide... But you might want to try my procedure for modifying "Jack Stone" figures - the result fits perfectly for 12-wide trains. Personally, I prefer 45 mm LGB track for my large scale trains, but some of them could be modified to run on standard Lego track. Feel free to take some inspiration here...
-
Oh, Lego, why can't you just get it right??? I would really love to buy quite a few classic Formula 1 racers from the 80s and 90s from you, but not such ones. At least there are now different front/rear tires. Otherwise, again, there are unnecessary mistakes... Where the air intake for the engine should be, there’s an additional tile – quite the opposite of an opening. The rear wing looks terrible when viewed from behind. And again, when the engine cover is removed, the roll bar comes off at the same time - although it would be easy to model it correctly, for the FW14B’s roll bar is part of the outer skin and doesn’t have to be hidden under the engine cover, as would be the case with the McLarens from that era (a little self-praise: you could have done it like this... ). Overall, in my opinion, this model is no more accurate to the original than the considerably older and cheaper Bluebrixx model (where I actually find the front more prototypical). A pity. After all, we will be able to use the tires for some MOCs from March onwards...
-
That doesn't work for me. The old profiles can't even be imported to a device where the BuWizz app was installed for the first time yesterday. I wouldn't express it that harshly. Apart from some - finally solved - firmware update issues with the very first BuWizz's years ago (2017?), I never had any problems and was very happy with them. Until yesterday... But still I hope that there's a solution.
-
Hi all, today, whe I opened the BuWizz app on my tablet, 6 out of 8 profiles were gone for no apparent reason (when I last used the app 2 months ago, they were still there). No big deal, I thought, as I had exported and saved all profiles on my laptop. So I copied them to my tablet and tried to import them into the BuWizz app, but all I got was a message "There was a problem importing the project". Does anyone have an idea what happened here and how I can restore my profiles? Reinstalling the app didn't work.
-
Hi all, with the "Slope, Curved 1 x 4 x 2/3 Double" (79756) finally available in dark gray, I was able to rework the model for greater accuracy. The headlights are mounted a bit further up now and the radiator grille is more true to the original. And, most important, the hood and trunk lid are now more prominently sculpted and therefore (at least in my opinion) look considerably better. But judge for yourself: The only drawback is that the new version is by far not as sturdy as the first one - by no means suitable for playing with. But as it's intended as a display model, that's ok. Kind regards, Sven
-
Thank you @Agent Kallus! And of course feel free to create your own figurs using my technique. By the way, it also works the same way with the - apparently slightly younger - 4 Juniors figures which have a less elaborately sculpted body, but the same internal structure:
-
1 stud wide coupling rods: alternatives to 1L axle with stop?
Sven J replied to Freak_NL's topic in LEGO Train Tech
You could also use the old Flex Cable parts for the coupling rods, they are only 0.5 studs wide. -
Thank you @sunhuntin! Feel free to make them, I'm looking forward to seeing them
-
Thank you @Renny The Spaceman, @JopieK and @Murdoch17! Oh, I didn't notice until you mentioned it. Hehe, that's funny, I like it. And while I think even more modified JS's will appear in the future, I've yet another one: