
dagupa
-
Posts
72 -
Joined
-
Last visited
Content Type
Profiles
Forums
Gallery
Everything posted by dagupa
-
 Hello. I just saw the video of the bucket, it works very well. The ground clearance was the aspect that I struggled with the most. I wanted a very low profile. The model ground clearance is about 12 mm, which is about 264mm in real life (using tires from Volvo 42030 as a scale 875/65R33 diameter = 2079mm) which is very low. I guess is not for off-road use ;) As the ground clearance is given by the steering portal, to elevate the machine, I would have to change the orientation of the portal. Placed horizontally, it would give 400mm of extra ground clearance but that design comes with two problems: 1. The construction is more flexible 2. The model would be +- 2 studs taller and I didn't like it. I will try to address this issue in a future model. Maybe I'll try building a pneumatic loader. 12 mm of clearance. About 27cm in real life Lowest part of the drivetrain I tried this, but it's too flexible because the space in the middle is occupied by the linear actuators. It's also makes the loader 2 "studs" taller. This is much sturdier
 -
Thank you. I'm working on the video Thank you. The bucket uses one M-motor for tilting and one L-motor for the liftarm.
-
At the end, I used a lot of parts that don't come in set 42030, but it was an inspiration. I changed the servo for an M-motor. I did not use the green motor because I didn't want to take apart my Volvo, but I had to, anyways. Thank you. I'm glad that yo like it. I'm going to make a video although I'm not good filming, I mostly make digital renders.
-
I saw very similar tires when I was researching for this underground loader. I can't find the pictures, or maybe it was a video. I remember they had chains on them and the loader was orange. I will follow the development process of your pneumatic loader. I want the valves from 42080 but I don't like the set that much.
-
I'd love to see that bucket working. I that why you have two cylinders in the front part? One for tilting and one for pushing the "inside wall"? Now I want to do a Pneumatic version. I guess removing the motor will leave enough space for pump and air tank. I finished the model: It's not perfect but I'm satisfied with the result. The battery compartment it's designed to accommodate and secure the Technic Battery Box, but the rechargeable battery also fits in there.
-
Yes, sir. Tires and yellow wheels. I guess when Lego designed set 42030 they scaled the wheels and the bucket to be realistic, so I used those wheels and bucket to scale mine. Wow. The second bucket is really nice. I don't have the bricks to build it but I will do a CGI to see how it looks with the technic body that I'm building. I not sure what to expect since my model is made entirely out of technic pieces. I do like the bottom of the technic bucket (first one), but the upper part seems too square. Where can I see your loader? I think I'll have the model working by Friday. I've been working 8 hour per day on it. I'll post some pictures to see what you guys think.
-
You're right. Most underground loaders have cleanup buckets, almost like they are trying to keep a clean cut. Maybe they don't have to break through the rocks and just deal with loose materials. I don't know how to model a bucket. Maybe someone else will give it a try. Also, I used a lot of pieces from the Volvo set, so using the bucket was the easy solution. Guess where are the tires coming from? :) I hope I will have a fully working model in one week.
-
That yellow is also a nightmare to render. I saw one once in Oregon, US. It was an old model in an already dying mine. Thank you. It's been a hard work, but I have a lot of vacation days. I hope you like the final model. I think one more week to complete it Marrying the body with the front part:
-
Some progress
-
Thank you. There's still a lot of work to do. I made some progress with the body structure. The motor is located on the back of the loader. No suspension since that would add at least two studs/units between the tire and the mudguard and my main goal is to keep a low profile. After all, it's supposed to be driven through tunnels most of the time. The black stairs and yellow handrail help maintenance personal to access the motor and other mechanical stuff. It's located in the rear part of the machine.
-
I shortened the arm about there. I also moved the motors backwards, which allows the anchor point to be place 2 studs back. Now the tires are very close the bucket. It does looks better but the downsize is that the weight (anchor point) is almost four studs away from the wheel hub, which technically would be the ideal place. I still like the long lift arm but, from an engineering point of view, that was just terrible. The actuators were dealing with almost double the weight. I will work a little more on the gears and the inside mechanics and I’m moving to the body. I don't know about adding a clutch gear. The actuator's driven gears slip when they reach the fully extended/contracted position so, most of the time, the motors don't stall except when the batteries are running low.
-
You are absolutely right. I didn't realize how long it was until you pointed out. Thank you. I have to cut at least four studs while keeping the lift arm long enough to dump the load over the hauler. I'm thinking about moving the anchor point over the motors but that would increase the height two studs and one of my main goals it's to keep a low profile, after all, it's an underground loader. Back to 20% Thank you for your comment.
-
Sorry, no. But you are not missing anything, it was really ugly. With this one I feel confident. Today I spent almost 6 hours trying to figure out the correct geometry for the lift arm. I confess I got some help from a CAD software. It's finally done and it works fine. 30% done. Here're some pics and a small video: Here's the video
-
Hello to everyone. I'd like to present a new project. I'm building an Underground Mining Loader. The idea came to me two years ago when Lego released the set Mine Loader (42049). By the time, I was expecting this to be the flagship model (1H) of that year, but it turned out to be a medium-size model. So I built my own. I took parts mainly from my Volvo Loader (42030) and built a version with a much lower profile. The result was ugly but functional. It's being on a corner getting dust. A couple of weeks ago I took this Moc apart and I'm rebuilding it from scratch. I'm not showing the "original" because it's really ugly. I hope I can make a decent model, something between good-looking and functional. Although most of the ideas come from the previous Moc, the "improved version" it's proving to be a difficult job. I think it would take a couple of weeks to finish the improved version. Here're some pictures from the first part. I'm happy with the results. I think 1/5 of the job is done. Disclaimer: I'm not trying to replicate a specific machine, but I have taken inspiration from the Caterpillar portfolio Thank you for your time. ****Pictures of the final model**** Lateral access to motor. For maintenance purposes, I guess. Hardly noticeable IR receivers ;) Easy access to motor. Cabin with chair and control panel. No floor. Easy access to battery and cables. You can also accommodate the rechargeable battery.
-
3:10 15:6 10:4 25:3 12:2 14:1
-
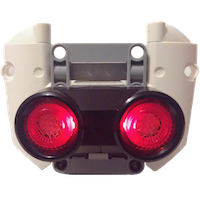
As point out before, this helps to give the model a proper orientation. It usually helps people when there's a rotation in the building process, but it's not limited to that. In this specific model that is exactly the same shape until step 12, those red round plates and the red 1x2 plate help builders to focus the attention back to the model after coming back from "reading" the parts list. People can lose focus of the model when they are not concentrated or the instructions are far from the model or just because they unintentionally moved the model between steeps. Without these differences, builders would loose time wondering if the model is in the correct position. But, why those color? For all the reasons stated above. Managing inventory and production lines is a complex process: so many combinations and interactions. I even think (and this is my opinion) that TLG uses Heuristics instead of searching for an optimal solution. That means that the exact answer to your questions is only in the head of those who took the decision and that my answer is just a guess :)
-
Micro-model Kylo Ren's Shuttle. (Batman goes Star Wars)
dagupa replied to dagupa's topic in LEGO Star Wars
I'm glad you like it. -
Hello, everyone I would like to present a micro model of Kylo Ren's Shuttle. I made two version using the pieces from Lego Set "The Mini Batwing" 30524. I got the idea from this Polybag And this is the result: It's a little model but it's my first Star Wars Ship. Thank you for your time. Instructions can be found here and the Inventory at Rebrickable
-
Hello. Leave the LDXFloor=0 and the +UA, plus change the background colour to: background { color rgbft 1 } This usually works for me.
-
That's one big flaw. That's why in mine, I removed the laundromat from the main building and with the pieces from the second floor (I think is the exterior of the manager's office) I built a coffee shop. I kept the exterior of the bank itself, since I really like it. That's interesting. I have always seen the Detective's Office as a little cartoonish. While the Brick Back, to me, is a "serious" building.
-
I do like the Brick Bank. The inside is pretty simple but the exterior looks very good. I wonder why so many people dislike it. I like the Parisian Restaurant the most, but the Brick Bank is right next to it. I want to see some of the answers to your question.
-
Formula Off-Roader Motorized
dagupa replied to dagupa's topic in LEGO Technic, Mindstorms, Model Team and Scale Modeling
That is something that have amazed me, too. It's always Newton vs Leibniz. Until you realized they both arrived to the same destination through different paths. Enough about religion ;) I've been trying to make a 4x4 version of this set, but the CV Joints just don't work with the Steering Portal when the frontal suspension goes down or up over the range -10 to 10 degrees. Which is good for a racing car but totally worthless for an off-road vehicle. -
Formula Off-Roader Motorized
dagupa replied to dagupa's topic in LEGO Technic, Mindstorms, Model Team and Scale Modeling
Thank you. The most difficult parts was to keep the original seat because it takes a lot of space. Thank you. The V2 Receiver managed to live up to the expectations. I used 8 rechargeable batteries to get about 9.4 volts. Thank you. I like this set a lot, too. I think it's weird that you can still get it with great discounts. I bought the last one a couple of month ago for US$30 at Walmart. Thank you for your kind words. I think so, too. It's a relatively cheap set and it comes with full suspension. It's not heavy and the box art begs for a motor. -
This looks really beautiful. Great level of details and very nice color scheme. Congratulations. It seems that you put a great amount of effort into this village.
-
Hello. I'd like to present my latest Technic project. This a modification of Lego set 42037 Formula Off-Roader. The goal was to build a motorized version without loosing the feeling of the original. Because of that, my main constraint was to keep the seat, since that seems to be the preferred place to put some of the Power Functions components. I decided to change the motor for a V6 version because it's shorter and it allowed me to place the servo under it while keeping the original ground clearance. The model requires 561 parts, including Power Functions. The Lego set and the Modification share about 75% of the parts. I upload the building instructions and inventory to Rebrickable, in case someone want to give this a try. You can download the instructions from dagupa.net UPDATE: Axle was missing from rear wheels. Now fixed. Uploaded 21/12/2017 Pieces added: 2x Technic Axel #3 and 4 CV Joints I'm happy with the final product. I think it looks like a deluxe version of the original. It also performs well. In the video I used a V2 receiver and 8 rechargeable batteries. Thank you for your time. Feedback and suggestions are always appreciated. UPDATE: Axle was missing from rear wheels. Now fixed. Uploaded 21/12/2017 Pieces added: 2x Technic Axel #3 and 4 CV Joints