
Hod Carrier
-
Posts
1,007 -
Joined
-
Last visited
Content Type
Profiles
Forums
Gallery
Everything posted by Hod Carrier
-
I'm certainly interested in this idea, particularly from a dynamic perspective. Have you worked out the axle spacing yet? I think that this is ripe for a bit of prototyping. The Stirling Singles were 4-2-2s, and as such the issue of centreing the wheels might solve itself without having to resort to springing. Rather than looking at the wheel arrangement as a fixed axle with a leading bogie and a trailing pony truck you could view it instead as a two axle chassis with two trailing pony trucks, it's just that the first of these is rather large and has the body attached to it. My thinking is that rather than using the more conventional double pivot for the leading bogie you could probably get away with just a single pivot which should cause the following axles to centre normally. I'll admit that my thoughts are untried, but I'd be interested to see what happens.
-
Welcome to the next stage of the puzzle; where to put the power and control systems. We've seen some ingeniously packaged small locos down the years, almost defying belief that they could possibly include PF/PU elements. PU has the advantage of not needing a separate receiver, which is one less thing to have to find a home for. Also, having the plugs on the side of the box means that you won't have to include the air scoop to leave room for the connection. It also has a bit more play and educational value than PF because as well as the remote you can use the app for coding to give the loco some automated features, which might be engaging for your son. If it was my design (and I do completely understand that it is not), I'd be looking for the "easy win". My recipe would be a PU hub under the long bonnet and a Technic M Motor sited vertically in the cab driving the rear axle directly through bevel gears. It would also be more controllable than the train motor and give better slow speed control for shunting. But those are just my thoughts and you are perfectly entitled to go a different way.
-
Really? That's strange. It's not a problem that I have had with my build, as you can see from the photo of the van that all the wheels are touching the track. If you've used a similar geometry your loco should also be fine. I can see what you mean about there being daylight underneath the leading main wheel, but it may just be a trick of the rendering process that's creating the appearance of the gap. Looking at the shadows it looks like there might a similar gap underneath the small guide wheels too, but it's a little hard to tell for sure. In any case, as rendered the loco is sitting on it's wheel flanges and not on the wheels themselves as it would when it's on the track. I like the visual improvements. Your young son is going to have quite a train to play with (assuming Daddy allows him ).
-
I've been looking at some prototype photos of the Y-8000, and I think that would be OK. The fuel tank and battery boxes don't look enormous from the side. It's just that the loco frame (chassis) looks quite narrow and so these features appear to stick out a long way which makes them look bigger when viewed from other angles. The alternative might be to turn the bogies around so that the small wheels are on the other side of the axle. Your underneath render suggests that the steps and coupler are part of the same assembly as the axles so clearance for movement would not be so much of an issue. Also you might find a way to hide the small wheels behind the steps.
-
I did a lot of work on long wheelbase freight vans a little while back but not on locos, so what I learned may not be very applicable. However, one thing that I would say is that I wouldn't recommend linking the two axles together nor using elastic bands to keep them centred. The problem with doing this is that sometimes you want the axles to steer the same way and sometimes the opposite way, especially if you're going to have points/switches. I found that linking the axles together on my freight vans caused derailments due to the wheels being turned in the wrong direction. My personal recommendation would be to use small wheels on a second axle to form a proper bogie. I came up with a couple of designs that I have tested and found to work OK, and I'm sure that you could easily hide the small wheels behind some detailing. The first is a power bogie for narrow gauge, but you could always modify this design to make it suitable for standard LEGO track, and the second is a trailing bogie used on one of my vans.
-
Ah OK. I was trying to count up the studs from the pictures but I was having a struggle coming to the right number. This pandemic has made me overdue an optician's appointment. I'll be very interested to see the motorised version and how it runs. I'm glad that you've decided to give the axles some articulation as that should definitely help with curves, and I'm keen to see how your solution performs.
-
What a lovely little shunter/switcher. Congratulations on your first locomotive. Is that the total length or the distance between the axles? I think the length of the wheelbase might cause you some problems on standard LEGO curves and points/switches as they are ludicrously tight. Having the axles so far apart might cause a lot of friction.
-
MOC: GWR 4900 Class 5972 Olton Hall (4-Wide)
Hod Carrier replied to CMF-1138's topic in LEGO Train Tech
Personally I don't find that the variation in dark red is any worse than any other colour, and certainly not enough to jump out at me. Perhaps, if you're worried about it, order more of these 1x1x1 corner panels than you need and then pick the best ones for use. It's reasonable to expect that there will be some variations, especially when ordering off Bricklink where you are getting parts from multiple sources. Besides, slight colour variation is an easy way to replicate slight weathering of the paintwork. -
Super review. I'm glad Ben is looking at offering his wheels complete with traction bands, although I don't see them on his website yet. Are these prototype/pre-production wheelsets that you're testing. This shouldn't be any issue. Certainly the more grip you have the better, so putting traction bands on the blind drivers as well will help with this, but driving through blind drivers is not a problem for coupled axles. My GT3 model is set up this way and the rods just transfer the drive to all three axles.
-
MOC: GWR 4900 Class 5972 Olton Hall (4-Wide)
Hod Carrier replied to CMF-1138's topic in LEGO Train Tech
Your hard work and diligence in getting the details right has paid off handsomely. This is an incredible build made all the more impressive by being sub-scale size. I look forward to seeing the completed model. -
Only marginally. The middle axle is a dummy, following the example from @dtomsen's DSB Litra MZ I. Dennis used hockey pucks as blind drivers mounted on non-friction axle pins, but these are rare and expensive parts in the UK so I used 2x2 round plate with a cross hole and a 2x2 round tile with an open stud and mounted them on 2L axles to allow free rotation instead. It has the advantage that you can have a central bogie pivot and not have to worry about routing the drivetrain around a central axle. Here is Dennis's technique. DSB Litra MZ I (8-wide) by Dennis Tomsen, on Flickr
-
Just a quick bump to confirm that you were correct in your assertion. With the help of those wonderfully helpful chaps over on the Irish Railway Modeller forum I've been able to clarify the layout of CC1 and to correct my model accordingly. The "handed" nature of the design tricked me into thinking that I'd not seen both sides of the loco when in fact I had and, with their help, I've worked out how to identify which side was which. They also very generously shared images of the roof which I had not previously seen. Here's the corrected CC1 in a couple of fictional liveries.
-
Oh yes, I remember this and being impressed by the way that the seat part gives a curved rather than a flat profile. As you say, the use of this part does also have some drawbacks, but then so do all other techniques. Modelling in LEGO is so much about finding the best compromise and the one that you are happiest with.
-
4wide narrow gauge bogie design by space2310
Hod Carrier replied to Asper's topic in LEGO Train Tech
Thanks for doing this. The relevant resources direct from @Space2310 seem to have vanished, so it's good that the design has not been lost. -
Oh yes, definitely. I don't have sufficient number of the hinge bricks to try it right now but it's on the list. That's fair enough. I appreciate the feedback, gentlemen. Thank you. I have, and it's probably the closest anyone has got to the correct profile of the Mark 1 coach. It's very impressive indeed. I wonder if @wes_turngrate has built one yet to test it's stability and strength. My very first MOC, the 4-wide DD-VIRM, had a similarly "bendy sided" approach to facilitate the body profile of that train, but even after putting it through a structural rebuild it could still go wonky if not handled gently.
-
Thanks for the feedback. Yes I am wondering too just how bad that gap might be when it comes to building these coaches. I'm hoping that it won't be too awful and that the render is exaggerating it a bit by making it unrealistically dark. Only time will tell. Just a quick look underneath the skin to show what's happening inside. It's not the most earth-shatteringly amazing technique, using hinge bricks placed on their sides. I've placed them under the tables to try and make them less intrusive into the interior.
-
MOC: GWR 4900 Class 5972 Olton Hall (4-Wide)
Hod Carrier replied to CMF-1138's topic in LEGO Train Tech
I know. My thought was very much the lazy cheats option. Sometimes things are just not possible, and especially so when you build at a smaller scale. Sometimes you just have to be happy with the least worst option and the one that looks best to your eyes. Given the building medium we have chosen and the ambition of the prototype I can't imagine anyone would be disappointed with any of the versions of your build. -
MOC: GWR 4900 Class 5972 Olton Hall (4-Wide)
Hod Carrier replied to CMF-1138's topic in LEGO Train Tech
I suppose I can confess to having one slightly cheeky thought that will have the LEGO purist shrieking for my head, which was to file off part of the flange to allow the running board to be dropped by 1 plate. -
MOC: GWR 4900 Class 5972 Olton Hall (4-Wide)
Hod Carrier replied to CMF-1138's topic in LEGO Train Tech
Wowser!! Now that's a thing of great beauty and just goes to show what is possible in 4-wide scale. Great proportions and detailing resulting in a very convincing build. I can see what you mean about the height of the running board. GWR locos always tended to have quite low running boards compared with other British designs. In profile your loco looks more like an LMS Class 5, but I'm not sure how you're going to come up with a solution without going wider. As to the splashers, I did also wonder about cheese slopes as @zephyr1934 suggested, but I'm not sure that they wouldn't be too angular and equally visually jarring. I guess the only way to find out is to mock it up and run another render and see if it looks better to you. But speaking for myself, I think the current design looks OK and could end up being the least worst solution. -
The humble BR Mark 1 coach has been a ubiquitous sight on the UK's rail network for decades. As such, it has been created and recreated in LEGO many times and in many different ways by many different builders. My own take on this iconic rail vehicle has been evolutionary and takes a lot from the designs of others and, as such, I have never presented anything in this field as my own. I was tinkering with the design a few months back to see if I could adapt it to create the outwardly similar CIE "Laminate" coach design to complement the Turfburner loco, and I was stuck on what to do with the body profile. Both the "Laminate" and the BR Mark 1 have a very gently curve in the lower bodywork between the bottom of the windows and the solebar. So far the two main options taken by LEGO builders to this shape is either to leave it flatly vertical or to use curved slopes, but to my eyes neither really works very well as they are either too little or too much. So I wondered what people think of this alternative technique, which is to use flat sides but slightly angle them in towards the bottom. Compare and contrast with this BR Mark 1 with curved slopes on the lower sides. I've not got a cutaway render to show how it's done just yet, but I could knock one up.
-
Well we're going to be diving into the vaults a bit for this thread, but it might be fun to revisit some old friends. First up is the Dutch DD-VIRM (discussion here*). This was my first MOC as an AFOL and a good way to ease my way in to the hobby. This model has had a couple of minor alterations since first debuted, particularly around the cab and the shape of the roof, which I have not yet got around to photographing. * Apologies that images of the design process are no longer visible in the original thread. The second is the Dutch SLT (discussion here) which I found to be a more taxing build because of the shape of the front end and the snotting required to make the doors. However, those difficulties just made the result more satisfying. With a couple of commuter trains under my belt I decided to build something a little faster in the shape of the TGV Thalys (discussion here). This is still 4 cars short of it's full length and is something that keeps coming back to my mind to update and complete. As you can see, I did go a bit mental with this design and pulled together a line-up of virtual TGVs in various shapes and colours. And then there was this whopper, a full-length model of the Ansaldo-Breda V250 Albatros in FYRA livery (discussion here) which got a special mention from the judges in the first OcTRAINber contest. And then there was this wee beastie; a powered 4-wide TRAXX loco using PF elements (discussion here). As yet still just a virtual design, but I did put together a design for some 4-wide scale track (discussion here) that could be used for display. It's perhaps a little heavy on parts usage, but it uses fairly common parts and the colours could be varied to suit taste and wallet. I do sometimes think about going back and revisiting at least some of these builds and improving them and maybe building a few more. At the time I can remember finding it quite a natural scale to build in and, although it does limit the amount of detail you can include, such small builds can still be incredibly satisfying. Plus there's the advantage of being able to park any considerations or concerns about the practicality of the designs as they are almost always just going to be for display. There are a few more photos on my Flickr page if anyone is keen to see more. Really looking forward to seeing everyone else's 4-wide builds.
-
Heavens!! Don't be worrying about that, Davide. The thought hadn't even crossed my mind. Besides, it's the obvious solution to making structures at this scale, as anything brick-built would be vastly over-scale. I thought about that too because the train bogies ought to be underneath the train body and not sticking out at the sides, but I agree that it might be tricky to achieve both with the track and the bogies. My solution to get around this visual problem was to try and make the bogies as narrow as possible so that it was within 4 studs width. This was the solution I came up with for the 4-wide FYRA high-speed train, which I have also used on my older 4-wide trains.
-
In response to the feedback received I've given the design a bit of an update. It looks a bit like the Fat Controller has fallen in with the Chicago mob. The loco has been lengthened two studs to permit the engine to be enlarged from V12 to V16 and the style of the bodywork has been changed with the fins dropped. The front end is a little more aggressive but the biggest change is the enlarged cab and the car-like rear end. I did take on-board the comments regarding wheel sizes, but I couldn't really make it work. The problem with a hot-rodded loco is that the wheels by necessity have to be underneath the bodywork and capable of articulation whereas on a car the wheels are outside the bodywork, which makes things a lot easier. I did explore larger wheels at the rear and even smaller wheels at the front, but whichever option I went for resulted in the loco as a whole getting taller in order to ensure adequate clearance for the bogies to articulate. In the end I have opted to keep things level in order to preserve the "slammed" look.
-
Brilliant!! Just brilliant!! Not only a single build, but the basis for an entire fleet complete with rolling stock and electrification masts too. What's not to love? I have a real soft spot for 4-wide scale builds, as that's how I started participating in this hobby. All you need now is some scale track to pose your models on.
-
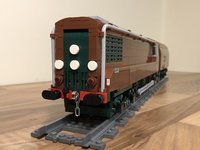
MOC: Santa Fe Super Chief EMD F7 A-B-A (4-Wide)
Hod Carrier replied to CMF-1138's topic in LEGO Train Tech
It's great to see some wonderful 4-wide scale builds gracing these pages again. Absolutely!! I agree with you 100%. I found that the challenge of 4-wide scale made for a very satisfying build if you can pull off a good likeness, as you have. Sometimes a close-up can be unforgiving at this scale, but there's nothing for you to be embarrassed about with this design. Very many congratulations!!