
LiLmeFromDaFuture
-
Posts
811 -
Joined
-
Last visited
Content Type
Profiles
Forums
Gallery
Everything posted by LiLmeFromDaFuture
-
[Model MOC] T-47 Airspeeder (Snowspeeder)
LiLmeFromDaFuture replied to LiLmeFromDaFuture's topic in LEGO Star Wars
Your very welcome, but what is there else to approve upon? Perhaps you could implement your own canopy that slopes, a sloped heat sink, maybe even include a working winch like others have, a detailed cockpit like others have, a detailed bottom accurate to the studio models, or feature yours in a gray color scheme? -
[Model MOC] T-47 Airspeeder (Snowspeeder)
LiLmeFromDaFuture replied to LiLmeFromDaFuture's topic in LEGO Star Wars
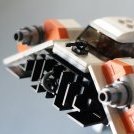
Your enthusiasm never ceases to delight me in my accomplishments. Perhaps you did not notice this photo, but the bottom flaps are fully opened and the top are slightly opened: Physically you open it by lowering the 2 x 2 traffic sign, which the design is secured by the wings. It should flow smoothly down, but sometimes it drags its side of the heat sink with it—simply push that side back in place. The cockpit can fully opened—at the sunroof that is. When photographing this feature I did not do so because it can look quite weird. Then if you wish to place the gunner in the back, simply squeeze the rear windscreen and easily pull up, as it's only connected to two studs on the body. -
Update everyone: Head over to the official page here for new photos, with the heat sink completed, and the LDD file.
-
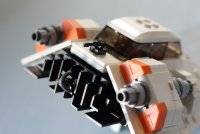
Greetings to all, Finally, after the course of almost 3 months of designing in LDD, I have finished my original creation of the beloved T-47 Airspeeder—but what we all know and commonly refer to as Snowspeeder, from the epic battle of Hoth featured in "Empire Strikes Back." Prior to building this airspeeder, I loved The Empire and everything concerning it, yet I despised the Rebels and everything about them. Well recently before the snowspeeder, I have been building a minifigure-scale AT-AT walker and numerous things related drew on me—especially the snowspeeder. I began to find the snowspeeder quite fascinating, and the idea to have one accompany my walker. Now the rest was made history in the course of about 3 months. Proceeding to photos Upon the level of detail, yet on a small scale, one would consider this a scaled down version of the 10129 UCS Snowspeeder model for minifigures. Like so it would be appropriate to design a display stand, for a "in flight" position. The bottom is nothing less of a swooshy-esque Now proceeding to various details of the ship: Here is the inside of the cockpit Unlike others, I decided to forgo a detailed interior. My priorities were to design the body with structural integrity, and readily accessibility for placing and displacing minifigures—even to having them sit on tiles instead of plates, because we all know how frustrating it is to pull minifigures off of studs by their headgear. Besides the smooth uniform slope of the repulsor units or either the laser housing, one of the most unique details are the grille detail on the repulsor units. Prior to designing, I have not seen this detail properly represented, but with exception to Lego's UCS Snowspeeder. I am appreciative I was able to achieve this because they look absolutely attractive. As well of something that is other times overlooked is the barrel diameter for the lasers. I believe any were to make their original T-47, the barrel diameter for the lasers should be according to. There is simply nothing else better than the use of technic pins for this aspect of the aircraft. As you have notice, besides the new Speed Champions windscreen, I have implemented Larry Lars' nose design into my work. I originally used the decorated wedge brick used on Lego's former Snowspeeder products, but later on in the design it work as desired. But what I always find remarkable about the plated nose is how readily easy it was to implement without sacrificing any details on the wings. Also I used Lars' most recent heat sink design, yet I made changes to it for implementation into my snowspeeder. Not only that, I as well replace that hinge plate he used for the plug detail on his with a modified tile with clip—for added accuracy of detail. Thrusters. What I believe is also critical to be represented, is the smooth, uniform, transition from the end of the wings to the boarder of the canopy. Simply the way this aspect must be, but mission accomplish here. Onwards to the structure of the build: The minifigures Luke & Dak True, Luke & Dak did not operate a snowspeeder with orange markings, but who ever cared about this with the original snowspeeder back in 1999 and its reboot in 2003? Unique 20 facts about this: I have fidelity for details and for them to be accurately represented as possible in my models Yes, I am perhaps a model maker, yet I aim to utilize Lego in unprecedented ways to incarnate the quintessence of that which I am modeling after I have only implement Lars' design for the nose and heat sink the rest of this model genuinely original The model is quite modular—can be separated in three pieces: body and wings The body is structurally sound—comprised of mostly plates which are overly interlocked to each other It would take such a crash to obliterate the body This model consist of 486 Lego elements The dimensions of the model from the wides and longest points (excluding the laser tips) are 20 x 23 studs Only three parts are unproperly connected according to Lego's system There is no black elements featured in the model (excluding the display stand) The heat sink and the grille pattern of the repulsor units are featured in old dark grey—a stylistic preference to highlight these aspects of the model in a respect to have being weathered down by heat The thrusters uses a dark grey antenna—a rare color unreleased before The harpoon gun was redesigned 7 times before settling on the current version (which makes 8) Despite some elements in older colors, the oldest part is the sunroof set for the canopy The display stand consist of 30 Lego elements While displayed, the snowspeeder is locked fixed onto the stand by the four fingers clutching the rib-esque section underneath While attached the snowspeeder will not wobble and could even be handled upside down (though that is not recommended) Placed on horizontal surfaces, the display would not topple unless intended force is applied There is 176 white elements, 151 light blueish gray elements, and 136 dark blueish gray elements A LDD file is available and is free as for now *FILES REMOVED*
-
Much appreciated as always. I am in the process of finalizing the model with the necessary revisions and needed parts to finish a few incomplete parts (such as the heat sink, lower air brakes, and thrusters). Afterwards, new photos will be made, as well to be featured in a new topic, and guarantee, without any further delay, the file will be available (free) to everyone who would want to download.
-
Glad you like the color scheme. One would even consider it a scaled-down version for minifigures. I don't know what is your preference for snowspeeders, white or light gray, but white elements were readily and even available, as opposed to gray. Though my primary reason was that gray looks completely terrible paired with the bright orange!
-
Thanks Anio. With the heat sink, black was too stark of a transition from the bright, new, white bricks. It can detract attention from other aspects and highlights of the aircraft. Black as well would not match the dark grey grille pattern of the repulsor units, and would also blend undesirably with the black stand. Additionally, with black, the spaces between the heat sink would not be easily perceived, because the black elements cannot easily cast shadows upon themselves, hence its dark color. Most of the elements for the repulsor units and the heat sink are exclusively in dark grey. This was a stylistic preference to highlight these aspects of the model in a respect to have being weathered down by heat—therefore why I chose these older colors. 2 x 4 tiles would be a more stable. In fact, I actually use them in place of the 2 x 2's on the LDD file. However, 2 x 4 tiles do not come in dark grey. I hope this answers your concerns, Thank you.
-
Yes. Recently, I have covered up a few gaps between the wings and heat sink, as well as block the lower air brakes, so the connection will not disconnected upon repeated use.
-
I concur. I favor Episode V apart from the others in the Original trilogy for a list of reasons—mostly for the Battle of Hoth scene with T-47s against AT-ATs. However, It was discontenting there was a lack of large scale battle nearing the end of the movie like the others—though it was nice that it started with one at the beginning unlike the others. But anyway, I appreciate your admiration for this snowspeeder and I will continue to exemplify the highest degree of fidelity as far as detailing is concerned—this will be exhibit on my upcoming AT-AT ModelMoc.
-
I wanted to make a new topic that's based on the actual MOC, not the LDD design process. Perhaps doing so, the snowspeeder would qualify it to be showcased on the front page for everyone to see and enjoy.
-
I wanted to release it when I have received the last parts to finish the heat sink and upload it in a new topic. But I might release it before that when this topic reaches 7 pages (with only 5 more comments to go)—to signify a state of accomplishment. Though I am still making revisions to the model and then doing the same to the file. Specifically, I am filling in exposed parts, and decreasing the part count.
-
Beautiful—excellent work.
-
Especially simple—only 30 pieces (all rather common).
-
Thanks hachiroku! That unique 1 x 2 tile near the tip of the right wing is a light blueish gray gold ingot bar (99563). It hasn't appeared in any sets (it's perhaps a prototype color), but most of the stores selling them have quite an abundant quantity.
-
Almost finish with the file and perhaps release tomorrow evening (EST). Thanks!
-
Here is the snowspeeder on the display stand: The stand is fairly simple. It is comprised of 28 pieces and is sturdy. The four finger-like structures clutches the rib-like section located on the underside fairly tight. When attached, the snowspeeder will not slide off or merely wobble. The stand can not be easily toppled—unless intentional force is applied. For easy use, the snowspeeder can be attached and detached quite smoothly. Interestingly, the snowspeeder can not even detached from the stand while under the force of gravity when held upside down. One thing is for sure, I need to get a different color background
-
It snugly clutches the underside of the snowspeeder (and is easily detachable), I'll have photos to show some time on. It can't fit any other ships, as I made it exclusively for the snowspeeder, and I have no other ships in my collection.
-
That could possibly work . Personally, I prefer it over the ball joints. Once I get to progressing with my AT-ST, I might implement those if the t-bars are of no use. But find out what works for your AT-ST. Nice work Smitty I am fond with the shape of the head—greatly reminds me of the version from ROTJ with its stockiness. Like this image: link
-
Here is my stand for the snowspeeder… Which one do you find preferable than the others: first, second, or third?
-
Given the limited possibilities presented here, I believe it's up to discover what supports the weight of the waist/hip & head of the walker. I never heard of "bit-directional"—perhaps a link please? Technic pins with friction ridges would not work so much. I second more pics.
-
Detaching it increase chances of fracturing dramatically, but over exerting it with constant moving can weaken it overtime (because it doesn't have time to rest). But I assume you will have it mostly on display—so it won't be so much of a problem if make a few tweaks here and there. If you insert the t-bar into modified bricks with stud(s) on them, they can be quite resilient. But the problem is, what many parts are there to make a joint that's long enough for your walker (there is technic 1 x 5 thin liftarms with axle ends, but they might not be long enough and can fracture fairly too)? Good to hear the proportions are coming out to your liking. Honestly, the 5 x 5 scala dish is your best bet. I feel it's the correct size for the head.
-
It sure does! Besides that, have you seen my recent comments in our conversation?
-
Ooh great start so far! I love the use of that hinged leg joint for the lower shin despite its inaccuracies—it looks sturdy. Don't be fooled by those ball joints! I know they're convenient, but I don't think the leg part connecting them will support the weight so well in the long term. Those leg joints can be a hit and miss game—you wouldn't know which ones are more robust than the others. Plus the ball cups are prone to fracturing (trust me I have many Bionicles with those joints, most which are scrapped because of that issue) I too have seen that outrageously posable AT-ST on IDEAS. Honestly those poses can not be preformed by an actual AT-ST. You could used this t-bar piece (4697b), but perhaps this is more appropriate for a AT-ST on a smaller scale. Here is a blueprint of the Return of the Jedi AT-ST: Link It has the dimensions, which could be useful, if you can read them.
-
Thanks! Upon a closer look of what colors are readily available & inexpensive, and what appears more appealing… Transparent-clear would be unreasonable for some—not so available or inexpensive on bricklink and would look weird with all the transparency matched with the clean white. Light gray perhaps not the best choice with regard of the also light gray underside—too indistinctive. Black is a renowned classic and is best to show with most models—it's a nice contrast to the light gray underside and the clean white wings.
-
Hi everyone! I have the design for the display stand built, but I wanted to hear everyone's preference for its choice color, either black, light blueish gray, or transparent. The design is quite simple and built mostly with four Technic, Liftarm 1 x 11.5 Double Bent Thick (32009). What is your preferred color for a display stand?