LiLmeFromDaFuture
-
Posts
811 -
Joined
-
Last visited
Content Type
Profiles
Forums
Gallery
Everything posted by LiLmeFromDaFuture
-
Thanks guys!
-
Forgot to show this, but here I have added the appropriate details to the nose… Instead of using the two 4 x 2 wedge plates, I swapped it out with a 4 x 4 wedge plate, so that the underlying color (dark bluish gray) of the plate (2 x 2) is matching with the color (dark grey) of the grille element. I think the alteration turned out fantastic! Oh and did you notice I added a control stick? See you soon.
-
A package came in! Contrary to my anticipation of receiving two, I am nevertheless glad one came in—and hey that's three out of seven! Even then, the ones I was talking about will be scheduled for delivery tomorrow. Simply, what came includes every orange element to highlight the aircraft and some of the dark elements required for the heatsink. I learned something today from Technic Bush 1/2 Toothed Type II (4265b), you can't center bars or other stick-like things in the middle of this particular part. Contrary to my observation, I assumed it featured the new X style opening like its regular counterpart (4265c)—the style was similar but lacked certain aspects to be used the way I desired it.
-
Thanks! I'll have pictures of more progress to show once more parts arrive in sometime today—in the meantime I am watching the original trilogy over again!
-
Thanks! I used my DIY PVC light box when taking photos of the model! Additional parts will be coming tomorrow around 4:00PM (EST)! I can vision the final product debut not too long from now—next week perhaps! If I would hold on to anything from "The Lego Movie," it's the fact that: "Everything is awesome!"
-
Two out of seven packages have arrived! Upon my experience on progressing through this build, I am really impressed of how robust the body is! I know I suggested the likely sturdiness before in the design process, but to my surprise, it's exceedingly phenomenal than I imagine. Incredibly, I would (NOT GOING TO ) have to forcefully crash-land it into the ground for a smashing pile of pieces! I suppose I accomplished 25% of the build—even then I am SWOOSHING it ! I hope everyone's anticipation is rejuvenated; if not, expect more updates this weekend and the coming days of next week. According to the shipment details of various packages, tomorrow speaks of: more Lego pieces (of course!), but most especially, look forward to seeing a Luke Skywalker snowspeeder pilot minifigure (sw461). See you then!
-
I am glad you like and I have made a few changes (excluding the harpoon—surprisingly it seems like no one likes it ). I made a quite few changes on the repulsor units and laser barrels such as: replacing some headlight bricks with brackets, changed up the connection between the power converters, repulsor units, and laser barrels for a more sturdy design, added the 1 x 1 round tile atop each repulsor unit for added detail, replaced a rare gray technic pin on each laser barrel with technic 1/2 bushes & other technic pins that are more readily available. Then about the 1 x 1 plate at the tip of the wings. I couldn't place a 1 x 2 like I intended because LDD forbade the connection since the angle of the wedge plate on the nose and its proximity to the wings, but once my bricks arrived, I plan to fiddle around with that & see what I can do. I will share the experience of receiving the packages, working with the LDD instructions, and parting together the MOC. See you then!
-
Well, it's been a while (I would say) since I posted an update on my progress with the Snowspeeder, well that is because I am working on acquiring the pieces to build it. Currently scrounging through my personal supply, which mostly comprises of gray pieces, since I have been building my AT-AT lately (75% perhaps completed), and since I donated ALL my old Lego pieces. Now then I am parting out the rest of the model with use of "BrickStock," a pretty efficient program for Mac users who want to buy lots of parts from Bricklink without the hassle of going through piece by piece & store by store which I have been doing previously with the AT-AT; about 5000+ pieces and I only have a thousand or more so to go . Anyway, what I have for you below (if your still reading), is just side by side showcase of the generic & gray-colored/Luke Skywalker's snowspeeders—you know, since some of you prefer gray T-47s nonetheless… Feedback anyone?
-
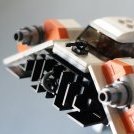
Thanks! I just hope it was greatly informative despite how long I don't completely like design over the previous one, primarily because of how thick the fins are, the underside of the tiles/plates (whatever they are called), and no curves. Sometime before I wanted to try something with glass elements that are for the 1 x 2 x 2 windows, but found they did com in the necessary colors. Then I thought about using flags, but didn't come to find a way to get them close as possible… I believe in dirty snowspeeders too, but don't see it easy enough to represent without a proper color like very light gray, or without a larger canvas (scale). As for most snowspeeders (excluding Luke Skywalker's) they're more white than gray, and I settled on this… However, I plan to make two snowspeeders, which the other will be Luke Skywalkers', whose will be gray (yep, I going to have to spray paint that sunroof frame gray and I have no problems with it ). I look forward to showing the snowspeeder heatsink and grilles of the repulsor units in dark gray—I think it's the best way to represent something weathered down immense heat—opposed to using blueish dark gray which will look to clean and new. Thanks for the rating! I guess the loss point was due to rear gun !
-
GuyDudeMan27 (do you have a nick name for that?) welcome back! Indeed, I have flooded this topic with updates, basically every week & multiple times in a week, ever since I made a dramatic change from my first version, in which you critiqued. Importantly, I value your opinion and everyone else, but I feel lightly discredited, yet I do not mean to offend in any way. I know each and every one of you were pleased I had my original nose design, because you and I have seen just about every minifigure-scale snowspeeder moc on eurobricks & the internet, and witness a good portion of them were alternates of Larry Lars' design, with exception to Brickdoctor's, who brick-built most of his and used Lars' nose design & perhaps the cockpit design. So I can fathom the disappointment when I made the transition to Lars' nose design, and how unoriginal it must have felt to see yet again another snowspeeder with the "Larry Lars nose design." I as well was disappointed when this happened. However, I believe I had the right intentions to follow out with this. Aesthetically speaking, when I increase the angle of the wings to make the join to the body appear uniform or "gapless," or lengthened the cockpit 1 stud back (as before the shallower angle prevented this), you will see below that the join between the wings and the nose look disgraceful in every way. I could decrease the angle of the wedge plates connected to the wedge brick, which would look nicer, but that would just detract from the authenticity of the angle that is liken to an actual snowspeeder… So that's the story of why I came to this solution—I hope it helps understand my reasoning. As for the heatsink. I loved the previous design as well. Especially, for how smooth it was, and how pleasurable the curves of the panels were. However, the assuming fins were not long enough for me to consider keeping the design since I shortened the gun deck, and I did not feel it would be visually interesting to see a block of plates to make up the difference of length. I assure if Lego manufactures a 1 x 1 x 2, a 1 x 2 x 2, and a 1 x 4 x 2 versions of their counterparts, I will be exceedingly busy to fashion those in that design. I know heatsink design I am currently using is credited as Larry Lars design, therefore, I don't mean to discredit him in any way, but there is not many ways to use tiles and arranged them in similar fashion as an actual snowspeeder heatsink, and I see the same with nose and the limited variety of wedge plates. You might see from the photos the only difference is that modified tile with clip, as I feel it is more accurate to the models than what Lars did with the hinge plate. On to the color. Black would be too stark of a transition from white; gray softened the transition between colors. It would be another story if my snowspeeder were gray (I reserve that for a Luke Skywalker's version ), though I believe gray is the correct color compared to photos I've seen across the internet. I have not mentioned this before, but I plan to acquire most (if not all) of the dark stone elements for the heat sink and repulsor units in old dark gray. Now the rear gun … I liked that one too for a time, but I dislike how there was no space between the cockpit and the gun (that was the only reason)—I am beginning to see that I am the only one feels this way and likes the details of the radio . However, I will see how both guns look on the snowspeeder in real life, and judge then. Lastly the roof. I think it will look much better in real bricks especially with the windscreen I have been linking. Besides, I wouldn't want something sophisticated like Lars' because wouldn't it work, as his rear windscreen rest one plate lower that the front (which makes it work in a sense), and doing something like looks odd in my opinion—plus I like the sunroof set I have right now although the glass is not the same transparency as the rest of the cockpit. When I made the first version and presented here, I didn't feel it was worth continuing (I mean seriously look at that thing). It was greatly inferior to Larry Lars' recent snowspeeder, even his first version, and Anio's petite version, that I felt I should just follow Lars' instructions and be satisfied with someone's else work. However, I was not satisfied with being unoriginal. I remember when I made my first dramatic update from my first version and felt that was it, it's finished—was I wrong. I made phenomenal improvements along the way and suffered some designs that I truly appreciated. I wouldn't call it a rehash, though the most familiar or recognizable aspects of my snowspeeder are his nose and heatsink designs, but these are only components you would say I implemented into this moc… So on a score of 10, you could give mine an 8 The highlights of this moc are definitely the full set of wings, laser cannons, and repulsor units & power couplings. What is most striking about it is the grille pattern of the repulsor units (also how linear the slope of this part is, as well as the slope of the power couplings). I have never seen anyone properly represent this except for Lego's attempt for their UCS snowspeeder. Then there is other details about the aircraft… I am excited to hear your liking leaning towards this model, but it will be a real experience once it's built I look forward to a reply of your thoughts on this soon!
-
Oh, I forgot to mention, I did make a few adjustments to the design so it will accommodate the body of my snowspeeder, plus I changed the hinge plate Lars originally had there with a modified 1 x 1 tile with clip for the sake of accuracy (for its similarity to the detail of the model). I don't suppose I could angle it a bit, because the center fin at top is a 1 x 2 tile that is only held by (also) a modified 1 x 1 tile with clip, which is interlocked with a 1 x 1 plate that is interlocked with a modified 1 x 1 brick with studs on 4 sides. This wasn't much a aesthetic issue when I formerly had the nice curves of the panels, but… You know, I will probably see what I can do about this and then post another update about it shortly .
-
I hope hearing about these updates have been entertaining for you as it is for me to hear the fantastic feedback! – Beginning with the nose, I too miss my original design, but as the angle of the wings kept becoming sharper than my more flatter snowspeeder version, my nose design looked greatly out of place, so I came to Lars'… – So that's what it's called "heatsink." Indeed, I am also using his design for this detail. I don't know if it has the correct number of fins (I seen some with 12 and some with 15, but that's my knowledge & mine has 11), but it did add 2 extra fins, opposed to the nine I originally had with the previous version, and gave space to include functional lower air brakes (just like you considered). – The rear gun deck looks fine √. But how about the gray gold bar, does it fit right with the rest of that section or is it not necessary? – True, true. It seems just like that . I had issues with the last one simply because the handle laid to close the rear of the cockpit (I wanted at least one stud of space between the harpoon gun and the cockpit). I tried something else with just binoculars and screwdrivers, but that proved uninteresting in every way. With the radio it nice details molded on the body, but lacks a second antenna to represent the harpoon gun (if there is such an handheld radio). But maybe I forgot this… How do you feel about the diameter of the bar compared to that of the antenna? – Interesting, I did not see that my technique for the rear flaps was similar to Lars', as I did not consider his when I merely sought for his heatsink design alone—what a coincidence. However, I do plan to complete some more work on that area so it isn't so fragile when I get to real bricks. – I attempted using headlight bricks instead of brackets but it left an unsightly gap, which I believe wouldn't be the best compromise for thinness—but I may try something at some point … But those rear gun updates
-
Is it a popular set? How many versions have Lego released—more than 4 at least? Who uses it the Rebellion or Empire? Are you making a Millennium Falcon with bricks ?
-
I didn't much like the first either—I am amaze of where it came from to where it is now. Dealing with the thickness of bricks, I exceedingly had to set the difference with tremendous amounts of details, even details that could not be readily achieved with plates. Perseverance really paid off and I am appreciative of the results, even the more that is to come.
-
HaHa ! Wouldn't use a 1 x 1 cheese slope, it's too sharp for the 4 x 1 slopes, but I use the 2 x 1 slope with grilles though… Tell me what you think?
-
really?
-
Thank you. Likewise, the thickness is a minor negative, If I went with plates, I would have forwent details such as the laser cannons, repulsor drive units & power couplings, and the cleaner, smoother look (which I will never consider ). Hmm… unrevealed project… would you confirm at least that it is either a land-vehicle or a air-vehicle?
-
HaHaHa! I love the excitement! True, the thickness of the wings is not appealing, but true, because I decided to build them with bricks I had the flexibility to accommodate other details. Ha! Never am I stalling . Even If I did momentarily, it was for a good reason, right? All these improvements I've been accomplishing and showing y'all recently have been worthwhile (my time & money especially), plus I have more updates to show below… What you see are my revisions to the harpoon gun, as well the back vanes that allow my new lower air brakes to be functional… Though I miss the curves of the panels. By the way, I have images below of the body by its self; to give a glimpse of how structurally sound it is (I made sure every plate element was interlocked to another by at least 2 studs, so I believe the body is overly secure, but as for the wing is another story I'll have to experience once I get buildin', yet I have confidence they will hold their own). Thanks!
-
Already done! I will have some photos up after I finish revising the back vanes, and harpoon and deck. Plaudits for being the 50th commenter to this topic, and opening up a third page!
-
Wow! I am impressed by that statement. This reminds of the times before when I loved nothing but the empire. However being a tremendous AT-AT enthusiast and everything related to it, the idea of having a snowspeeder against my AT-AT (which is secretly in the works) floated around… and now I am here with my T-47, which astonishes me as well. I will have the file available once I finish revising it. Thanks!
-
I am truly pleased to hear time and again of how amazing the evolutionary progress is! Likewise to hear others agree that the new windscreen would make a perfect addition to the cockpit. Indeed, I as well imagine many others fashioning their speeders with my original techniques, then reading the comments and the new topics about implementing them! Thanks!
-
New nose, sharper wing angle, and longer cockpit. ScottishDave, I particularly think you will be most thrilled over these improvements, as they issue from your suggestions on certain aspects of my snowspeeder: Surprisingly, I finally came around to implementing Larry Lars widely acclaimed design for the nose (and it was a relatively smooth swap from mine to yours). At first, I never approach this idea because of how it lacked the proper pattern like the decorated wedge brick and how many studs would be exposed for implementing so. However, I observed the in accuracies of my design, overcame my disputes with the obvious studs and the lack of a quality pattern, and accepted the proper angles of the design over the minuscule amount of studs and pattern. Besides, it looks exceedingly better, as all of the studs appear in the right places. More revisions down the road Done! All what I needed to do was increase the slope of the wings (which the angle is similar to yours) that it would allow the windscreen (I replaced the other one with this by the way) to be lengthened back… More revisions down the road This also attributed a more appealing side profile for the wings and cockpit. More revisions down the road Love that pattern of grilles? so do I! Because I angled the wings more, I was delighted to witness I could also add couple more 1 x 1 modified plates with vertical clips to the inner slope ends on each of the repulsor units. More revisions down the road And undershot view More revisions down the road Lower air brakes still not functional though… I look forward to hearing feedback!
-
ScottishDave, thanks! I too am impressed of the phenomenal progress and astonished by its marvelous aspects! Certainly, the wings and their intriguing detailing are the main highlight of the aircraft. Indeed, since I first decided to brick the wings instead of plate them, I had accessible a wide range of possibilities to handle detailing such as the repulsor units and lasers. Why because of this factor I could set the 1 x 2 roof tiles on a linear angle (or continuous slope) by having some of those elements on a plate level and others on 1/3 of a plate level (if that makes since). Other things like the harpoon-deck gave that section a more smoother appearance, than using that console as a modified brick with studs on both sides with a stand to angle the gun parallel to the deck. – I tried adding 1 x 3 tiles to clean up some of those studs, but then things became worse than that stud-ed section: the angled plate section angled higher than the level of the wings. However, I am considering trying something once I get to physical bricks. – Thanks! There is a few aspects I find fascinating: its simplicity, its angles, and it looks like it's a mechanical feature. However, it is not functional in any way, which was disappointment—it would've been cool if it were would it not? I might experiment with turntable plates, but that is once I build it, since you cannot use the plate without the plate holder in LDD. – Perhaps it is to thick, but since I am using the brackets available and roof tiles to build up that aspect… I'll just have to wait until Lego releases 1 x 1 - 2 x 1 & 1 x 1 - 1 x 1 brackets (I truly look forward to Lego producing a 1 x 1 - 1 x 1 bracket, especially in black for another project). – Exactly why what happened with the power couplings, plus I went for the better proportioned stripe and those undeniably intriguing grille pattern as well. – I wish Lego produced a 1 x 1 corner panel (or just a plain panel without the corner) in trans black… I can only expect to see so in the near future. Well thanks for the positive feedback and suggestions! I am glad to read you are interested in this, this has truly compelled me to progress successively with the snowspeeder, which I know will be a blast to see in real bricks. Other than seeing those repulsor units with their grilles and the back vanes in the flesh, I look forward to getting a hold of that particular windscreen, and as I also thought of too, apply some cut white stickers across the canopy to represent the frame as well.
-
As I feel this is the final improvements to this version (but I'll keep you posted if there's anything new) of my original snowspeeder, here is another comparison between Lego's recent and underwhelming snowspeeder and ScottishDave's impressive & generous rework of Larry Lars' most famous snowspeeder—analyze below… I look forward to hearing feedback from y'all! As you can also see above each snowspeeder is fairly on the same scale, dimensions almost 19 x 20 studs between each :D
-
I agree. Their recent snowspeeder 75049-1 (2014) hasn't dramatically change in design from the one release back in 2003 (4500-1). 10+ years and we are only given new play features, some more minifigures, etc., and few minor improvements in details and build!