SylvainLS
-
Posts
1,356 -
Joined
-
Last visited
Content Type
Profiles
Forums
Gallery
Everything posted by SylvainLS
-

LDD Failed to start
SylvainLS replied to Eggyslav's topic in Digital LEGO: Tools, Techniques, and Projects
Any other application running? -
Update 2017-03-08 Added: 10169 / 10169.dat Minifig Sack with Handle 11640 / 11640.dat Minifig Electric Guitar Classic md5sum: 2b5666a9035bfb4a23290d4984eb164b
-
In LDD, the motor is an assembly of the two parts, so that’s where the two parts come from. (Also, the part IDs are “wrong” in LDD: 54715 is supposed to be only the left part but LDD uses that ID for the whole housing.) And you’re right, it seems Blueprint doesn’t differentiate sub-parts from assemblies and standalone parts.
-
Thanks , I’m just lucky I happen to check for new parts just after they are submitted.
-
Update 2017-03-02 Added: 19118 / 19118.dat Friends Key Ornamented with Stud md5sum: f358b209eb566ebe006931c89a2603d5
-
Update 2017-02-28 Added: 15745 / 15745.dat Rock Gem Facetted Heart Shaped md5sum: 7db165c312c667a9e2d398fda06ecf1c
-
Numbers are Lego’s. You can see them in LDD (e.g. in the status line when you select a part in your model, the number and name of the colour is displayed). Look at Ryan Howerter’s page for a comprehensive list.
-
Update 2017-02-20 Added: 98382 / 98382.dat Minifig Teddy Bear with Arms Down md5sum: 0368b914c36ece82f13c71433fff5e10
-
[Help] Exporting Lego directions
SylvainLS replied to Mesabi's topic in Digital LEGO: Tools, Techniques, and Projects
LDD’s instructions are saved in the LXF file itself. If you don’t modify the model, the instructions aren’t regenerated when you go into Building Guide Mode, so they can be read and shown by any other LDD installation. You can also export them in HTML (Generate HTML) when in that Building Guide Mode. You’ll have a “Building Instructions [your-model].html” file and a “Building Instructions [your-model]-images” directory with the images. You just need to copy them and open the html in a browser. -
[Help] Exporting Lego directions
SylvainLS replied to Mesabi's topic in Digital LEGO: Tools, Techniques, and Projects
Generated with what? LDD, LPub, Blueprint…? -
Update 2017-02-15 Added: 18910 / 18910.dat Hinge Panel 3 x 4 x 3 Curved md5sum: 4577126391777fc6100502ae4debc58e
-
Update 2017-02-14 Added: 18896 / 18896.dat Bike 2 Wheel Motorcycle Frame 2 x 7 x 3 with Clip for Handle Rematched: 2453 / 2453b.dat Brick 1 x 1 x 5 with Solid Stud (LDD’s 2453 has hollow stud, LDraw’s 2453a is open and not produced anymore) md5sum: d6394021168219c6b3547c689fcf2d6e
-
Update 2017-02-11 Added: 89801 / 89801.dat Minifig Trophy Cup 16091 / 16091.dat Car Steering Wheel Large Reinforced md5sum: 67d1847d255e3f9eb753ee770aae3fbc
-
LDD Brick Version 2248.1
SylvainLS replied to StarWars8Spoiler's topic in Digital LEGO: Tools, Techniques, and Projects
Yes, a very very small update. Only three “files” in db.lif were modified/added: 1 info file where version has gone from 2248 to 2248.1, and 2 new files for the meta-infos about 26604 and its geometry. Nothing else. (100% certain: my .wine directory is under git) -
Update 2017-02-10 Added (New brick in LDD, 2248.1): 26604 / 26604.dat Brick 1 x 1 with Studs on Two Adjacent Sides Corrected: 47905 / 47905.dat Brick 1 x 1 with Studs on Two Opposite Sides md5sum: f22249d77281f7fcde602890e6ae188c
-
LDD Brick Version 2248.1
SylvainLS replied to StarWars8Spoiler's topic in Digital LEGO: Tools, Techniques, and Projects
There’s only 26604 Brick 1 x 1 with Studs on Two Adjacent Sides / BRICK 1X1, W/ 2 KNOBS, CORNER. -
Construction trouble with LDD
SylvainLS replied to Lalla's topic in Digital LEGO: Tools, Techniques, and Projects
The one behind the two bricks under the mouse pointer on your picture. There shouldn’t be one there. It’s a figurine | turned bricks | a figurine | turned bricks | etc. -
Construction trouble with LDD
SylvainLS replied to Lalla's topic in Digital LEGO: Tools, Techniques, and Projects
Did you remove the figurine behind? -
Construction trouble with LDD
SylvainLS replied to Lalla's topic in Digital LEGO: Tools, Techniques, and Projects
It’s an option in the Preferences of LDD to show outlines on bricks (seams). Way easier to see what you’re building when it’s on. Did you manage to rotate your bricks? -
Construction trouble with LDD
SylvainLS replied to Lalla's topic in Digital LEGO: Tools, Techniques, and Projects
The left figurine shouldn’t be there. You can’t turn because of it. Else, the rotation tool on the lower brick should work for both. (Have you tried the “Outlines on bricks” option? (not available everywhere)) -
Update 2017-02-04 Added: 13349 / 13349.dat Wedge 4 x 4 Triple Inverted with Ribs between Stubs (Modern variant of 4855 … without Ribs …) md5sum: 1e254d97a0c2aab34137385dbe6daaa2
-
Construction trouble with LDD
SylvainLS replied to Lalla's topic in Digital LEGO: Tools, Techniques, and Projects
20482, in modified plates (plate with clip icon). The shaft/pin on top of the plate inserts into the hole of hollow studs (or clips, hands, etc.). Only available in LDD Extended mode (menu View | New themes | LDD Extended). LDD Extended has more bricks (especially the newest ones) but you need to color your parts (either you choose the color before picking or you use the paint tool). It also allows to paint any brick in any color (even legacy ones, like old grays). (You know what mode you are in with the color of the tool bar: blue for “LDD,” brown for “LDD Extended.”) -
Construction trouble with LDD
SylvainLS replied to Lalla's topic in Digital LEGO: Tools, Techniques, and Projects
It’s not very easy to see on your screenshot but what parts are you holding and what parts are already placed? If I remember the instructions, the white telescope is placed first, the corner plate + panels + gold round plate with shaft are put together and then placed on the telescope. That construction doesn’t need scaffolding. You should even be able to place the parts one by one. The white telescope, then the gold round plate with shaft, then the corner plate and the panels. Maybe you forgot the plate under the telescope? Or a brick is a little bit out of place and causes a collision?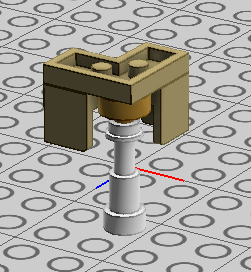
-
Construction trouble with LDD
SylvainLS replied to Lalla's topic in Digital LEGO: Tools, Techniques, and Projects
Just ask. The only risk is getting an answer. -
Construction trouble with LDD
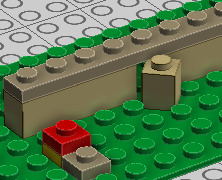
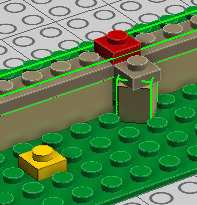
SylvainLS replied to Lalla's topic in Digital LEGO: Tools, Techniques, and Projects
First pic: 3 plates, dark tan one is the target, red one is the helper to place dark tan, yellow one helps to place red higher. Second pic: Select both red and dark tan plates, then grab the red one and place it. Dark tan follows and keeps its orientation.