Wurger49

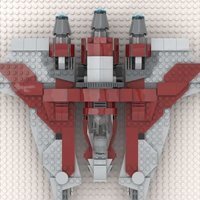
[MOC] Darth Vader's TIE Advanced x1, Alternate Build for 75347 TIE Bomber

Recommended Posts

2023 is the year of LEGO Star Wars TIEs, TIE bomber has returned after 20 years, and the TIE Interceptor has returned after 17 years, both great models worthy of picking up. The last minifigure scale TIE Advanced x1 was from 2017 which I don’t have, I was itching for an TIE Advanced to go with my 2018 Solo Tie Fighter. For 75347, there is a Darth Vader figure included in the TIE bomber set, very strange choice to be honest but that’s the impetus for me, its bent wings and double fuselage gives me more pieces to work with. Recently, Amazon was doing a sale at $71.20 AUD, I decided to buy two sets. I built the bomber first to learn the techniques before disassembling to rebuild.

52848664852_7ede6e48d2_c.jpgTie Advanced X1 v1.2_3 by Richard Yao, on Flickr

The solar arrays are the easiest to modify, moved the black tiles one stud from the edge so the whole support frame is one stud from the solar panels. Ideally, I would like to have 8 additional 1x2 black tiles to go in below the triangular tiles. The solar power converter has been thinned to 2 studs wide like the main support strut, the wedge plates are needed elsewhere. I thought about reducing the height of the bent panels, but decided against it as the original TIE Advanced has wide panels.

52849242441_c380466c80_c.jpgTie Advanced X1 v1.2_7 by Richard Yao, on Flickr

The wing spars are made longer by 2 studs, using the mainly sloped pieces to create the bulky angular shape. I used two 1x2 slopes to have the opening to show the deflector shield generators on the front. The smaller 4x4 cockpit dish has no bar handle, and I really wanted to make sure Vader can get inside the cockpit, so the official LEGO designed opening is kept. I turned the horizontal laid hinge piece to the vertical plane to keep the cockpit as round as possible.

52848663267_ffe0ab9b28_c.jpgIMG_3663 by Richard Yao, on Flickr

As I was designing the hatch of the eyeball cockpit, the first few attempts were the same tubular design of the official set, definitely not what I wanted. I then tried out the round corner bricks, they looked great from all views, and I flipped the 1x2 slopes so the wider side is facing the round bricks, reducing gaps between the pieces. The newly printed 6x6 inverted radar with two Ingot bars acting as upper viewports formed the access hatch.

52849426574_7b7fd622a0_c.jpgIMG_3666 by Richard Yao, on Flickr

Now I moved to the back where the hyperdrive is located, supported by the disc like structure which houses the power cells and the stabilizing field projector bars. I used two 6x6 round plates as the basis for the shape. After trying out many different methods of connecting them to the cockpit and wing spars; my design used two 1x10 tan plates and two 1x6 black plates to sandwich the two 6x6 round plates, all four plates connect back to the cockpit and supported the entire back section with no wobble. I designed this section without wings, after I put on the wings, I realized the disc structure was too narrow, and had to widen it by two studs on both sides. I had to use white and dark bluish grey plates to support the pieces, leaving a messy looking underside. For the round edge of the disc, I tried multiple combinations of four wedge pieces and two curved slope pieces, decided to separate the wedges pieces as side by side they form a straight edge, I prefer to show the round shape of the 6x6 plate from the top view.

52849694623_448a19fafc_c.jpgTie Advanced X1 v1.3_4 by Richard Yao, on Flickr

The two pairs of red ion engine exhausts are attached by 1x2 brackets, I managed to put them on the same location above and below the back disc. There are not many parts for greebling on the Hyperdriver, two grille pieces for the thermal radiator ports and two roller stakes to fill in space.

52849636895_bb7611fdbe_c.jpgTie Advanced X1 v1.2_4 by Richard Yao, on Flickr

On the earlier versions of this ship, I left the two laser cannons on the side of the cockpit as the official set, after which I have mostly finished up, I wanted to see if I can move them below the viewport. After placing the two 1x1 light attachment plates on the bottom of the cockpit, the 1x1 round pin tiles don’t fit as their placement is too close to the inverted slope. I had to use long technic pins from the actual drop bombs, push them though the ring attachment. The inverted curved slope means the cannon attachment is one stud back from the edge, so Vader lost his lightsaber hilts to trade for long Ion cannon barrels. I know the cannons meant to be embedded inside the cockpit module, I haven’t figured it out with the pieces available from 75347, though my end product does look like aircraft gun pods.

52849428094_b42260e811_c.jpgTie Advanced X1 v1.2_9 by Richard Yao, on Flickr

I am pretty happy with the end product, it’s a very solid swooshable model that uses 453 pieces.

Please let me know your thoughts on the comments below. Instructions are available on rebrickable.com.

https://rebrickable.com/mocs/MOC-146501/wurger49/tiead-advanced-x1-vaders-fighter-alternate-75347/#details

Edited by Wurger49

Share this post


Link to post
Share on other sites

Looks good! I do think the haunches are a little high, could do with a thinner part above the cockpit. And I like how you made it completely from the TIE Bomber, but I think that cockpit design looks far too small for the Advanced Prototype, maybe introducing a 6x6 one or shrinking the whole design would help? The wings and rear are spot on though!

Share this post


Link to post
Share on other sites
6 hours ago, Crazy bricks said:

Looks good! I do think the haunches are a little high, could do with a thinner part above the cockpit. And I like how you made it completely from the TIE Bomber, but I think that cockpit design looks far too small for the Advanced Prototype, maybe introducing a 6x6 one or shrinking the whole design would help? The wings and rear are spot on though!

Thanks man, will look into the area above the cockpit. I love doing alternate builds using only pieces off an official set, it's a nice challenge and easier for normies friends to start on their MOC build jouney with all the pieces there. 


Edited by Wurger49

Share this post


Link to post
Share on other sites
10 hours ago, Wurger49 said:

Thanks man, will look into the area above the cockpit. I love doing alternate builds using only pieces off an official set, it's a nice challenge and easier for normies friends to start on their MOC build jouney with all the pieces there. 


Absolutely agree - MOC building can be imposing for a first timer and having something like this would definitely be really useful for people trying to break into that world. I don’t have the TIE Bomber set so I can’t really propose a part in that set which would work better.

Share this post


Link to post
Share on other sites

V1.1 Update

I moved four 2x4 dark bluish grey plates from two central solar wings, rearranged the black tiles for so they are structurally stable.

Moved those four plates to the underside of the back disc, did further rearrangement of plates to clean it up, and the side slopes are held even more securely.

I changed the greebling arrangement for the Hyperdrive.

52855912359_c2de50f704_c.jpgTie Advanced X1 1.4_5 by Richard Yao, on Flickr

52856187303_57db49b162_c.jpgTie Advanced X1 1.4_3 by Richard Yao, on Flickr

Share this post


Link to post
Share on other sites

Create an account or sign in to comment

You need to be a member in order to leave a comment

Create an account

Sign up for a new account in our community. It's easy!

Register a new account

Sign in

Already have an account? Sign in here.

Sign In Now

  • Recently Browsing   0 members

    No registered users viewing this page.