Search the Community
Showing results for tags 'gbc'.
-
 Update: Information regarding modules from 2018 onwards are represented after @Blakbird's original post. I want to keep BlakBird's section of the post as he left it, to honour the immense amount of work he put into it. ( @Ankoku @9v system) ----------------------------------------------------------------------------- Original Post Start ----------------------------------------------------------------------------- G%$ #@&% it. Thanks to Akiyuki, The Rebricker, and the rest of you &%$*ers, I've now caught the GBC bug and it is going to cost me a lot of time and money. It all started with Akiyuki. Well, GBC didn't start with Akiyuki, but I was more or less "meh" on the whole concept until he came along. His ingenious mechanical solutions are mesmerizing, perplexing, and wonderful. Although I admired them from the start, I figured there was more or less no chance of me replicating them from the videos, especially since the one I was most interested in was also the most complicated: the ball factory. My involvement therefore remained stagnant (and non-existent) for a couple of years until The ReBricker showed up and proved that you really could reverse engineer the Ball Factory and then went one step further and posted video instructions for the whole thing. "Fine", I thought, "I'll just build that one." A few months of LDraw modeling, part collecting, building, testing, and display case building later I was hooked. It was one of the greatest building experiences I've ever had. This forum has repeatedly wished for a comprehensive set of instructions for the GBC modules of Akiyuki, and I've decided it is my responsibility to help make your dreams come true. With that in mind, I've compiled a list of all of Akiyuki's 31 non-Mindstorms modules with the goal of creating and/or finding complete PDF instructions for as many of them as possible and compiling the resources here. I've made a lot of progress already. Here is the list along with whatever I know about building material available. (currently 31 of 31 complete) Pinball PDF instructions available from Blakbird and Courbet 992 parts Presentation Topic IO file Zigzag Stairs PDF instructions available from Courbet 481 parts Presentation Topic IO file Cup to Cup - Type 1 v1 PDF instructions available from djm v2 PDF instructions available from Blakbird 1089 parts Presentation Topic Cup to Cup - Type 2 PDF instructions available from Courbet 1222 Parts Presentation topic IO file Elevator Module PDF instructions available from Blakbird and Courbet 1621 parts Presentation Topic IO file Marble Run PDF instructions available from Blakbird and legolijtje 1140 parts Presentation Topic IO file Catch and Release PDF instructions available from Blakbird and jesuskyr 711 parts Presentation topic IO file Ball Factory Video instructions available from The Rebricker PDF instructions available from Blakbird 4428 parts Detailed review by Blakbird Spiral Lift Short Version 876 parts PDF instructions available from Blakbird Presentation Topic IO file Tall Version 1455 parts PDF instructions available from Blakbird and 9V System Presentation Topic Pneumatic Module PDF instructions available from Blakbird and jesuskyr 543 parts Presentation Topic IO file Archimedes Screw - Type 1 PDF instructions available from Blakbird and Courbet 995 parts Presentation Topic IO file Archimedes Screw - Type 2 PDF instructions available from Blakbird and Courbet 739 parts Presentation Topic IO file Archimedes Screw - Type 3 PDF instructions available from Blakbird and Courbet 768 parts Presentation Topic IO file Zig-Zag Lift PDF instructions available from Blakbird and jesuskyr 800 parts Presentation Topic IO file Basket Shooter V1 PDF instructions available from Blakbird and djm V2 file from 9v system 2226 Parts Presentation Topic Train Module - Type 1 PDF instructions available from Blakbird and Courbet Motor (157 parts) Switch (167 parts) Unloader (324 parts) Siding (106 parts) Loader (603 parts) Crane (3046 parts) Complete Set (4569 parts) Presentation Topic IO file of full layout Train Module - Type 2 PDF instructions available from Courbet Motor (160 parts) Unloader (751 parts) Siding (178 parts) Loader (835 parts) Presentation Topic Wheel and Steps PDF instructions available from Blakbird and Courbet 1198 parts Presentation Topic IO file Step Module V1PDF instructions available from Blakbird and jesuskyr V2PDF instructions available from Ankoku and 9v system 1785 parts Presentation Topic IO file Fork PDF instructions available from Blakbird 878 parts Presentation Topic IO file Six Heads PDF instructions available from Blakbird 1696 parts Presentation Topic IO file Bucket Wheel Tower PDF instructions available from Blakbird 1415 parts Presentation topic IO file for 8 bucket version Lifter Triggered by a Stuck Ball Video instructions available from The Rebricker PDF instructions available from Blakbird 1068 parts Presentation topic IO file Spiral Staircase PDF instructions available from Blakbird and jesuskyr 1923 parts Presentation topic IO file Tilted Rotors PDF instructions available from Blakbird 1223 parts Presentation topic IO file Invisible Lift Video instructions available from The Rebricker PDF instructions available from Blakbird 3203 parts Presentation topic IO file Cycloidal Drive PDF instructions available from Blakbird and jesuskyr 2081 parts Presentation topic IO file Fork to Fork PDF instructions available from Blakbird and jesuskyr 1743 parts Presentation topic IO file Planets PDF instructions available from Blakbird and Courbet 1558 Parts Presentation topic IO file Strain Wave Gearing PDF instructions available from Blakbird and Courbet 2789 Parts Presentation topic IO file Zig Zag stairs V1 PDF instructions available from 9v system 469 parts IO file Here's a montage of some of the LDraw work I've done so far which also gives you an idea of the relative scale of the modules: I'm not going to post any actual instruction files until I (or someone else) has tested them by physically building the model and proving that it works. I'm a stickler for accuracy, so I'm trying to get as close to Akiyuki's originals as possible. I already have PDF instructions ready for 4 of them and just need to test them out. As I build each model, I'll post a mini review about what I've learned and then I'll post links to the instructions and parts lists so anyone else can build them too. (Update: See bulleted list above for which instruction files are currently available.) As always, help is welcome. If you have successfully built any of these modules and are willing to share your information, please let me know here. In particular, I need LDraw files to make instructions. In a pinch, I can make them myself if you have detailed photos. In an even tighter pinch, I'm making everything myself from the videos, but it is slow going. Enjoy! Akiyuki GBC modules with instructions available to buy from the man himself ( In 2018, Akiyuki started to create instructions for some of his modules. Some for free, some require payment. For anyone who has tried to reverse engineer one of his modules, the price he charges is more than worth it. ) Hockey Stick Lift (2018) https://akiyuki.jp/en/works/1234 Catch and Spin Robots (2019) https://akiyuki.jp/en/works/1423 Heart Chain (2019) https://akiyuki.jp/en/works/1509 Peanut (2019) https://akiyuki.jp/en/works/1587 Akiyuki GBC modules with free instructions Cars with adaptive cruise control (2019) https://akiyuki.jp/en/works/1667 Spiral Lift GBC module compact type (2020) instructions by @FernandoQ https://akiyuki.jp/en/works/1841 New modules which currently don't have instructions available there are currently no new Akiyuki modules that need instructions Modules that were inspired or modified from this project Modules by @FernandoQ Serpentine PDF Instructions 1356 parts Pasillos/ Tilting ladder PDF Instructions 1140 Parts Modules by @Berthil Related threads Train System @Doug72 has created a dedicated thread for the Train System here: It contains many improvements, mods, additions etc. which anyone interested in the train system should check out! EV3 @9v system has created a dedicated thread for Akiyuki's EV3 modules: A thread dedicated to modules like the Ball Cleaner, Container Transporter and Fast Ball Sorter Robot.
 -
 A new topic to attempt to centralize information, improvements and discussions about the most iconic Great Ball Contraption made by Kawaguchi Akiyuki, The Ball Factory GBC Version 0, July 2008 by Superbird28. Akiyuki stated himself he was inspired by Superbird28 when designing and building the Ball Factory. Why can be clearly seen in this video dating back to the pre-digital age. Thanks @Jonas for noticing. Version 1, June 2011: with color sorter as input: Version 2, november 2011: picker for 2 balls and optimized for higher speeds (1.3 balls/s) Februari 2016, @Blakbird and @TheRebricker reverse engineered the Ball Factory over a period of two years and posted the below: Video instructions by The Rebricker PDF instructions by Blakbird 4428 parts MOC Review by Blakbird LEGO Digital Designer file by @TheMagician The Akiyuki Project topic by Blakbird April 2019: Ball Factory New Style GBC compliant by me (free building instruction here), reliable and easy to move: A big thank you to Blakbird and TheRebricker for all their hard work! This reverse engineered version adds the option to circle balls within the ball factory, here my build from December 2016 Many have build the Ball factory in various colors and versions. Below an overview of suggested and quoted improvements with pictures out of the 77 pages in The Akiyuki Project topic, up to you what changes you want to make. Feel free to add your builds, improvements or questions about The Ball Factory to this topic. ___________________________________________________ Spiral Lift platform improvement by Jonas: used a SNOT technique to get a stronger platform. It allowed me to remove the gap and to fix the superstructure to the studs. Moreover, I used the remaining stud of the 30414 brick to stabilize the tower column by a vertical 1x6 tile. Now, each column is fixed from 3 sides and the tower is really stable. It will survive even an accidental kick. http://www.brickshelf.com/gallery/tacvud/GBCFactoryXT/spiral-tower-platform-new.jpg And, I added another (third) black pin to strengthen the vertical support (shown on page 186 in Blakbird's manual) ___________________________________________________ Ball picker improvement by Jonas: I have also made a small improvement of the ball picker - the part that picks a pair of balls and puts them into a bucket. It happened quite often that the right ball dropped before it reached the bucket. When I analyzed the construction of the picker, I noticed that the rightmost axle is significantly looser than the other ones. While the other two rear axles are attached to the rail construction, this one is not and cannot be attached. In my version, I fastened this axle to the rest of the assembly by replacing a 3L liftarm by an L-shape liftarm (not necessarily in yellow color). http://www.brickshelf.com/gallery/tacvud/GBCFactoryXT/repl-ball-picker.jpg -> http://www.brickshelf.com/gallery/tacvud/GBCFactoryXT/repl-ball-picker-new.jpg Since that time I have not observed any earlier drop. ___________________________________________________ Back pivot point by @Ankoku I have used the 5.5L Axel with Stop just like the original. You could probably get away with a 5L, but the connection may be hanging off slightly. The main piston rod has been changed from 20L to 19L in complete length. I used the "Technic, Plate 1 x 5 with Smooth Ends, 4 Studs and Center Axle Hole" which Akiyuki used, just because I did have them kicking around spare. A 6L Plate would be fine. I have gone with a 11L and 7L lift arm. Akiyuki went for a 15L and 3L, thus far, I haven't seen any reason for using those particular lengths. One bonus with using the plate to connect the two lift arms, is that the connection is rock solid, so you no longer have the wobble of the altered version. As you can see on the right, the connect on the end of the 8L axel is flipped. In the ReBricker instruction video, he has it this way round and then adds a later correction to show it the other way around. This way round is the way it is in the Akiyuki video and it is required to make this pivot point work. ___________________________________________________ Bucket shift timing mechanism by Ankoku Here is the piston itself. I have changed it to the original format. This is obviously the left one of the two in the video, as you can tell by the connector end, but other than that, the two pistons are identical. The crucial change is Technic Beam 1x3 Thin between the two year 1x5 Technic Beam Thick. The reverse engineered solution doesn't have that. That provided the extra travel I was looking for. As you can see, the connections for the yellow beam on the right aren't as pretty and you lose the symmetry. That said, the new motion is as smooth as butter, which is immensely pleasing in comparison to trying to make the other method work. ___________________________________________________ Bob improvements by Ankoku The initial changes to the height didn't do much to improve smoothness and I found that the paddle seemed to now be an issue. It was also the source of quite a bit of friction. As you can see in the image, the paddle is 3 deep in total. You can tell this from the light grey 3L axel. The bottom part of the paddle is a Technic Beam 3 x 3 L-Shape Thin. Using that piece makes a lot of sense and seems far better than using 3x Technic Beam 1 x 3 Thin, where the 1st of those completes the light grey 3L axel length and the other two are at 90° to create the L shape. Unsurprisingly, this approach is smoother as there is less friction. ___________________________________________________ Bucket unloader by Ankoku So I was playing with it and it didn't seem to work very well and certainly didn't reflect the motion I was seeing in the Akiyuki video. Having watched the video more times than I care to remember, I noticed that the lift motion seemed to be in a single motion, not two. I also noticed that the lift arm used seemed shorter than the one in the instructions. So in the end, I changed it from a Technic Beam 1 x 5 Thin with Axle Holes on Ends, to a Technic Beam 1 x 4 Thin with Axle Holes on Ends, using yellow ones to reflect those in the video. This seemed to work well and reflect the video. Then I checked on Bricklink and it seems that Technic Beam 1 x 5 Thin with Axle Holes on Ends don't come in Yellow. So yeah, that bit needs to be a 4L not a 5L. ___________________________________________________ Back slider by Ankoku, There is definitely these two beams there, length unknown. Below I am using 2x Technic Brick 1 x 15. You can see both in the Akiyuki video, although only 1 at any one time. This also explains why the bottom Technic Axle and Pin Connector Perpendicular is attached differently to the two above it. For the forward back motion you see in the video, this is not possible with the use of a pin instead of an axle. The axle you can see here, allows full motion in one direction, but slightly limited in the other, which is exactly what you see in the video. It is only possible to put the top Technic Brick 1 x 15 in there if you remove the plates from the bottom of the slider. If you look in the Akiyuki video, those plates are not there. I still don't know how either piston connects to the slider exactly. I am still hoping to hear back on that. That said, these two beams seem to be correct and answers a few questions. ___________________________________________________ Bucket slide by Ankoku The area that the buckets slide along for the shifter is actually offset by half a stud in the Akiyuki version. This is not reflected in the instructions. This answers why the shifter itself is half a stud over the sliding area at maximum backwards reach. I always thought the shifter didn't do full travel, but it does, it is just the sliding area which is misplaced. Here you can see how the sliding shelf is connected to the conveyor with a Technic Brick 1 x 2 [2 Holes] Anyway, changed the length of the slider my one, so that is now correct. Removed the plate from the bucket stopper just before the slider, so that is now working correctly and is the same as the video. Bob now actually aligns correctly with the buckets at maximum reach. ___________________________________________________ Shifter changes by Ankoku This removes the need for any universal joints and thus removes the variable speed of the conveyor. ___________________________________________________ Shifter changes by Ankoku It seems Akiyuki has reworked the pivot mechanism and beam length. This new approach removes any potential bend in what would have been an 8L axle. The new approach requires a shorter piston beam, a longer beam under the shifter. The brace is 2x Technic Beam 1 x 6 Thin. Here, you can see the positioning of the pivot point, the indentation in the conveyor tower, which is 2 bricks deep to allow the pivot arm to travel that far. You can also see the black axle instead of the grey one, as it requires that extra 1L for the back and forth arm to pivot one. At the top, you can see where the slider platform connects and how it is moved 0.5L across. Shifter Changes in action: ___________________________________________________ Ball dumper by Ankoku It sits at the right height, the ball router works well and the axle housing is aligned correctly. As you can see above and below, I have added blockers to either side, which means that a renegade ball can't escape up hill. Balls can only pass when the router is in the correct position for that route. Inside is only 2 wide now and doesn't have any pins etc. ___________________________________________________ Ball unloader by @smdzucladoc After seeing Ankoku's mods as well as his detail photos of the bucket shifter, My ball factory has been much improved. I was still having a lot of friction in the ball loader until I add these mods. Now the ball loaders is very smooth. I add a 1x3 liftarm in between the two Axle and Pin Connector Perpendicular Triple and it seems that the loader doesn't bind to the axles anymore and it is very smooth. I also added some additional bracing to the back of the ball loader. I added two additional Technic, Brick 1 x 2 with Hole and a 1/2 bush to the bottom axle. I also change the axle 3L to 4L and added 2 Axle and Pin Connector Angled #1 and then a 6L axle perpendicular to try to brace the 12T and 40T gear as perpendicular as possible. ___________________________________________________ For inspiration, this extended version by @Jonas and black version by @Thunderthumbs And Steampunk version by @OneMoreRobot
 -
Below an overview of all my GBC machines with correct links and background information with newest on top. All image thumbnails link to the Youtube video. Green title means the GBC is present in my collection, with red title is demolished and no longer exists. Bold text is the Mould King set, all licensed. All machines are 100% LEGO and 100% mechanical. If a machine has a building instruction it is for free and linked below the video. About 25 machines survived as I only keep the reliable modules that are suitable for events. When put after each other the length would be about 16 meters. I will be updating this post when I create new machines (or demolish one). Some machines have a dedicated topic on Eurobricks but most of them not. Feel free to comment or ask questions about any module. This Youtube Playlist will show all GBC machine videos. I started eight years ago with building GBC machines when I saw a big circle of machines at LEGO World Utrecht while being an exhibitor myself with a modular squash center and RoscoPC F1 models. After that I started building the more difficult Akiyuki machines, for fun and to learn from them. This would not have been possible without the Akiyuki project thread here on Eurobricks! It wasn't long before I designed my own GBC and actually that first one has been the most successful one to date (Rainbow Wave). Since then I've build over 30 machines and exhibited all of them on several events, mainly LEGO World Utrecht. A highlight was the invitation to show 3 machines to Eva Longoria in a very popular Spanish live TV show called El Hormiguero. Flipswitch The Flipswitch from GBC Rat redesigned to fit in a frame and the motor inline with the frame. This is a fun GBC module that can run all day. Build te be modified as a feed for the Ball Factory including emergency loop. Length 36 cm 690 parts Building Instructions Snake Circle The best of two GBCs with lots of ball action. The Snake (redesigned Serpentine by Fernando) from the Logarithmic Counter and the Circles from the Wall Wave. The module can be run by hand (without PowerFunctions motor) and can return to its own Inbox. 18 balls will make a nice continuous loop. Length 34 cm 1842 parts Building Instructions Speeder Bike Ball Pump Brick build Speeder Bike and a Ball Pump ‘powered’ by the Storm Trooper. Inspired by Scout Trooper Speeder Bike but no parts are the same. The tree was inspired by 10236 Ewok Village. I know a Scout Trooper is commonly seen on a Speeder Bike but I had a 75114 Storm Trooper lying around. Length 45 cm 3106 parts Building Instructions Crane Loader Type 2 Re-design and modernisation of the Akiyuki Train Loader for the Type 2 train. Many modifications were needed to run the bigger Type 2 train. Drive and timing system replaced by a long gear rack and a clutch switch. Length 99 cm (with three train tracks) 3298 parts Building Instruction Wall Wave A Wave up a Wall. This LEGO Great Ball Contraption has a switch to drive by hand and an option to re-route the balls into the inbox. Length 34 cm 1945 parts Building Instruction Rollercoaster Fully mechanical Rollercoaster with 24 Carts and one Power Functions XL motor. Only Light Bluish Gray tracks were used, tracks gaps to align the tracks correctly are filled with rigid hoses. Length 119 cm 5011 parts Building instruction not available. Inception Machine with three flipping cubes and steppers create a never ending ball path for four balls. Based on the Penrose Stairs from Yosuke Ikeda. The machine is operated by hand and needs a soft touch to let it work well. Technically not a GBC but the intention was/is there to create one with the same concept. For this version the x45 GBC balls were too light so the 18mm steel balls from Mindstorms were used. It took wo years of trail and error to create this machine. 1707 parts Building Instruction Push Ups Based on the Serpentine by Akassin, runner-up in the Eurobricks TC23 GBC contest. This compact machine has an option to switch to hand crank and has a reroute to the inbox. With this it is possible to run it by hand as a stand alone machine. Length 35 cm 1670 parts Building Instruction Container Transporter V3 'Akiyukification' of the Container Transposer by Geoff. The original Container Transporter by Akiyuki was controlled by a NXT, three motors and three touch sensors. The version from Geoff is 100% mechanical and timed via differentials and a timing disc, a masterpiece in engineering with 136 gears! This 'V3' version lifts these genius mechanics into a GBC frame. Length 97 cm 3686 parts Building Instruction Ferris Wheel Entrant and winner of the TC23 GBC Competition. The wheel is held together by 128 strings and has 63 ball pods. 64 were planned but the strings had too much tension with 64. Currently eight strings have been replaced by axles to make transport in a flat position to events possible. Length 84 cm Building Instruction not available. TC23 entry topic Planetary Lift This is the feed module of the Ferris Wheel but as a stand alone GBC module. It has a straight line mechanism based on the idea of ord and others. The stepper ball feed timing has a fine-adjustment through a differential. Length 37 cm 687 parts Building Instruction Mould King 26015 Parallel Steppers A mix of my Rainbow Stepper and the Switchback idea by John Sherman. A reliable module suitable to use as a corner module and including a build-in recycle gate. Length 29 cm 1350 parts Building Instruction Rimo Buckets Original design by Rimo Yaona, reverse engineered and build together with NDL-GBC. Main principle is locking the tower turn movement which initiates the bucket turn, after the bucket turn, the tower turn movement is unlocked. Length 76 cm 1796 parts Building Instruction 26011 Mould King Logarithmic Ball Counter Original design by JK Brickworks through a ball clock which is based on the wooden ball clock by Harley Mayenschein. Ball feed idea based on the double Serpent by Fernando Quintara but rebuild to a studless back frame. Every 10th ball on the ramp is passed on to the ramp below. Length 52 cm 881 parts Building Instruction Eurobricks topic 26012 Mould King Shoot the Loop Entry for the 2021 Great Ball Pit height challenge on Discord (runner-up). A rollercoaster GBC attempt to loop at very high speed, only six weeks of (allowed) development time! The rollercoaster cart is loaded with one ball and launched by high speed spinning wheels. The ball is unloaded at the top. All within about one second! Length ? Module has been demolished as it was not reliable enough for events but a great learning moment to may be create another rollercoaster GBC in the future. Building Instruction not available. Staggered Lift Series of ramps that lift to move balls from left to right onto other ramps. Length 43 cm 1541 parts Building Instruction Akiyuki Five Tilted Rings Rings with pods placed under an angle pass on ball to the upper Ring. Blackout version, inbox turned 90 degrees, Lime accents. Length 63 cm 2966 parts Free building instruction not available because original building instruction is sold by Akiyuki under copyright. The Zebra Entry for the 2021 Great Ball Pit Spring Into GBC Contest on Discord (runner-up). In this contest the trapezoid flag (44676) and Technic crank shaft (2853) had to be used, preferably functional. Build in 3 days from stock parts and uses 66 of the mandatory elements in a functional way. This module has been featured by TLG. Length 59 cm Module has been demolished to make room for other modules. Building Instruction not available. Framed Robot Dreams My version of the very attractive Robot Dreams, 1st GBC by JK Brickworks. This version is using normal gears instead of splat gears, has six robots and is build on a frame. Module has been demolished as I unfortunately after many attempts could not get it reliable enough for events. Length 88 cm 3353 parts Building Instruction Mechanical Container Transporter Original design by Akiyuki which is controlled by a Mindstorms NXT, three motors and three touch switches. This version has one XL motor and a mechanical gearbox controlled by gears and clutches only. Length 85 cm Eurobricks topic Module has been demolished as it was not reliable enough for events. A new attempt based on the Container Transposer by Geoff will be ready soon. Building Instruction of this version not available. Tensegrity Based on the Tensegrity concept by JK Brickworks. The balls going down create unbalance in the Tensegrity structure but not enough to let them collapse. Module has been demolished, it was reliable but for events it took up a lot of space and (by design) could not be moved without collapsing of the ramps. Length 92 cm 2156 parts Building Instruction 26006 Mould King Akiyuki Hockey Stick Lift XXL Original design by Akiyuki. This version has almost triple the amount of pass points to get the ball higher for purposes shown in the video. Length 35 cm Free building instruction not available because original building instruction is sold by Akiyuki under copyright. Bling Color Sorter Geneva drive ball feed with manual ball color switch through Power Functions remote and servo motor. Module has been demolished because the ball exit with colored hoses was too cramped and too many balls dropped. Also kids tend to overpush the PF remote, a remote lasted only one event day! Length 76 cm 1964 parts Building Instruction (by 9V System) Akiyuki Peanuts Original design by Akiyuki, changes to the original design are turning the upper part 45 degrees and adding a frame for sturdiness. Length 60 cm Free building instruction not available because original building instruction is sold by Akiyuki under copyright. Turntable Cup to Cup My version of a Cup to Cup module using six 60 teeth turntables. It took a few years to get this module reliable for events. Length 67 cm 1153 parts Building Instruction Eurobricks topic Rainbow Stepper At most GBC events there are many modules with steppers (and belts) as main mechanism. This is my attempt to make an attractive but simple stepper GBC. Length 52 cm 946 parts Building Instruction 26004 Mould King Akiyuki Ball Factory V3 Original design by Akiyuki. Without doubt one of the the most iconic LEGO Great Ball Contraptions which has drawn me into building GBCs. With 15 synchronized components the Ball Factory is also one of the most complex LEGO GBC ever designed. Originally placed on two big baseplates, it was hard to relocate and reliability was a concern with balls dropping into the complex mechanisms causing jams and need for time consuming resynchronizing. This version is an attempt to make it more reliable and easier to relocate. Length 73 cm 4381 parts Building Instruction Centipede Original design by Great Ball Pit making good use of the well known Brick Separator. Length 60 cm Module has been demolished as it was not reliable enough for events. Building Instruction not available. Vertical Train Loader Unit Vertical Train Loader for the Akiyuki Type 2 Great Ball Contraption train system. This is a compact and reliable GBC to work together with any Type 2 Train Unloader. Length 38 cm 1234 parts Building Instruction Pneumatic Scissor Lift Unit with compact Akiyuki train layout Module to lift the balls over the train tracks with pneumatics. Inspired by the Akiyuki train layout but made much compacter to be able to run on events on a single table. Length 70 cm, complete circuit minimum of 280 cm Building Instruction not available, building instruction for the Compressor is available. Rotary Dumper &Train Elevator Original design by Akiyuki, heavily modified with a new timing system by Doug72 and counterweights to save battery and speed up the cycle. My version uses the original and faster lift but with a lock at the bottom to be able to make full use of the counterweights which in turn saves battery power of the train. Length 80 cm (with 1 track) 2640 parts Building Instruction Train Loader Unit Original design by Akiyuki. Modified (more open) version of the train loader working with V2 Akiyuki train system. Length 58 cm (with 1 track) Building Instruction (by Akiyuki). Train Unloader Unit Original design by Akiyuki. Modified version of the train loader working with V2 Akiyuki train system. Length 49 cm (with 1 track) Building Instruction (by Akiyuki). Train Unit V2 (rechargeable) Original design by Akiyuki. Modified version of the train designed around the rechargeable 8878 LiPo battery. 234 parts Building Instruction Roulette 100% LEGO version of a Roulette wheel with full set of 37 numbers (European style). This GBC is a buffer at the start of a full GBC circuit dispensing two balls per two seconds. The spring loaded shooters have been replaced by weights for reliability (see below). Length 80 cm Building Instruction not available. Hammers Feed module for the above Roulette with a vary large Inbox to hold many balls. Weights (part 73090b) are dropped and shoot the balls in the Roulette. Building Instruction not available. Ball Counter 100% mechanical counter based on the 1 to 10 ratio design by Parax77. This module has been featured by TLG. Length 57 cm Module has been demolished after a few events where the counter mechanism jammed repeatedly. Building Instruction not available. Eurobricks Topic Ball Shooter Marble Run V2 Complete re-design to make this module GBC compliant. The balls are launched by a rotating wheel at 3000 rpm. A first version with two spinning wheels (video here) was not reliable enough. Improvement over the V1 after more than 300 hours of running; Elimination of half plate offset in the drive line, one L motor (M motor gone), longer inbox, centered exit and optimized ball gate with return lock at the top. 2362 parts V2 Building Instruction Building Instruction (by Dunes) without the improvements 26002 Mould King (uses flexible hoses) Solaire Original design by Great Ball Pit. The module uses the 40385 skateboard ramps as pathways. Length 30 cm Module has been demolished as it was not reliable enough for events. Building Instruction (by 9V System) Ball Catcher Platform together with the Paternoster and Ball splitter. In de video is a mouse as Ball Catcher. The mouse is controlled by Power Functions. The mouse has been replaced by a motorized Wall·E of set 21303 (not in the video). Future plans are to convert this platform to the robot pathways of the Pixar movie. Length 90 cm Building Instruction not available. Paternoster Designed after the Paternoster in the Pixar Wall·E movie. Length 33 cm 2357 parts Building Instruction (by 9V system) Double Bucket Wheel Having bought two 42055 Excavators for parts to get started with GBC, this module was to see if I could put the buckets to work. It worked. Module has been demolished, basically because it did not get much interest during events and I needed the storage room for other modules. Length 44 cm 999 parts Building Instruction (by 9V System) Ball Shooter Marble Run Original design by Akiyuki. First attempt to transform the Marble Run to a stand alone GBC compliant module with two high speed spinning wheels.. Building Instruction not available (for V2 available). Demolished as it was not reliable enough, especially the ball intake and uncontrollable ball speed at the top. Rainbow Wave My first GBC. Balls are surfing on a wave of 38 Lego colors. This GBC has app. 1150 moving parts! 1988 parts Length 93 cm Building Instruction (first version by Courbet). Eurobricks Topic Akiyuki Invisible Lift Original design by Akiyuki. I have modified this GBC up to a point where it is reliable and transportable enough to take to events. All modifications are listed here on Flickr. After about 7 days of running on event days the Power Functions XL motor breaks down and needs replacing. Where possible the red axles and blue pins were replaced by black ones. Length 68 cm Building Instruction (without my modifications) available in the Akiyuki topic. Akiyuki Ball Factory Original design by Akiyuki. First GBC build for me, for fun and to learn from. It was hard to relocate and got out of sync when balls dropped. Module has been demolished and replaced by my V3 re-design (building instruction available). Building Instruction available in the Akiyuki Topic.
-
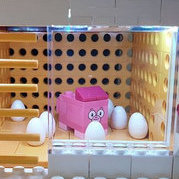
.thumb.jpg.d2cf4e6d8ddf5d2fe408f3650c97ec9e.jpg) GBC Module - Ball Factory My idea is to build a ball factory. The balls are placed in baskets in pairs, transported a little further by a conveyor belt, and then emptied again. For the baskets, of course, I will also have to build a return track. It's inspired by the Ball Factory from Akiyuki, but I made and will made some major changes, such as using only technic parts, the bigger conveyer and other mechanisms. Here a close-up from the left part: Due to the rotation of the light grey lliftarms and the yellow axles, the baskets will move one position approximately every 1 to 2 seconds. Therefore, the feeding mechanism will also be placed at this point. The feeding mechanism will also be a conveyer belt. After the conveyer belt for baskets follows the emtying mechanism of the baskets: The mechanism will empty the basket to the right due the rotation of the dark bluish gray axle at the right side, the rotation of the yellow axle connector at the left side makes the whole platform tilt forward so that the basket slides away and makes room for the next one. Next thing to do will be the feeding mechanism (a conveyer belt).
GBC Module - Ball Factory My idea is to build a ball factory. The balls are placed in baskets in pairs, transported a little further by a conveyor belt, and then emptied again. For the baskets, of course, I will also have to build a return track. It's inspired by the Ball Factory from Akiyuki, but I made and will made some major changes, such as using only technic parts, the bigger conveyer and other mechanisms. Here a close-up from the left part: Due to the rotation of the light grey lliftarms and the yellow axles, the baskets will move one position approximately every 1 to 2 seconds. Therefore, the feeding mechanism will also be placed at this point. The feeding mechanism will also be a conveyer belt. After the conveyer belt for baskets follows the emtying mechanism of the baskets: The mechanism will empty the basket to the right due the rotation of the dark bluish gray axle at the right side, the rotation of the yellow axle connector at the left side makes the whole platform tilt forward so that the basket slides away and makes room for the next one. Next thing to do will be the feeding mechanism (a conveyer belt). -
 Hello guys, In this topic i want to show you the miniature gbc modules. Many of you might know the gbc miniloops built by various people. but these are just a single module in an infinite loop. What about mini gbc's with modules that follow their own standart? I have created one: as you can see all of my modules have shared power inputted into the bottom middle. the desicion to put the connector here was mainly influenced by the fact that you can easily make a crank for a stepper module by using common parts. here is the first batch of modules: first of all the simple and classic ball bin size stepper: next up is a simple stepper module: and finally a sweeper module: here is a scale comparison: to the left is my mini gbc ball bin and to the right is a "regular" ball bin. hope you like my models!
 -
Philtech's GBC Modules Here I would like to present you my GBC Modules. First of all I want to show you my GBC Module - Slider. GBC Module - Slider (see below) GBC Module - Lifting Rim GBC Module - Slider It has a slider that pushes the balls up an inclined plane. Here a few images: Here you can see the mechanism: The io-file can be found here: https://bricksafe.com/pages/Philtech/gbc-module-slider This MoC at Rebrickable: https://reb.li/m/112266 Thank you for reading and I hope you like it!
-
My GBC Loops Here I would like to present you my GBC Loops. Technic GBC Small Technic GBC Mini GBC Loop First of all I want to show you my Technic GBC Loop. Other loops will come later. Technic GBC Loop It has three different ways to transport the balls forward: an arm that lifts the balls, with a separator in front of it (like in my small GBC (I will present it here soon)): a conveyor belt: and three small rotating arms: This MOC is already for a while on Rebrickable. Here is a video: More photos, instructions, parts list, and some 3D files are available here. Thank you for reading! I hope you like it.
.jpg.a8147903bdcccb7b64f0a947cda9187e.jpg)
-
 Hi everyone! I have a big question. from the 7th of may to the 15th of may (26th of february to the 6th of march was the old date) we will do our next "phaenoBRICKS" exhibition. We, means the "Steineland Harz + Heide" RLUG which is a part of the "Stein Hanse", a big LUG in the Northern Germany. The phaeno (www.phaeno.de) is a very famous science-museum and we are glad und proud to have the possibility to do our LEGO(R)-exhibition in it again. The last one was in the year 2020, one week before the great pandemic had forced us to stop holding exhibitions. It was a great success, over 13K people visited the phaenoBRICKs on it´s playtime. Now I started planing for 2022 and here is the reason I came to you. The phaeno is a museum to do experiments, learn physics, mechanics, chemistry .. and many more. The perfect area to present a nice GBC-project. The last time we only had a small circle with only about 20 GBC-elements. This time I hope to make it larger und bigger. It fits perfect to the phaneo, how you can imagine. I hope .. no it will be great, if it were possible to find and build a community here in this forum that would have the time and desire to carry out this project together with us. I am sure, the phaeno will support you and us, with paying the hotel and getting here for example. The details we can clear up personally later. At first I would be happy to hear from you, we all are very dear and nice AFOLs with familiar atmosphere. We always try to accomodate international guests, last year from France and Austria, next year from Denmark and France again. It would be nice to create a recurring GBC-attraction at the phaenoBRICKS. Greetings from Wolfsburg! llap Olli picture from: https://de.wikipedia.org/wiki/Phæno Von Richard Bartz - Eigenes Werk, CC BY-SA 3.0, https://commons.wikimedia.org/w/index.php?curid=25934991
-
 further development of my endless ball track to a gbc loop
 -
 This great ball contraption uses a series of gears and pins to grab the balls and lift them. The mechanism is quite reliable, especially for a module that I designed. Would like to have made it run a bit faster as it does not quite run at 1bps, but it should be able to run at that speed if it is run on 9v. (it was only running at 7.2v in the video as the batteries are rechargeable) Photos on Flickr.
 -
 Sioux Technologies and PV-Productions organize a free GBC workshop for kids, age 7 - 14 years old. The date is during the holidays of the Netherlands, Wednesday 23 October. Location will be Sioux Labs in Eindhoven (NL). Entrance is free. More information can be found here (in Dutch only): Hot-or-Not: The Next Generation workshop | Sioux Technologies Questions? Please let me know. Warm regards, Hans
 -
 I'm back with another module and video. This time I've created a small, simple conveyor belt that is proving to be quite reliable. As well I've shown how you can modify it to make it your own creation. Instructions for this module are available on my website. Here is another version I've made. I'll be posting the video for this one next week. Here is the video for the Jade Dragon variant.
 -
This lego great ball contraption uses a shooter mechanism to shoot the marbles into a castle. The range of the shooter mechanism can be easily adjusted with a gear at the back, it uses a large linear actuator attached to a shock absorber to do so. Part of the back of the castle is made from lego 6L half beams to slow the balls down. I have the LDD file for this module here. Do you like this kind of decorated module or do you think it is better to just focus on the functions? I like this kind but it uses a lot more pieces and takes a lot longer to build.
-
This Lego great ball contraption module uses mechanism with the transparent food covering type pieces (I have no idea what they are actually called) It is a reliable module, even though it looks like it is flexing a lot in the video. The tightness of the mechanism that holds the balls is able to be adjusted very easily to make sure that they pick up the balls each time. I have (as you can see) finally got some proper GBC balls to run my modules with. This module can hold one layer of them in the input bin before they get stuck, I would guess that that is about 30 - 35 balls. Like most of my recent modules it is compatible with my power sharing standard. The LDD file is on bricksafe here.
-
This lego great ball contraption miniloop uses a ball pump style mechanism to lift the balls up, when they reach the top they fall out of the "lighthouse" down onto the rocks and back to the start again. The mechanism is quite reliable and can be made as tall as you want, if it is built higher it might need extra weights to make up for the weight of the balls though. (I am considering using it for the start of my next module). LDD file.
-
This lego great ball contraption module uses technic "banana" gear to lift the balls up. It does put a bit of stress on the parts but it doesn't leave any damage. They are at a bit more of a angle than Maico Arts original version wich was 1.5 studs apart, this way it can be higher and run smoother. The stepper mechanism uses two lift arms on each step, this helps it run smoother and with less force on the motor. The LDD file is here.
-
This Lego GBC Module uses a Scissor Lift mechanism to lift the balls up. The mechanism is quite reliable and sturdy, I never had problems with the balls falling out. The gear train is long but it does not have much friction because the stepper does not use much power. I would like to make one with more lift mechanisms similar to Akiyuki's six heads module but I don't enough of the cup pieces. The LDD file is here. More photos here.
-
Version 2 of my cup to cup GBC but actually third rebuild. I thought it already had a separate topic but apparently not, hope you don't mind I create this one. After running it at several events, where it was one of the favorites of the public, I updated the drive system to a more direct drive and better force distribution by driving the crank through a 36 teeth gear instead of directly on a single axle. Also added more steppers for better ball entry and exit with basket. Direct drive from the XL motor. According to the gear calculator from Sariel this setup has 46Nm compared to 16Nm for the previous one! This makes the whole GBC run smoother and more reliable resulting in no dropped balls during the half hour I tested. The turntables are mounted with neck brackets in the frame to get the correct gear distance. For reference, version 1 video here
-
This lego great ball contraption module uses a three sided wheel with "forks" to lift the marbles to the next module. The module is surprisingly reliable but it can take some time to get it running well. The stepper used to load the main mechanism works fairly well but it could still use some work, as you can see at 0:50 in the video it does not always work perfectly. The instructions, LDD file and part list are here. I used 1x3 technic half beams instead of the correct 1x5 ones in the instructions becuase LDD does not have them. The differential gear is not essential, it is only to make it easier to set the timming of the loading mechanism.
-
All mechanical and 100% LEGO Ball Counter. Numbers do not always line up perfectly because of backlash in LEGO gears but it counts every ball. I tried to minimize amount of gears but as many of you know, backlash is almost unavoidable. The wheels can be taken out the GBC to set to zero. 1:10 ratio mechanism by Parax77.
-
Hey Guys, Here's my latest GBC module D.R.O.P (dark red olive pusher). It's not the most exciting module, nor did I do the original engineering of the mechanics. I did however choose the colours and changed up the original design so that this is a bit more sleek looking. It's kind of slow, and somewhat unexciting, but I did manage to hook it up to a shared power system (later in the video) which runs 3 modules off 1 M motor with a simple axle chain using universal joints. Its reliable up to around 22 balls, any more and the arm may not be able to get underneath the balls to sweep them out. Having said that it *should* be able to clear the 1BPS rate of the GBC standard. I'm planning on running this at BrickCan next week and if the module does seem a bit slow I will regear it from 8-40 to 24-40 at the lift-arm.
-
This lego great ball contraption module uses two "minecarts" and a conveyor belt to lift the marbles. The module is quite reliable even though it has so many gears and moving parts. The carts have extra plates on the bottom to make them heavy enough to pull the strings down, as these strings are quite stiff. The Instructions and part list is on rebrickable here. ↑↑↑ This mechanism with the two 2L technic beams is what makes the carts stop at the top to let the marbles in. The PF switch is attached to the servo motor witch flips the gearbox direction, this way the main XL motor always runs in the same direction.
-
This Lego great ball contraption miniloop uses a screw made of technic flex tube to lift the marbles up, then they role down the ramp and back to the start again. The ramp is made of "cheese slopes" and hinge bricks wich make it flexible. The ramp can is flexible but if you want to bend it more than about 15 degrees you have to swap one of the 1x2 slopes for a 1x1 slope. It works well for short distances but might need to be supported if it is made longer. The LDD file is here. Some of the parts for the screw are missing because they are not in LDD, the screw should look like this: More photos here.
-
 after watching the brickworld gbc videos i saw that the workshop module is a ball pump and a stepper for 2019, does anyone know where i can find the instructions for the ball pump? thanks
 -
I forgot to post this last week, here's my latest module Upslide. It uses a helical pusher to push balls up a friends slide, and it's powered by a PF M Motor. I tried to run it at BrickCan this weekend, but it only performed for a few hours before having a bunch of issues I'll need to fix. I need to reinforce the input bin walls, tweak the output at the top of the slide, and fix a small gearing issue for the helical drive. Stay tuned for a version 2.