

quilkin
-
Posts
105 -
Joined
-
Last visited
Content Type
Profiles
Forums
Gallery
Everything posted by quilkin
-
Mark, many thanks for your posts here and instructions in your Brickshelf folder. I have made some track sections similar to yours and a simple train to start with; also now some points controlled by a NXT motor. But I have question about the curve design and wondered how you calculated the number of bricks required for a 45 degree bend. By my measurements you would need more than 18 incremental bends to achieve 45 degrees, unless the parts are strained which would make the design 'illegal' from a TLG point-of-view (see my comments on Hidaka's cusoo page). Shouldn't we be using a wider radius if we want to conform to standard use of parts? (my measurements give a 0.25mm gap for each 2x1 brick which is 8mm wide; that's an angle of cotan (0.25/8) which is about 1.8 degrees - so 25 incremental bends to get 45 deg.)
-
Well, my first MOC bike is now my avatar. This didn't have a big enough parts count, though, so my second was bigger and was the subject of an earlier thread in EB; it can be seen here. More than three years later and I've nearly finished mark 3: As you can see it's not quite ready yet (need some more bricks for the 'tyre' on the front wheel) and there are one or two problems. I can't get the tooth spacing right on the chainwheel; if I made it a much larger diameter it would probably work but it's already too big at 72 teeth. At present it almost fits but the chain, when in tension and the pedals are turned, tends to ride up the teeth and slip off. Another problem is that that headset (between front fork and handlebars) isn't built strongly enough; it all fell apart when I tried to carry it around for the photos! I can probably deal with this but the chainwheel has got me stuck and I don't want to buy more parts (to equalize the colours) until the design is correct. There's more photos on brickshelf where you can see some details of the build, including many turntables employed as bearings. It's not quite full-size, would probably suit a chid of about 10 years old if there was one light enough not to break everything - would have to be made of paper though .
-

[TRIPLE] Wind-up insectoids WIP
quilkin replied to Lipko's topic in LEGO Technic, Mindstorms, Model Team and Scale Modeling
Great to see some non-vehicles! I wish I could think of a way to make your cocoon idea work, to get a proper triple connection. I believe that what happens inside a butterfly cocoon is just a fluid, the caterpillar just 'dissolves' into a slush and then the slush reforms as a butterfly. Guess you could just fill a shell (made of panels) with a load of loose parts -
Remnants ... from a Studded Era
quilkin replied to DrJB's topic in LEGO Technic, Mindstorms, Model Team and Scale Modeling
Studded and studless both have their uses. For example a studded construction can be much stronger but is indeed heavier. However the odd spacings of studded make studless better for compact constructions. But we've had many discussions about studded v studless, both here and elsewhere, do we need to start again? The thread has gone somewhat off-topic; the original post was more specific. -
Komatsu D575
quilkin replied to jorgeopesi's topic in LEGO Technic, Mindstorms, Model Team and Scale Modeling
For the tracks, I'm puzzled you didn't use the old chain links http://www.bricklink.com/catalogItem.asp?P=bb76 which run with the driving wheels you've used. Two sets of these in parallel, joined with 1x4 plates, would be a good size. Or wouldn't they strong enough? -
I didn't know Lego made a magnifying glass! This is so realistic, from the first pic I didn't think it was Lego either, until the tyre(s) gave it away. Brilliant, and so good to have something other than vehicles on here.
-
A couple of years, maybe, but the I didn't start until I was 40-ish when my children played with it (a bit). When I was 6 (1958) Lego was hardly heard of in UK, Meccano was the thing for mechanics, and other sets for buildings. So I got into Meccano. nearly 20 years now (on and off) but only 15 for Technic, my first set was 8074 I think. I'm already over 60! And semi-retired so more time for these things now. I'm not really sure, my interest seems to go in cycles between Meccano, Lego, and other things e.g. software. Before that I definitely had long 'dark age' for Meccano; sold my first big set when I was 15 and purchased a whole load more about 3 years ago. I now have a large number of parts of both Meccano and Lego (mostly Technic). Can't really decide which I like best, which perhaps explains my interest going in cycles. But I do feel that until I settle with one or the other, I won't be an expert at either! ...... does all this info make me the oldest respondent to this post?
-
Help with your MOC
quilkin replied to Jim's topic in LEGO Technic, Mindstorms, Model Team and Scale Modeling
Yes, it's a bike, you can see some of it here; the frame is far too floppy at present (it bends under its own weight!) which is why I'm trying to redesign it. I'll post new pictures (in a new thread) when it's rebuilt. Jim's suggestion of increasing the cross-sectional size put me on the right track. -
Help with your MOC
quilkin replied to Jim's topic in LEGO Technic, Mindstorms, Model Team and Scale Modeling
I'm using 3L pins, but I know what you mean - I have put all those older 2L pins into separate storage so they don't get used accidentally! Panels are an expensive solution, but more importantly they don't give the option of overlapping the layers, so there is a weak point at the join of each panel. Anyway I think I have come up with a better solution, without using liftarms but using all studful construction: - this is immensely strong, if somewhat difficult to assemble (and disassemble....) - in case the photo isn't clear, the liftarms are replaced with continuous 6-stud technic bricks with a 1x6 plate every 3rd brick. -
Help with your MOC
quilkin replied to Jim's topic in LEGO Technic, Mindstorms, Model Team and Scale Modeling
OK, thanks guys. Tests with the 5x3 cross-section made with (studded) bricks and joined with 5x3 liftarms are good, so I'll go with that. I'll need about 100 12-hole bricks, 50 or so 5x3 liftarms, 200 long pins and I haven't yet worked out how many 8x1 or 6x1 plates as spacers. The colour scheme will be better than my test constructions! Careful planning will be required to ensure I can fit the two half-sections together for each of the three beams; that'll be up to 60 pins to push home at the same time.....I wonder if they'll ever come apart? -
Help with your MOC
quilkin replied to Jim's topic in LEGO Technic, Mindstorms, Model Team and Scale Modeling
I did think about these but there are no holes across the centre (in the right direction!) for the middle three layers of liftarms. This wouldn't matter so much for connecting sides made of studded bricks, because the middle layers are held by the studs. Anyway I have made a 5 x 3 version of both and the studded version is considerably stronger when trying to bend the beam (in the vertical direction , which is most important). (ignore the 'bend' in the photo, that's due to the camera lens!) .... thanks Blakbird, just seen your comment after posting mine. Yes, triangles are strong but the diagonal (5) needs a 6-hole liftarm doesn't it? -not available in thick and expensive in thin. The 5x3 liftarms are a good compromise. -
Help with your MOC
quilkin replied to Jim's topic in LEGO Technic, Mindstorms, Model Team and Scale Modeling
Thanks Jim. I have tried the 3x5 liftarms but the results seem similar to using the pin connectors. The cross-section could bigger at 4 x 4; but 3 x 3 seemed a good size to use for the long pins and other available parts. 4 x 4 would be tricky in studful, it would need to be 4 x 5 or even 5 x 5. I'll do some experiments - if it works it will be costly at Bricklink! -
Help with your MOC
quilkin replied to Jim's topic in LEGO Technic, Mindstorms, Model Team and Scale Modeling
Not sure if this post belongs here or should start a separate thread! I am looking at ways to make a large beam (cross section approx. 3 x 3 studs) as strong as possible. I have come up with these ideas, in studful and studless (these are 'opened' to show the construction) but wonder if anyone has better ways. The studfull appears stronger (in terms of bending and torsion) but is much more difficult to assemble since the whole of one side needs to be fixed at once across a large number of pins. This is a pain when trying to sort out how the ends of the beams are joined together. To see what I'm trying to do, there are more photos of the application (a W.I.P.) here . If I can decide on the best method I'll need to order a whole load of new parts, but don't want to order parts for the wrong method - and if I can't make the beams stronger than they are now I think I'll have to abandon the project! -
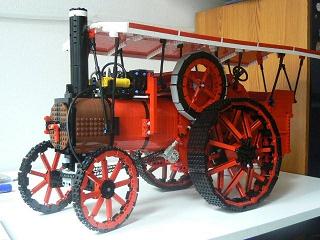
For anyone interested in other MOCs like this, I made a similar (but bigger) steam vehicle about 3 years ago. You can see it here. I did post this on the forum when I first made it , but cannot find the thread any longer. I still have most of it built (getting a bit dusty now), but have taken the roof apart to use for other projects. The original idea was to make it run from the pneumatics, using compressed air, but it needs far to much power for that. I may rebuild it now with electric motor(s) and simpler pneumatics to simulate the original pistons etc.
-
Turntable for a....."Tank"
quilkin replied to OrangeKNight's topic in LEGO Technic, Mindstorms, Model Team and Scale Modeling
A really big turntable design here http://www.texbrick.com/model_marinecrane/index.html and here http://texbrick.com/tjab/?cat=11 if you need to reinforce things to stop the turrent tilting sideways, and pulling the turntable apart, which could happen as the size grows. -
Better gui?
quilkin replied to Grimofdoom's topic in LEGO Technic, Mindstorms, Model Team and Scale Modeling
I also got a NXT 2 at Christmas, and have been trying out the different programming languages; I have been programming other languages for years. Robot-C seems easiest for beginners who want to advance beyond the Lego GUI. I agree with fred67, are you confusing RAM and hard drive space? If your laptop is struggling you may need to uninstall some stuff (antivirus programs are the worst culprits in my experience!), or just reboot it if you haven't done for a while, that can often free up unavailable RAM. -
Keeping charged cells in the fridge will retain the charge for longer (but make sure they are in a plastic bag so they don't get wet with condensation). But at normal temperatures, if they are discharging after a few days then they are faulty.
-
Anyone wanting to try making their own designs could try these days for less than £1000: see this machine or this one Not sure if they would be good enough tolerance for making good Lego parts, but anyone like to try?
-
GBC Wave Machine
quilkin replied to quilkin's topic in LEGO Technic, Mindstorms, Model Team and Scale Modeling
Thanks for all the positive comments, guys Well then I'll have to make a metachronal wave machine my next design - trying to make each 'frond' push the ball sideways as it passes over should be quite a challenge...... -
I have been trying to think of new modules for the GBC and cam eup with this. A web search for 'lego wave' didn't come up with any, but neXTSTORM did give me the idea for a mechanism to use. Sorry if this GBC device been done and seen before!
-
Battery box question
quilkin replied to yoraish's topic in LEGO Technic, Mindstorms, Model Team and Scale Modeling
Don't connect two battery boxes together! At best the batteries will go flat faster, at worst they could leak and ruin your boxes. If you want more power use good rechargeables (lower in voltage but better current supply - see the other thread earlier today)- but only use one battery box at a time! -
I don't know if this is of interest, it's a different sort of vehicle anyway. Quite a bit of Technic (mixed studs and studless) but much non-Technic as well. It does actually run when powered by a bicyle pump but I got the gearing far too low and it's very slow! Some more work needed. I like the rear wheels best, they took ages to get right but there's still a problem with the axles bending under the weight, even though they are built using turntables. More images available here
-
I can't find any reference to this on the site so maybe no-one has seen it...have a look whether or not you like football! http://www.guardian.co.uk/football/video/2010/jun/29/world-cup-2010-germany-england-brick-by-brick (in english) or at the creator's site (in German)
-
The biggest Lego wheels made in one part (as far as I can see) is like this or like this which is 20 studs diameter. But these are a bit limited for, say, tractor wheels. How can you get bigger wheels? I started by building a wheel like this, for a racing bike All the parts in this design are stressed in ways TLC wouldn't approve of, but then real bike wheels are designed to be under stress anyway. After that I wondered about making some wheels for a decent-sized tractor or traction-engine and came up with this which isn't as elegant or stable (and also has many stressed parts) but is very flexible in design, in that it could easily have a bigger diameter or width. If you limit the design to non-stressed parts you can do this but the size has to be either 40 or 42 track links, anything smaller won't bend and anything bigger is too floppy (the 42-link version has 6 spokes each side, separated by 7 links each). And many other lego designers have used these links for wheels or other circular constructions. I think my favourite is this one because it's the most elegant. Any other ideas?
-
Any Technic Cyclists?
quilkin replied to quilkin's topic in LEGO Technic, Mindstorms, Model Team and Scale Modeling
I saw those wheels in some photos somewhwere on the web and wondered what they were - thanks for defining them - but they're $25 each at Bricklink! I think mine built from parts were cheaper and could be built to a range of sizes. I've built more large wheels since then (not bike wheels), I'll post some pictures in a new thread soon.