
John Hill
-
Posts
54 -
Joined
-
Last visited
Content Type
Profiles
Forums
Gallery
Everything posted by John Hill
-
Hi, I found this http://www.ebay.com/...1-/371096433674 I have no connection to the seller. I trust I am not breaking any rules by posting this link? John
-
I have several 4.5volt trains. I fit four AA rechargables in the battery box and contacts underneath to pick up a charge from 12V power rail sections set at the stations etc. When the train runs over a 12v section a relay in the battery box opens if the rails are 'live', the open relay stops the train while the batteries get a charge then a timer cuts the supply to the rails, the relay opens and the train leaves. Simple system that keeps my 4.5 trains alive!
-
I bought a Sluban set which didnt cost much more than lunch money so my expectations were not, um...., very high. It is really not too bad, the rolling stock is a bit weird but nothing that a little bit of redesign could not fix however I have never seen a two wheeled rail vehicle before! The locomotive is one piece (as others have reported) and is a bit bigger than a similar Lego steam loco, of course it has the horrible sound chip that will soon be getting disconnected! The couplings are hook and eye but it is easy enough to fit Lego couplings, which fortunately I have a goodly supply of, except for the locomotive which will need the existing hook cut off and a Lego coupling glued on. The rolling stock runs quite easily but I do not have high expectations that the plastic 'pips' that act as axles will have any more than a short life. The loco as received would hardly run on Lego track and derailed at the first set of points, every set of points thereafter and a few other places as well! There had to be a reason. Firstly, the loco has too long a wheel base for six wheels on the curvature of the Lego tracks but worse, the wheels were too far apart. I cured the six wheel problem by pulling out the middle axle and pair of wheels and tried to push the other wheels further onto the axles but without success. I had to remove one of the driving wheels and carefully drill it out from the outside to allow the axle to come on a bit further, success! The loco now has no problems with Lego switches and other track curves. I really should put the middle wheel pair in my lathe and turn off the flanges (like a real loco). Sluban, I have seen worse and dont regret buying this set. The slightly tweaked rolling stock is plenty pretty enough to act as scenery fillers and for the occasion turn around the track. I dont think I will ever use the loco but it is nice to know it will run on Lego track if I ask it to.
-
Hi, try this site.. http://brickset.com/sets/113-2/Motorized-Train-Set
-
Converting Hogwarts Express 4708/4841 to powered train?
John Hill replied to snaphappyninja's topic in LEGO Train Tech
Yes, it is easy to convert to 9V, I dont know about later power methods. With 9V I found it easier to fit the motor in the tender. It is a project well worth doing as they are very nice trains especially if you add a few more passenger cars. -
Oh dear, it has been several months since I posted the wave form picture in post #16 and the software is still not ready! I got somewhat diverted onto other projects and thought it would be good to do the project in Linux. I bought a nice new PC but the installation of Linux went wrong on me.... I really must get back onto this project!
-
Train car connector with electricity transfer
John Hill replied to system's topic in LEGO Train Tech
I have tried connecting cars to the locomotive for lighting etc but did not preserver however the most promising used 3mm phono jacks and sockets which are available with and without the cables already attached, these will give you two or three connections. The little battery connectors used on older versions of Lego trains may look more authentic but I dont recall they were polarised which may be a problem. -
This is how I modernised my 4.5 volt trains.. http://www.eurobricks.com/forum/index.php?showtopic=86856&hl=rechargeable
-
Adding 'Juice' to long 12V track layouts . . .
John Hill replied to Breakdown's topic in LEGO Train Tech
HI I have a sizeable 12V layout too and I know that over a certain size everything slows down. No, as far as I know, you cannot use multiple transformers on the one track. I think the problem with large layouts is that the slight resistance at every track join adds up until the trains run slowly the further the train is from the power connection. The solution to this is to connect your transformer normally then run another pair of wires from your transformer to the far side of track circle and connect them there. Of course you have to avoid short circuits, for example the wire that is connected to your transformer and to the 'outer' rail must be connected to the outer rail at the far point.. I run a mixture of trains on my layout, 4.5, 9 and 12V and have never had a motor failure and the guide I use is ensuring that a motor is never asked to do more than Lego expected and no insane speeds. John -
Old rails compatible with new ones?
John Hill replied to Good old Lego builder's topic in LEGO Train Tech
Thinking on this further, I think the best option would be to cut a new all plastic section and one of the older blue or gray rails in half and glue together to form a full section length adapter. Presumably this could be done for both straights and curves. -
Old rails compatible with new ones?
John Hill replied to Good old Lego builder's topic in LEGO Train Tech
I dont believe they will connect without modification but that should not be too traumatic as the modification would only entail cutting the end off a current all plastic rail section to produce a flush end. Obviously you would then have non standard track lengths with the problems that might bring. -
HI, a variable resistor is the cheap way of controlling motor speed and is not too bad for flat out racing as the 'throttle' is mostly open but is not near so good for low speed where the motor has greatly reduced torque. If you want good control at all speeds look for a pulse width modulated (PWM) motor speed control. If you want to get really serious you could look at DCC (digital command and control) which is used by model railroaders. John
-
HI, very nice looking tipper wagons... my effort
-
This might be a useful site... http://illianaroad.com/engineering/the-amazing-train-that-never-was-louis-brennens-gyro-car-monorail/
-
Thanks Locoworks, I am not sure of the extended capabilities of my Digitrax Zephyr DCS50 but I do know it has the two jump ports and a couple of loconet connectors so no doubt what you say is true and thanks for reminding me. However the incentive for this project is to achieve something of my own creation. John
-
I passed a minor milestone today in that I managed to get a picture of the waveform from my sound card DCC system.. The lower trace is the output from the sound card and of course is analogue, the upper trace is the DCC digital signal as passed to the "power station" circuits. I use an LM339 voltage comparator, just one chip to convert the sound signal to digital DCC. But there is much more work required on my software!
-
What's your favorite railway museum and why?
John Hill replied to Hey Joe's topic in LEGO Train Tech
This is my favourite museum... www.plainsrailway.co.nz ....because it is in our town! -
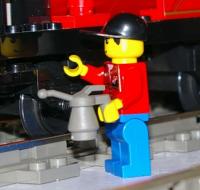
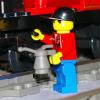
Three illegal alien workers on their track speeder. This is a 12V adapted to run on the 9V track under DCC control. You can easily see the simple (i.e. crude) power pickups. The DCC decoder chip is external to the motor and hidden inside the speeder seating area, held in place with modelling clay.
-
Carl Thank you for your comments which have raised some questions in my mind about the PWM drive to the motor and hopefully I can get a clearer picture with the aid of my oscilloscope. I might even be able to post some images from it.
-
Yes, very much like those excellent examples of your alainneke. But mine is much cruder in that the contact brushes contact the actual rails and not metal wheels (which I do not have), hopefully I will eventually make some metal wheels but with 12 bogeys to make I am not looking forward to the task! I studied my Digitrak manual and as far as I can see the decoder voltage settings of CV2,5 and 6 set the voltage as fractions of the maximum available voltage but I decided not to use these settings as reducing the voltage is against the principles of a PWM drive.
-
Bricktrix, it is quite simple really. 9V and 12V LEGO trains fitted with DCC decoder chips (internal for the 9V and external for the 12V) run perfectly well with my Digitrax Zephyr controller but the controller is very awkward to use having only one throttle and requiring multiple button presses to select the train to be controlled (just one example of why I find this controller unsatisfactory). I can run my 12V DCC trains on the 9V tracks when I fit them with pickup brushes. I can mix 9V and 12V on the same track safely as I never ask the 9V motors to do more work than they were designed for. I certainly do not run any motors on "unregulated 12VDCC" whatever that may be, as my motors are all fed from the PWM output of the decoder chip. Thank you for the comments regarding setting up the decoder tables but really they are not at issue as the motors run perfectly well, 9V and 12V, on my Digitrax controller. I use the most simple Digitrax decoders available at the time and even N gauge decoders appear adequate for LEGO motors. The software for a minimal controller is really quite simple as the basic control packet is only a few bytes, the difficult part is frequency shift modulating the track supply with this data and that is what I am doing with the PC sound output. The only problem I have at this point is confirming the waveform that is being put on the track, it appears to be right as the decoders do respond to commands but at times they go off and do something else, for example pause, slow, speed up. Considering the robust nature of the NMRA DCC specifications it is difficult to see how poor waveform might result in incorrect but valid format control packets. An alternative explanation for the behaviour of the decoders may be lurking in software which of course is also under examination. Your topics are very impressive but quite different to what I am doing where my first stage is intended to run several LEGO trains under DCC control with basic functions of start,stop,speed, forward, reverse, lights on or off. My software will run a dozen or so trains but will not be called upon to do anything more than that, certainly not being used to program CV tables et al which my Digitrax controller does very easily. My controller is being programmed to meet NMRA S9.2, baseline packet for speed and direction which is four byes only. I may go on to develop software for the extended packet formats once I have the basic operation reliable. John When running the 9V DCC trains on my Digitrax controller I just keep the throttle settings low to avoid over stressing the 9V motor but I am sure you are right that the decoders could be programmed as you suggest however I dont intend to do that instead I will have speed tables in my controller software (eventually) for each type of motor in that way I hope I can always run the loco decoders with factory defaults, except address of course.
-
Hi, my name is (as you can see) John and I am retired and living in New Zealand. We started collecting LEGO about 40 years ago and I have never tried to count just what we have but there are quite a number of 4.5V, 9V and 12V trains and accessories. Trains are my main interest in LEGO and I look forward to looking at what others have done with their LEGO trains.
-
Hello to LEGO fans everywhere. We started collecting LEGO in 1973 and have bought "a little" every now and then since such that when I retired a couple of years ago our retirement cottage included a LEGO room which of course will never be big enough! I have kept away from most of the LEGO electronic technology and have almost nothing in that line. So the collection is mostly basic buildings, simple themes and a lot of trains! 4.5V, 12V and 9V but no RC stuff as yet. Perhaps I should not say this but I do not hesitate to modify my LEGO bits if it suits what I am trying to do and I am quite comfortable mixing in other brands that are compatible. John
-
Thanks for the comments and advise everyone and especially to AC_ as that link is exactly what I have in mind!
-
We started our LEGO train collection about 40 years ago when 4.5V trains were the current art! Buying batteries became a bit stale as the years went by and those little trains tended to stay on the shelf until I made a few 'improvements'. The first thing I did was replaced the 3 'C' size batteries with 4 'AA' size NiCds which were a very good substitute having slightly higher voltage but not excessively so. This hack does require a bit of traumatic surgery if you want to continue to use the battery cars but I was eventually able to live with myself! The next 'improvement' was to fit copper contacts under the battery cart so that I could park the train on a section of 12V conductor track and recharge the batteries without taking them out of the battery box. Then one night while watching TV I thought of another 'improvement'! I found a relay of the kind that is made to fit in the same socket as a 14pin IC, these are quite small and can be had with 5V coil. I fitted the relay in the battery box with the coil connected to the DC side of a small rectifier and the AC side of that was connected to the underneath contacts. I wired the relay so that when the coil was not energised the battery was connected to the train motor and when the coil was energised the motor was disconnected and the rechargeable battery was connected to the DC side of the rectifier. With this system I could use a simple timer circuit to control power (about 7V) to the conductor rails of which I had just one section at the LEGO train station. With a charged battery the train runs until it gets to the station and when the contacts hit the live conductor rail the relay opens to stop the train and the battery begins to take a charge, when the timer cuts the power to the rail the relay closes and the train heads out. If you have 4.5V trains sitting on the siding I trust you will find these ideas useful. P.S. the rectifier does not mean that you need AC on the conductor rail, it is just there so that the train can be facing either direction and still charge properly.