
Jasper Joppe Geers
-
Posts
330 -
Joined
-
Last visited
Content Type
Profiles
Forums
Gallery
Everything posted by Jasper Joppe Geers
-
Well done! I have to agree, this is indeed typical dutch design! And you're from Moscow? Excellent work! Reminds me of Erik Brok's Market street.. I do wish an interior would finish the whole thing, but if this is the first one, i hope lots of this will follow. And: Nice detail, a bike... There's no dutch house without one... ;) Cheers! JJ.
-
This is absolutely incredible! I really think you're setting a new standard here in modular design. It has IMO nothing to do anymore with Cafe Corner style or whatever, this is just a new way making a beuatiful MOC very playable as well! The second thing i really enjoy is the whole presentation. It comes even with a genuine sticker sheet? We're waiting for the box and instructions then! A big thumbs up to you mate! Cheers, JJ.
-
Well here we go. It took me some time to collect the bricks together, but most of them have finally reached me, so i begin. I've mentioned in my street thread that i would take some pics more through the proces of building, giving you an idea of what i'm up to. First of all, the bottom layer will mostly be done in dark purple color. Therefore, the range of different bricks is limited and i have to be creative sometimes. No matter, that shouldn't spoil the fun! I've started to lay down some pavement, and the spots for the street lanterns. As this is a corner building, i could add loads of features on the pavement, but not now. Have a look: You'll notice that i've done 5 ornaments with the cheese slopes. The spot beside the entrance on the right is left open for a genuine gumball machine to be added later. I've ordered some bricks from Chromebricks.com, and i'd like to be careful with them before i add them to it. As i don't know exactly how to do this gumball machine, i leave it for later stage. I've added some pics how i did those ornaments for those who are interested. At first i had them straight on the pavement, but it looks better to me when lifted a plate by placing them on a 1 x 2 tile. Have a look: http://i80.photobucket.com/albums/j185/JJG...el/DSCN2974.jpg http://i80.photobucket.com/albums/j185/JJG...el/DSCN2975.jpg Then i'd like to show you the basic idea for the entrance. It took me some searching and patience, but i managed to get my hands on a few of those ski plates. I needed 4 of them, to work out some ideas. So far only 2 are used. I'll discuss the way of using them later. First this: There are a few ways of creating a diagonal face to a corner building. You can use a turntable like in Cafe Corner, you can use some hingeplates, or you can use some jumpers as shown in the pic below: http://i80.photobucket.com/albums/j185/JJG...el/DSCN2973.jpg The diagonal distance between those studs are 4 studs, so a 1 x 6 or 1 x 8 plate could be used here to cover them. In this i've used two 2 x 2 corner plates: http://i80.photobucket.com/albums/j185/JJG...el/DSCN2976.jpg A 2x4 plate added between them and covered with a 1 x 8 tile, and there we are. Behind the 1 x 8 tile is some space left, and that is where i could fit the ski plates. I hope i can work them out nicely. The pics are not the best really as i've taken them tonight, so bad lightning there. I'll promise to do better next time. I hope you'll enjoy this moc with me while building it! See ya soon. Cheers, JJ.
-
That's easy. The roads and cycle paths are made of Dark tan tiles seperated by 1 x 8 plates, and 1 x 8 tiles on top of them. The pavements are baseplates of 8 studs wide, tiled with Light bley tiles 2x2, with spare spaces for the trees, waste bins etc.
-
@rapseflaps: Can you tell me why you posted this article again? It is mentioned already some posts above.
-
Don't know if this is helpful, but let me explain how i usually start: 1. First of all you need a clear idea as possible what you would like to create. Should it be a bank? a Hotel? Or maybe a barber shop? 2. When you have some ideas (maybe put on paper) you should decide the size of your building. At this stage the article of Aliencat mentioned here is really helpful. 3. Start with some pavement, and include the spots where a street lantern should be, or a waste basket or whatever you would like to create. 4. if you've done that, try to work out the spaces of your building with some basic bricks. For example, if you want to create a post office, try to think of what areas could be found in there. Put down the bricks on the baseplate where the interior walls should be. 5. From here you need your imagination mostly. Be creative, and think what could work for your moc or not. The great fun (for me the most) starts actually when you can get an interior done as well as the outside. Hope this can help you a bit? In my case i've done everything that should fit beside the well known mocs like CC, GG and FD. When i get the feel that my moc is meeting that kind a level, then i'm happy! Cheers, JJ.
-
Well hey! That' the way to celebrate! Congrats on your achievements, and a nice Moc there! Cheers, JJ.
-
I really love the way you did this roof, and indeed, some ligtning you did there! It makes me think of taking moccing to a next level, the one of doing interior roof and ceiling as well.... hmmm........
-
Looking forward to the next pics then! Haha. I'm sure you can take this even a step further! I absolutely dig this moc, and 'die' to take a tour inside your hospital... I like your thinking about where everything can be found like the operation rooms, emergency rooms... Top job! Cheers, JJ.
-
Well hey, look at this! This is the most brilliant hospital i've seen so far! There is detail enough, and the addition of your minifigs stand out excellent. The building fits exactly the rest of your work, so kudos to that as well. The helicopter platform part is a great idea, which swings on a hinge like the old 375 castle! I do apologise for being a little critic here, but i miss the 'modular' idea here a little bit. Is there any posible way to part this building in several layers with interior build in it? That would make this one completely a winner for me! :) I really like to see some pics of all your mocs fixed together in your street!! Cheers, JJ.
-
Excellent piece of work! You really brought the fishmarket alive! Cheers, JJ.
-
Looking at this building i wonder how the rest of the street would look like! Great job! Cheers, JJ.
-
Thanks all! After entering this forum i've seen lots of great things here. I wonder why i never found this before... cheers! JJ.
-
Well done! Clever use of bricks here!
-
Looking at this building i have two things that spring to my mind. First thing is the panels on the bottom floor, if you have the bricks you could easily combine them with 1 x 4 x 6 frames, and have a slide door fiitted which would suit this building perfectly. Second thing is the heigth of this building. Please create a second floor James! Make it white with black decorations! That would be great Looking forward to see more of you! Cheers, JJ.
-
Well thank you Kinjai, Instructions? Well, I'll leave it to your imagination to figure things out, but if there's anything specific you would like to know i'll be happy to answer! For the post office e.g. there are some pictures in my map with the basic lay out on the baseplate. Perhaps that helps? Let me know anyway. Cheers, JJ.
-
Just lovely! If i ever need work done in my street, this is the one to have around! Cheers, JJ.
-
Way too much, haha! I always try to keep myself limited to a budget, but i never can keep myself to it. I have a basic collection of bricks to choose from, but mostly i get everything special together using Bricklink. I'm not one of those computer guys really. I'm more into real time building. It gives you this extra dimension of looking at things, not just your computer screen. It would be great of course when one day TLC releases a design from me, that would truly be a great honour. But i think that Jamie Berard will always be the modular guy there (Thankfully!!) Cheers JJ.
-
What is Your Favorite Modular Building?
Jasper Joppe Geers replied to Legoliner Pilot's topic in LEGO Town
For me, the Green Grocer still does it. Basically this piece of excellence set the standard to compete with. I was hoping that the fire brigade would be of such level as well, but unfortunately... Still, there is enough tweaking to do to make them beyond interesting don't you think? -
Job well done i'd say! Perhaps a little more detail on the front? Cheers, JJ.
-
Good point. Thing is, i need to reorganise my map on Photobucket sometime. However, it would cause current links to break if i move any of those pictures. I can give you a link specifically to Collison's Bike & Cycle shop. (At least, that is what's going to be on the sticker later on) Here it is: http://s80.photobucket.com/albums/j185/JJGeers/Lego/ Cheers! JJ.
-
Hey Wout! Of course the Neude postoffice is one of a kind, but i think it doesn't work in the modular way. I tcould work if it would be build as a centerpiece, to create a street all around this buiding. But only then i believe loads of other buildings would be possible! Cheers, JJ.
-
And a big thank you again! I wish i could continue this stuff, but i need to bring my brick collection up to scratch as they say... And what's more, now with all your comments i have some extra homework to do! Haha. Cheers! JJ.
-
When it comes to that, i wish TLG released a set with some interior design for it!
-
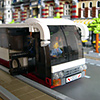
Excellent bus! And glad you did it 8 studs wide! I'm one of those who doesn't believe in vehicles like that on 6 studs.. it just doesn't make sence. Looking at the picture i see some houses on them? Where can i have a look at those!?... Top job! JJ.