
-Mini.jpg.22fd9f6228faf03e40c193dcf09aa9d0.jpg)
Andy Glascott
-
Posts
382 -
Joined
-
Last visited
3 Followers

About Andy Glascott

- Birthday 03/18/1973
Recent Profile Visitors
4,654 profile views


-
It looked really good yesterday at Brick Day @Electricsteam, great to see it running so smoothly.
-
Very impressive I love the smooth gradients not just in the track but the whole slope up and down is so smooth.
-
-Mini.thumb.jpg.03594ed3626ab4a4b625a32af4d03d5f.jpg) I can't believe I only have 4 more modules to build on this thing. I finished the 14th one this morning, which features a couple of as is modular buildings and a rebuilt New Year Celebration. The tram stop is right outside the Boutique Hotel to take guests direct to the station at the other end of the tram line after running around the back of the buildings. Full module: Tram Stop: Full module from the other end: Until someone bashes the module against the door after a show... To be fair, he has already bought the replacement, I just haven't done the replacement.
I can't believe I only have 4 more modules to build on this thing. I finished the 14th one this morning, which features a couple of as is modular buildings and a rebuilt New Year Celebration. The tram stop is right outside the Boutique Hotel to take guests direct to the station at the other end of the tram line after running around the back of the buildings. Full module: Tram Stop: Full module from the other end: Until someone bashes the module against the door after a show... To be fair, he has already bought the replacement, I just haven't done the replacement. -
It’s looking really good. I have a GP loco on my list to build at some point in the next year or so so might borrow a bit from this when I get to it.
-
Module 13 - the first part of the 9v loop It's taken a while to get to this point, the first part of the year was taken up with a couple of shows which eats into my building budget a bit, but I have been building in the background, and finished off the latest module last night. Looking back at the original design the 9v plans have changed considerably, and now include a Power Functions/plastic section for a tram to run back and forth on, making this technically now a layout in 4 eras... By way of an update, here's the map for the 9v loop: And the overall map with the previous loops, including the upper level 12v loop that now runs the length of the layout: (Thank you Imgur for making it much easier to embed images!) The module I've just finished is the grey one at the bottom left of the 9v area and features an open paved area for minifigs to hang out and the official title for the layout, "Lego Trains Through The Years". Here are some pics. Hopefully the next few modules won't be as slow to build, I had also run out of baseplates but a large order arrived recently as well so I can crack on with at least the next three sections, at least until I need to order yet more parts...
-
Possibly at some point @Vilhelm22, would certainly look good as a pair, but I’ll have to test this motor in running mode first to see what it can pull, both trains on the freight loop are quite long for 12v.
-
Thank you @LEGO Train 12 Volts, and yes, good spot about the 9v track. The reason is simple, the 12v modules of my layout are in storage between shows, I’m working on the first of 6 9v modules now, so that’s the one that is available in my build space from loco pics 😀 @Hod Carrier I found that post the other day but couldn’t get the images to post and didn’t have a lot of time to play around (I’m now away with work for a week as well and only on mobile devices with a data connection so not going to try again for now).
-
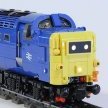
Over the last18 months I've picked up a couple more 12v and 9v train motors, so have been slowly working on adding to my loco collection - my aim is to have 3 locos or trains for each loop on my layout so that at shows I'm not running any one train/loco for more than 20 to 30 minutes at a time - got to look after these vintage machines! The BR Class 20 is the third loco for my freight loop, and while I can't find any photos of one in this colour scheme, there are so many of these still about of the original 228, and they've been running for so long (coming up to 70 years!) there's a good chance one did appear in something like this. The closest I've found is this one. The colour scheme and design are based on this Rebrickable design which cleverly incorporates a newer battery box into the colour scheme. The 12v motor limits the detail you can add to the bogies, but I can live with that. Sadly, I can't get Flickr to play ball tonight and insert images so here's a link to the photostream, specifically the first of 3 pics of the loco... Might be time for a different image hosting account...
-
[MOC] Richmond Triple Crossing / Modular Bridge
Andy Glascott replied to Electricsteam's topic in LEGO Train Tech
Success! Thanks @Phil B -
[MOC] Richmond Triple Crossing / Modular Bridge
Andy Glascott replied to Electricsteam's topic in LEGO Train Tech
Thanks @Murdoch17, will have a look in a moment Anyone else running into issues with Flickr? I've replaced the links in the post above a few times, tried different sizes, no avail... My photostream is here, the two images above are the first two in it. -
[MOC] Richmond Triple Crossing / Modular Bridge
Andy Glascott replied to Electricsteam's topic in LEGO Train Tech
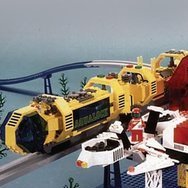
A couple of pics of recent RVALUG train events that @Electricsteam and I participated in - our annual club show and Ashland Train Day. We do a collaborative city/train layout each year at both and they are the two main events I haul my growing layout to. (Sorry it's taken a while to add them @zephyr1934.) @SD100 the long grey train is another member's, I haven't found pics of it anywhere else but it's based on the train in Snowpiercer. RVALUG - Brick Day 2025 - Club collaboration: Club layout (foreground) and my layout (background) at Ashland Train Day - [url=https://flic.kr/p/2r4Yaca]PXL_20250426_165733089[/url] by [url=https://www.flickr.com/photos/53631197@N04/]andyglascott[/url], on Flickr The day before Ashland Train Day this year our layouts were featured on local TV as part of the promotional stuff for the event, if anyone is interested here's the link - -
My layout has 2 transformers controlling it, one with 8 accessory switches connected, the other with 5. Both have lights connected to the end of the switch panel, the lights do flicker occasionally, most of my switches are approaching 40 years old and there are at least 2 varieties of signal switches in there. Loose connections do happen, over time the pins on the switches (like all the Lego pins) get compressed and need to be spread out again, so either could be the cause of flickering lights. If you look closely at a pin you'll see it has 4 segments, there needs to be a small gap between them and over time they get pushed together, particularly if your control panel flexes when you move it. I use a small penknife blade to gently push them apart - I find the width of the blade is enough widening. Gently push the sharp side of the blade into the pin from the round end, the blade will push the prongs of the pin apart just enough. It may also be worth using a voltage meter to check the output of your transformers, both to the track and to the accessories - I recently discovered one of my spare transformers only puts about 50% power to the track but full power to the accessories. Don't be alarmed if the reading shows a volt or two above 12 as well, all of mine were putting out 14v at full power.
-
My mind is my mind is already going to how to connect that new track piece to the barriers on a level crossing…
-
Tidying up/ hiding light cables (7867 etc.)
Andy Glascott replied to cozzie4d's topic in LEGO Train Tech
If your layout is on a dedicated surface, a wooden board for example, you could drill through the wood by the control panel, drop the wire down through the wood and bring it back up by the signal, switch or whatever it is going to. -
[MOC] Richmond Triple Crossing / Modular Bridge
Andy Glascott replied to Electricsteam's topic in LEGO Train Tech
Most of the trains in the pics @Electricsteam posted are by builders in the LUG he and I are in, as far as I know he and I are the only LUG members on here as well @zephyr1934. The green atomic “steam” loco belongs to electricsteam, the rest are other members of the LUG.