
davidzq
-
Posts
100 -
Joined
-
Last visited
Content Type
Profiles
Forums
Gallery
Everything posted by davidzq
-
What do you do when there's a part you need in a color that isn
davidzq replied to Beck's topic in LEGO Train Tech
Being a purist, my answer is to find a solution which does not require that piece. In your case, I would make the first plate on the windows a 2x2, and have the brick with knob moved in one stud. It would be in the interior of the train, and hidden, so could be any color. -
Bogies/Trucks with metal piping (Jacobs)...
davidzq replied to edsmith0075's topic in LEGO Train Tech
I bought some 1/8th inch O.D. aluminum tubing at a local hardware store. I don't recall the price, but it was cheap. I used a tubing cutter, and reamed the ends with a train axle. Cut the tubes to slightly longer than 4 studs, otherwise the wheels will scrape the side of the bogie and create drag. I also used the older 9V era wheels and axles, where the metal axle sticks through the wheel. I worried the RC/PF axles are too lose, and may pop off. -
Help with using a window pane as a ladder for high cube boxcar
davidzq replied to edsmith0075's topic in LEGO Train Tech
Oh, look at that, it was swoofty! http://www.brickshelf.com/cgi-bin/gallery.cgi?i=3562648 -
Help with using a window pane as a ladder for high cube boxcar
davidzq replied to edsmith0075's topic in LEGO Train Tech
I've seen these with the pane sitting on top, and a 1x1 plate with vertical clip next to it, to lock it in place. The clip was then used to hold some grab handles. Forget where I saw this, on someones daylight, I think. As far as Dr Spock's idea about the flex tube. It sorta works, but ends up too thick, I did something similar on my rescue. -
Unfortunately dark green is missing several essential parts. But when they become available, I WILL be upgrading! Although a blue/black/silver version did exist for a few years... Hmmm......I think you may have strayed into my Favorites from other builders.
-
Thank you, everyone! If anyone has any specific questions regarding design, I'd be happy to take photos. I'll also post this prototype from a couple years ago, showing the basic construction. Not much in terms of volume . And if I was, I'd be bankrupt. I estimate I've spent over $1800 on this project, through its 7 year life. The axles are a simple technic assembly, with the cars held in place by rubber band to allow expansion. Being European coaches, the low slung look was intentional. There's still plenty of clearance for switches and crossings. Absolutely! And NMRA helped me identify all the trouble spots, so I should be able to run it for hours! As far as building other trains......No, you don't have to go in hiding, or smash all your mocks in shame (Smug, I know..... ), I have no plans to build any more trains (Although a Brandt Power Unit is on my long list....eventually).
-
I wanted a good looking train! Also, not my video, but here's some proof that is does run well.
-
Go right ahead! I was only there Saturday and Sunday, and the train was hiding in the back of the yard most of the time. I did have it running for several hours on Sunday though.
-
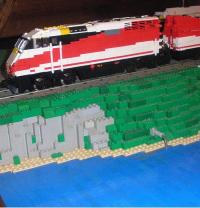
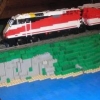
Hello everyone! I've been lurking this forum for years now, occasionally posting in help topics. I have to admit, I'm not much of a train builder (hence my lack of posts), but I finally realized a dream I've had for a very long time. Amtrak Cascades by David Hensley, on Flickr It all started about 7 years ago.....I am a Seattle resident, and see this train passing by regularly. It's always held a special place for me. I always wanted to have a nice long train, but financial trouble made that hard, which is what got me into Talgo. I started off by building a copy of James Mathis's wonderful rendition of the Cascades, although mine was red for lack of parts. I continually improved on this design, making it more and more realistic. I must of went through at least 6 versions. 3 years ago, having no access to my bricks due to a move, I turned to LDD and decided to once again revisit the train. This time I decided to spare no detail, and upgrade to 7 wide. A year later, I finally gained access to my bricks, and tested the design, but money still kept me from building. 2 years, and a great career later, I finally decided it was time, and here is the result! NMRA_2015_30 by Allen Smith, on Flickr. Not my photo, taken at NMRA 2015 More photos with detailed descriptions on Flickr. The model is 7 wide, and powered by 4 L motors (2 per locomotive). She runs well, and will negotiate standard curves and switches. Now, since I'm here talking about trains, hopefully you won't mind if I dig up something from awhile back. Nordco Rail Inspection truck.
-
The friction rings that come stock on the wheels are worthless, but easy to replace with a visit to any hardware store. http://railbricks.co...nctions-primer/ I will also second the fact that more weight means more traction, and therefore more pulling power.
-
powered bogies, vertical or horizontal? what is better?
davidzq replied to THERIZE's topic in LEGO Train Tech
No, the motor widens above, and the four technic pin holes on the bottom rest on the cheese slopes. There is some play, which allows the bogie to tilt a bit on uneven track, but the motor never goes anywhere. I also have some tiles on top of the bogie to help distribute the weight, but the pin holes on the cheese slopes will support the weight while still rotating freely, as long as the cheese slopes are securely connected. -
powered bogies, vertical or horizontal? what is better?
davidzq replied to THERIZE's topic in LEGO Train Tech
There are two ways to mount a motor vertically. The first of which is to have the motor fixed inside the locomotive. The second is to have the motor fixed to the bogie, and loosely inside the locomotive, allowing it to pivot with the bogie. The first option functions the same as a sideways mounted motor. The torque of the motor will make the bogie want to spin in one direction, and may cause derailment. The second option eliminates this problem, but makes it difficult to change gear ratios. On my recently completed Amtrak Cascades (Haven't taken photos yet), I used two L-Motors fixed vertically to the bogies. The collar of the motor sits in an octagonal hole (using cheese slopes), which allows it to spin freely, while still supporting the weight of the locomotive. Vertical L Motor Mount by David Hensley, on Flickr David Hensley. -
Help with Cheese Slopes for MOC 8 Wide Maersk
davidzq replied to edsmith0075's topic in LEGO Train Tech
It looks like you should be able to stick a 1x4 tile on the bracket, right below the 4x4 turntable. -
Help with Cheese Slopes for MOC 8 Wide Maersk
davidzq replied to edsmith0075's topic in LEGO Train Tech
If I understand correctly, you want to get rid of the three SNOTed plates between the vent tiles and the cheese slopes, or at least two of them (leaving one to hold the slopes). You can do this in two ways. First is the obvious; remove the two plates! You will need to replace headlight bricks with 1x1 bricks with stud (and vice versa), and move them one stud back to connect the middle 4 cheese slopes. The other option is to move the cheese slopes out by an additional half plate. Remove the two plates, and replace them with 1x1 bricks with stud (not SNOTed), allowing you to place another vent tile. -
Yes, except I would use the 1x2-1x2 brackets, so I could have some studs facing downward so the lower 2x4 tiles are upside down; no exposed antistuds (Though you can't see them from any normal viewing angle anyways!).
-
For the Union Pacific, I would have all the grills on a 2x10 plate. Behind this plate would be 1x2 - 1x2 brackets http://www.bricklink...em.asp?P=99781. Studs up on the top half of the 2x10, studs down on the lower. The 2x tiles above/below the grills would attach to these. Use a 2x3 plate to connect each side on the studs-up brackets, and connect this to the train with a jumper plate.
-
For flush, gap-less brick built doors, the best method is a mechanism that slides out, and then swings. I've used this technique in various forms on pretty much everything I've built. A good example of this can be found here:
-
Looks rather nice, and I like the scheme too. One way you could seamlessly attach the angled in sides is to use 1x2x1 panels snotted on their sides or 2x tiles (or larger). I used both of these on the rear of my F59PHI and F40ph.
-
[MOC] Spanish High Speed Train "AVE 112 class DUCK"
davidzq replied to Aitoruco's topic in LEGO Train Tech
Alright, but do you have any photos showing how they work? I am always looking for inspiration to improve my own designs. -
[MOC] Spanish High Speed Train "AVE 112 class DUCK"
davidzq replied to Aitoruco's topic in LEGO Train Tech
Hello, I am a talgo builder myself and I was wondering if you had any photos of the way you attached the bogies. You say it only works on smooth curves, so I'm assuming you dont have a mechanism to allow the cars to seperate for clearance, while keeping the wheels parrallel to the track. Perhaps the work of James Mathis http://www.brickshel...lery.cgi?f=2267 or myself v1:http://www.flickr.co...157626410047262 v2: http://www.flickr.co...157631793237402 could help. -
As far as handrails, clip verticle combined with 3mm rigid hose should do nicely (though it can be somewhat pricey in white). For doors, a technique I've been over-using for several months now is to attach the doors to clips, with the clips attached to tiles, allowing them to slide out. Basicly, the door pulls out a stud, and then rotates. Example:
-
LDD 4.2.5 Bugs
davidzq replied to Zerobricks's topic in Digital LEGO: Tools, Techniques, and Projects
Every time I put a 1x1 brick with studs on side (1 stud, 2 stud, and 4 stud) into a 1x1 brick with technic hole (which it allowes me to do) but then try to move them, LDD crashes on me. Which is unfortunate because I need to do this quite often! EDIT: oops, someone beat me to it on page 5, but only mentioned the 4 studs one.