
LL1982
-
Posts
200 -
Joined
-
Last visited
2 Followers

About LL1982

-
Thank you both. Since I cannot print stickers myself I figured I might as well spend a bit more.
-
 Great to see so many versions. Good improvement from the first more classic lego like version to now.
 -
Wow impressive work and love those slopes and little details. It looks really great, just watched the movie.
-
Printed bricks and last parts for the boogies came in just before the heatwave struck so I had some time today to update the locomotive. Did some test drives with the new boogies and they hold well. Indeed the 5L axle did not work well at the motor as Thomas predicted, not enough hold. Again thanks for all the feedback, much appreciated, it helped me a lot. More shots/movies on IG and flickr.
-
Thanks Thomas, yeah the new version is thanks to feedback indeed better. Ok will check with the axles. Trimming 34yr old lego pieces feels like heresy 🤣 but it is an option. My printed bricks are in the mail also so I hope to soon post an update with full set of boogies and those.
-
I prefer my classic figures with a classic head, but I can see if my daughter has one of the modern faces that i can swap it out with for you ;) Thanks, hope the 5L axle improves it even a bit more by reducing width again by a couple of mm.
-
Thank you all. I also learned we now have 5L axles, so ordered some of those that would help the boogies fall even more under the main body. Parts are ordered to make two complete boogies. And it gives more space in the area between the boogies to put some details in.
-
Thanks, the hose may be an idea indeed, but I think I found a solution, will upload photos. The ingots are a test that worked out. The official grills looked wrong to me and at the hub I cannot fully cover it as they do not make 3 or 4 high brackets. The 1x1 window is a small window which is in one of the two access doors. There is one on the side, with the 1x1 window. The second door is opposite diagonally and gives access to the side board of the train on the left side of the train. Inside are two chairs, one for forward driving on the right, one for backwards driving on the left, if I am correct. Thank you for all the input, really helpful and it got my mind working on different solutions. Concerning the boogies (or trucks) I found a possible solution in using some old skool flag poles (no clue how you call them, I used them on the pirate flags) and some bits and pieces I had lying around from the hobby train. I did not have enough parts for two boogies, but I got a concept down. Need to do a driving test to see how it responds, but it feels solid. It looks better compared to my previous version, at least to me. @idlemarvel @Selander @Ts__ thanks for the feedback there. @Ts__ mentioned the black headlights being to high which i agree on so i found a relative quick fix, though i need to order a new bracket piece that still allows lights in the headlights but putting it lower.
-
I know, I am trying to use up a big part of a room at home. But those big curves take so much space. That I am still at r56 max. It is that I need the floor space for all my part bins and I have the track on the table but it feels more efficient to simply have it on the floor just like in the 80s 🤣
-
Bricklink Designer Program Trains Sets | 2024 & Beyond
LL1982 replied to RedBrick1's topic in LEGO Train Tech
It looks wide enough maybe he tested it and the skirting stays outside the rails though track ballast may be an issue then? Based on the look this feels more like a monorail type of train. Or maybe on that rollercoaster track. I love classic space so it is a set I will keep my eye on. But part wise it's gonna cost a fair penny. -
Thanks for the honest feedback. I have to say the black never caught my eye, but now I cannot unsee it 😂. I already have an idea to move that back further down.
-
Thanks. I will give it a try tonight and try to post a wip if I achieve something. Thanks
-
That is also the part i do not fully like when looking at the original. Right now that grey is part of the structure of the trucks, its a 12 stud plate and then tiles on it. It holds the details that hide the wheels. I have used clips and to those i connected the plates. I also tried that in black but it looked awful, DBG was much better in my opinion in this version. I would rather have clips and then a black bar (but they are not 12 studs long) that is then underneath the main body to go from end to end and then add details to that bar. That would look better I think. But I have not figured that out yet. The lego motor has no connection points in the middle which makes it harder to detail for me at least. Do you have any suggestions? The ingots I am also happy about. The normal grills would not work here, and the only one that would, would be the 2x1 sloped grill, but that would not fit in the profile. I had a whole bunch of these and they felt like a good fit. Thank you. Yeah the windows are left overs from bygone era's and I wanted to really use these on this older locomotive.
-
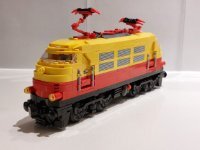
My take on the NS2205 diesel-electric locomotive. They have been issued in 1955 and in use until 1985 I believe and then some years in service here and there but all retired around 2000. It was issued in brown and yellow/grey. Though I would prefer brown as a challenge, I seriously lack those parts and I went for what i had on stock. There is also a different locomotive from the same era that I may want to build in the future in similar brown livery. I've been busy with this one for some weeks on and off. Waiting for parts, changing concepts, changing my mind again and do it else. I build it 7wide to get a bit more detail in it but still make it manageable on our R40 layout and not become too big compared to the standard sets. I used a dimensioned drawing online to scale it, though the height is a bit adjusted for the hub and then as consequence the cab is also a plate or two higher. The PU HUB is a separate block in the engine that can be taken off, I added a push button to activate it and the front section has a technic brick with a transparant 1x1round so I can its status. Nice that the locomotive had a top front light also. The trucks were a bit of a challange in 7wide and then not using the lego side panels for the motor. In the end I found a design of Ties (open-l-guage) that I modified to fit my train. Though the original locomotive that tracks are all black or browned by rust and dirt, but I found it looked better with a DBG trim and black details / underside. I am sill not happy but for it works until I figure out a better way. I still need to find some replacement parts to get the right colour for my hinges and I want to put the logo and id number on it. The original: There are some more shots on my flickr page and my IG also has the in progress shots: https://www.flickr.com/photos/201059867@N08/
-
Wow that digital image looks great, seriously big layout.