
Ferro-Friki
-
Posts
81 -
Joined
-
Last visited
4 Followers


About Ferro-Friki

-
 I love this shade of blue, it’s very refreshing for such a popular engine. The vinyl lettering looks amazing! Just a number 1 would have been a pity. I’m looking forward to seeing it with medium azure wheels. That and side rods will make the engine even better.
 -
What a gorgeous engine. I love a locomotive with plenty of texture and detail, and you certainly did her justice! I still can’t get over how good the bogies look… The stack of sideways plates with clips next to the Medway logo are a ladder or another grill? Are the bogie pivots between the first and second axels? In that case, how well do the inner axels take the curves? I guess all those grills made it impossible to apply the yellow arrows on the black background design Medway uses for its other engines. I think I like the “Pikachu” livery better. But not as much as the original CP orange. Still, anything is better than the boring dusty beige Medway uses for their Stadler Euro 6000 in Spain.
-
Ferro-Friki changed their profile photo
-
Impressive MOC! These modern rounded trains are not easy to make out of Lego… Great job sculpting the nose, the green hose around the windshield looks fantastic. I was asking myself the same thing! Working with half-plate measurements is a pain, but so worth it for accuracy. Besides brackets I find panels on their side to be very useful. Also, I love all the texture on the roof, it looks amazing. It’s hard getting good reference pictures for that.
-
Oh wow, that’s a lot of batteries to change / recharge I think I’ve said everything there was to say about my S-251, at least for now. I’m more than okay with this topic becoming about 3-bogie engines in general. That would probably be the best approach for a symmetrical engine, as opposed to steam locomotives. Good luck with that! The vacant lot close to my home has been taken over by cats, and the smell is NOT pleasant… That’s perfect then, since the PF motors only have that much free space to move side to side. Your approach is absolutely impressive! I’ve never seen anything like it on a Lego train. I should have expected as much from the same person who cracked the code for close-coupling Talgo rodales. Thank you for sharing! :) I think your design is very much applicable for my S-251. It would need to be redesign from the ground up around it, but I think it’s doable. The levers would have to sit as low as possible but not too low so as to interfere with the cosmetic underframe details. The PF motors currently have plenty of free space above. The battery box might be more troublesome, since it already sits as far up as it can go. Currently I have other trains in mind, but I don’t rule out revisiting “La Reina” in the future. And this kind of lever-linkage mechanism is giving me ideas for other aplications…
-
That’s really good outside the box thinking. I hadn’t thought of tackling the middle bogie from the other two. I’ll take note. Was the weight of the driver wheels assembly not enough to keep it always on the rails? How well do the engines run in reverse? That’s a very nice looking locomotive! I used to think that B’B’B’ engines were far less common in Europe than they actually are. I imagine it’s powered with a third-party battery box, right? Since a PU train hub only has two ports.
-
True, it’s probably its best application. I suppose at least the four opposite straight sections, possibly more. It’s not something I’ve thought about. According to Holger Matthes' page and the Railbricks magazine it takes 92 straight track pieces to make a full circle. Although in my experience, the curve is very flexible, so you can make it smaller or larger. Thanks! :) You mean the side bogies would also need to slide side to side? My S-251 has 2 studs thick walls for the SNOT grills, so it has even less space inside :/ When you put it like that how could I possibly refuse? hahaha What do you have in mind? I'm interested. Cool! What prototype is it based on? Were you able to motorize the middle bogie?
-
Thanks! I'd rather not think about that... I’m still hang up on that actually. This is how far the current middle bogie pivot would have to slide out in order to navigate R40 curves. If I could reduce the same blue fold on the bottom that you mentioned to just 1 tile thick, and the sliding pivot to be 1 stud wide somehow, it could work. I’ve been thinking that R56 curves are a bit pointless. If a model can’t run on R40 and you have to buy larger radii, you might as well get the R104+ curves, which look far better, allow for more straight-forward couplers, and higher speeds. R56 has none of that, nor the universality of R40. Right now I want to make other trains, but I might look into making the S-251 R40 compatible in the future. BONUS: here's La Reina in motion :) I wish the video had better quality, but this is the best my potato phone could do :/ Turns out that this engine can be motorized with a PU city hub and just one PU L motor (there’s no way for a second motor’s cable to reach the hub port), unlike what I first thought. Still, my intended 2 PF L motors and Buwizz 2.0 setup would be far better. And yes, I’m a big fan of Holger Matthes’ brick-built large radius curve design.
-
Thanks guys! :) I did try some more complicated designs, but they didn't work as well. In the end, the more simple and straight-forward, the better. 1 x 6 bricks with channels would work better, but I don't think they'll be coming up with that piece anytime soon. Don't worry, no atoms were split in the making of this train, just some transparent bars and ribbed hoses I tried to do her justice, this is a very beloved engine in Spain
-
[Revised MOC] DSB Litra EA (8-wide electric locomotive)
Ferro-Friki replied to dtomsen's topic in LEGO Train Tech
Amazing model! Very well captured. I really like the details on the roof and the undercarriage, it’s very hard to get good reference pictures of those. I’m happy she got to meet the remaining EA in Denmark. It’s always special when you can get the MOC and real engine together. Where did you get the decals? They look high quality. -
Hey, these all look pretty good. I understand you don't like round streamlined trains? Now that you mention it, I don't really like the ICE3 that much either. It’s objectively one of the best AVE trains we have here, but it’s just not interesting to me. Of course, you and anyone. It’s not patented or anything
-
Thank you! I don’t think anyone has called one of my trains a piece of art before :) Be careful! If other Spanish train nerds heard you they might come after you!
-
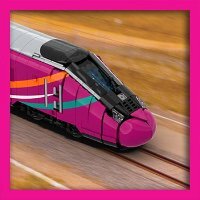
Hello everyone! I have another MOC I’d like to share here, the 251-004. After the success of the S-269 (“La Japonesa”) in Spain, RENFE ordered Mitsubishi an advanced, more powerful version of the engine. Which turned out to be the S-251. As such, both locomotives share a lot of similarities, most noticeably, an almost identical bogie design. Although as you can probably tell, the S-251 has 3 bogies instead of the S-269’s 2. This earned the S-251 the nickname “Japonesa y media” (Japanese and a half). You might even notice the similarities with JNR’s Class EF66 locomotives, very closely related to the Series 251. (Photo by Javier López Ortega on Flickr) Despite being very capable of providing passenger services, the S-251’s power was better suited for pulling freight. Since the beginning of their work life, they were employed in the treacherous mountain pass of Pajares, between Asturias and León. Unfortunately, since the opening of the new Pajares tunnel, the reign of the S-251 in the mountain pass is not what it used to be anymore. They can still be seen running around the region, as well as pulling containers and other cargo between Barcelona and Zaragoza. In an effort to homogenize the corporate image, since the late 80s, RENFE applied a new livery to all of its locomotives. With yellow cabs and grey bodies, the age of the taxi livery begun. It lasted until 2005, when RENFE was split into two public entities, ADIF, for infrastructure operation, and Renfe Operadora, for train operation. Accordingly, a new locomotive livery followed. Very similar to the taxi one but replacing the yellow for white (borrowed from the AVE) with a magenta stripe, the new company colors. With the recent introduction of the S-256 (Stadler Euro 6000) into its fleet, Renfe revealed a completely new livery out of nowhere. Bravely embracing the striking magenta color with broad diagonal white stripes, I really thought all locomotives would adopt this scheme. Years later, all engines apart from the 256s have kept the boring old 2005 livery, and it doesn’t seem like that will change anytime soon. Maybe one day... I really think it suits the S-251. The 251-004 is the only engine of its kind to preserve the original blue and yellow livery. This is due to a successful effort by the Railway Friends Associations of Gijón and Madrid, and Renfe employees. This earned her the title of “La Reina” (The Queen). My MOC of the 251-004 has 12 M size wheels and a 9V style magnet from HA Bricks. It is designed to be powered by two PF L motors and a BuWizz battery box. It’s a bit cramped on the inside, so it can’t fit LEGO battery boxes since they’d be too tall. The challenge with this engine was creating a functional middle bogie. Not only does it need to pivot, but also slide side to side. After many overengineered failed attempts, a very simple combination of two 1 x 4 bricks with channel and an upside-down 2 x 2 tile with technic pin connected to two 1 x 2 plates with door rails did the trick. This also allows the middle bogie (unpowered) to move slightly up and down, which ensures that the other two bogies will always be on the rails when running on uneven track. Unfortunately, the locomotive can’t navigate R40 curves, and it’s restricted to R56 or higher. Some of the part choices and techniques I’m particularly proud of in this MOC are the windshield assemblies, a technique similar to many amazing diesel-electric locomotive MOCs I’ve seen out there, the blue sword spikes at the fronts, the boomerangs as the number plate nose fixture, the blue claw pieces as the windshield visors, or the SNOT side grills, which although not too complex, took a few attempts to get right. It also has some silver TrimLine tape to recreate the iconic steel “whiskers” and custom stickers.
-
That’s true, although they are by no means bad. Still, when I’m sourcing bricks for a MOC and Bricklink tells me I need to order from 8 different shops, each with its own shipping fee… Reducing it to just 2 Bricklink orders and a Webrick order really makes up for the small quality difference. I’ve never seen these before. And Webrick sells them? Are the side studs sturdy and well aligned? I’ll play around with them, they look useful. @LEGO Train 12 Volts, @Shiva, @zephyr1934 Thanks! :) Yup, it’s a 3 bogie B’B’B’ engine. They were a lot more common in Asia, but there’s a few of them in Europe. Nowadays manufacturers prefer Co’Co’ configurations. Middle bogies can be troublesome. Thanks, but I’m happy with my current bufferbeam solution. It works for me, and I like seeing a prominent hook on one of them. Oh, the S-251 never double-heads trains. She’s way too power hungry. Two of them can easily shut down an electrical substation. At most you can occasionally see a broken down 251 being towed by another.
-
Thank you! The colors really invoke a warm sunset as you wind down for a good night of sleep onboard. I don’t rule out building matching coaches in the future. I was able to post links from mostly other places, but two of the pictures are from Flickr with lower quality… She is not beating the shoebox allegations Well, I have good news for you then, because this engine has a sequel! The S-251. Here’s the bogie with the magnet. It has a wide range of movement and is R40-proof. That’s a good solution for European couplers, the chain is certainly closer to the real thing, and the idea of working buffers is very intriguing. However, the magnets are the most versatile and convenient solution in my experience. They couple automatically, you can decouple them without even touching them just by pulling on the coaches, and are compatible with pretty much any Lego train, official or custom, ever made. Even if they are slightly toyish. Thank you! :) They're the reflective tail signal holders, in case the engine has to be towed. I got them from Webrick. They have many pieces in colors Lego has never produced. I get many of my bricks from them, I've never been much of a purist.
-
[BDP-9] The Solar Express: The Tilting Train
Ferro-Friki replied to damangos's topic in LEGO Train Tech
It looks great! It’s based on the Azuma trains, right? I really like the narrower windows of the restaurant car, I always like when the inside purposes of the coaches manifest on the outside like that. I’m really curious about the tilting mechanism. I attempted building a tilting train a long time ago and it wasn’t easy. I tried using gears too, but the teeth didn’t align right and it caused the coaches to always lean slightly to one side, even on straight track. Balance is also very important, especially with the battery box. I understand you put yours above the motor? You might get better results fitting it in between the bogies, bellow the floor level of the train. It looks like there’s space for it in there, although it would get in the way of the interior. The closer you get the center of gravity to the tilting axle of rotation the better it will behave. Otherwise if the train heads into a curve too quickly, the additional effort the bogies would take to tilt the body of the engine might make it derail.