
CheungsLegoCreation
-
Posts
30 -
Joined
-
Last visited
Content Type
Profiles
Forums
Gallery
Everything posted by CheungsLegoCreation
-
 Thanks Heppu. Basically I used the Powered Up App to setup the control. The legs and shoulder movements are all connected to one hub and the arms are done using another hub. Buttons are used for controlling movements (front, back, left and right), vertical sliders are used to raising the shoulder and arms, buttons are used for opening and closing the hands. I mainly used the mindstorms hub for prototyping and then convert the design into one using the control+ hubs. Obviously the main disadvantage of this approach is I need to factor in the weight of the batteries and sometimes it would require redesign (in this case I need to increase the width of the feet to make it tilt less as it walks otherwise it could flip sideway). I am working on a mech that hopefully will use a single hub (4 ports) and yet will perform pretty much similar actions (to a certain degee) but it will take at least a few weeks though. Programming using Pybrick could be easier (which I have not tried) and I am not sure if I can connect to 2 hubs at the same time using the web programming interface. I guess I will just have to try and see what happens. Happy building!
 -
Hi all, Long time no post ;) And here's my latest powered up based mech, utilising 2 technic hubs and 8 motors. 3 motors are used for walking and turning, 1 motor is for raising the arms and moving the antenna, the rest of the motors are for arms movement. Compare to my previous bot, this bot features wider feet, allowing the mech to walk with less body tilt. I hope you will enjoy watching the video. If you have any question about it ask away :) Take care and happy building. Cheung :)
-
Thanks 2GodBDGlory. I love the fact that Control+ allows me to send commands to multiple hubs at the same time, unlike the 51515. But the weight of the battery is definitely a factor in limiting the number of hubs I can use (the bot may not be able to move if carrying too many battery boxes), I guess that's where the 51515 hub is better due to the lighter weight of the battery. I will definitely try to add another battery box (an another 4 motors) to it, let's hope the bot can hold up. Happy building!
-
Hi all, I would like to introduce you to my latest biped based on the Powered Up platform. Here's a copy and pasted quick introduction - Introducing Bot 7 - My 7th generation LEGO Powered Up humanoid biped. The bot is built with 8 Technic Large motors. Bot 7 has 6 DOF for leg movement and 2 motors for shoulder joint and arm movement. The bot has been programmed using the Powered Up app. Battery boxes have been placed on the side of the bot to improve body tilting for movement and provide stability when the bot perform a hip + knee tilt. This bot features - * Large step size continuous movement (forward, backward, left and right turn) * 360 degrees shoulder movement * 270 degrees arm movement * Incredible hip + knee tilt without touching the ground * a highly recognisable t-shirt 7 :) Comments are welcome, happy building! /cheung
-
Thanks Jim. I am interested in seeing what I can come up with for the next iteration too :). It may be possible to use those smaller motors (those that look like a cube) to make the bot smaller but I am not too eager to spend $$$ on them given those motors are likely to have less torque then the current motors. /cheung
-
@oracid Thanks for the link to the code. It is impressive such a small amount of code can do that much :)
-
Amazing work. Well done!
-
Hi all, It's me again with yet another iteration of my new biped (generation 6, that's why it's called Bot 6). This time the bot is built using 2 separate hubs communicated via the hub to hub block. It is a challenge to create a set of legs that can drive under high load and that's why this guy moves slower than Bot 5 (which uses only a single hub). Shock absorbers are also added to each leg and a leg separator (a 7 unit beam) has been inserted to prevent the feet from rubbing against each other. Hopefully I will be able to come up with a better movement mechanism in the next iteration. Enjoy the video and happy building! /cheung
-
This looks really cool and the line follower is definitely very quick. How much programming is needed to get this going?
-
Hi all, Long time no post. Hope you have all been well. This is my 5th generation bot Bot 5 featuring a variable step distance of 2, 4 and 6 units. This is almost similar to Bot 3 I built a couple of months ago except for a much more stable body tilt mechanism. The step size can also change during movement. Although it moves slower than Bot 3, the movement design should allow it to handle more load (I am planning to attach yet another hub on the bot and use the new hub to drive more motors / sensor - will just have to see how it goes). As always, feedbacks are welcome and HAPPY BUILDING! Regards, Cheung 8)
-
Thanks Gimmick. This is a work in progress and I am hoping the next change would allow it to pick up "golf ball" by doing object detection. It could take a few months to do it though since I am new to python and there are still lots for me to learn. Hi Philipp_83, my code is very messy at the moment and it's probably not in its best form for sharing. That being said my code was based on information from https://mobile.twitter.com/biglesp/status/1260872904771854336 It contains an example on how to use pyserial to connect to the technic hub from RPi.
-
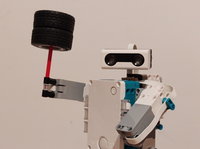
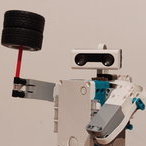
Hi all, I did some small updates to my bot over the past few weeks and the video below shows how the bot is looking now - [media] The bot's height has increased and I have added a extendable grabber and a tiltable camera. Hopefully in a few weeks time I will be able add object detection / tracking to it. Take care and happy building! /cheung
-
Hi all, I am happy to introduce my first version of RPi 4 based mindstorms bot. The bot consists of a Rpi4b, Rpi4b camera, Rpi BuildHat, RPi SenseHat and a Mindstorms 51515 hub. The buildhat is mainly used as an interface to supply power to the Pi (2 x 18650) and is NOT used for driving the motors due to issues with its Python API. The pi runs a python based web server and exposes a web interface. This interface shows a live stream view of the camera and can be used to drive the bot. The SenseHat at the front displays message entered through the text control. When a key is pressed on the web interface, a http request is sent to the web server and perform the corresponding action. Commands are sent to the Mindstorms hub using PySerial via the hub's REPL interface. Future improvement include a nicer web interface (the one shown in the video is essentially a quick hack). A tilt-able camera head and a hand to pick stuff up. The current setup I have would allow me to connect up to 10 motors / LPF2 devices. Questions / comments are welcome!
-
Thanks. Strange enough the torso-arm distance doesn't seem to make any difference because the bot is centre heavy (torso is 2XL motors + 2 hubs with 12AAs). I think the tilt would work better if the linear actuators on the foot are placed near the outer edge of the feet. With the heavy body the stride length has to be reduced to 5 units instead of 7 units my earlier version could do (as the gears connecting to the XL motors starts to slip due to the weight - that is, it could lift the body using a single motor).
-
Hi Jos, Thanks for your feedback. Initially I tried tilting both feet at the same time but the weight of the bot doesn't really allow it to be tilted as the torso is too heavy (12AA + 6 motors). Perhaps I could also remove the foot tilt of the non standing foot once the bot has been tilted too. Time to try it out 🙂
-
Hi all, I am glad to share with you my latest Control+ biped Bot 4. This is based on Bot 3 but instead of using the 51515 hub Bot 4 uses 2 technic hubs and 8 motors in total (4L and 4XL motors). The tilt sequence may look a bit strange but it is mainly due to the weight of the 12AA batteries. Anyway, just in case you want to see the video, you can find it here - Bot 4 - A Control+ Mech Looking forward for your feedback :) /cheung 8)
-
Hi all, I am starting a new thread here to document and report my process of building a new bot based on the Raspberry Pi BuildHat. Comments and suggestions are all welcome. At the moment my bot is build with the following H/W - RPi 4b Buildhat Sensehat (for displaying a face and doing other measurements) A Rpi camera Raspberry Pi OS (debian buster, finished configuring the python libs for the hats and added remote access so I can deploy new python code to it) At the moment the bot can only tilt its head up and down, but in the next few days I will start adding tank tread for movement and a front grabber. Just in case you are interested in see what it looks like, here are some pics - Bot with camera, build hat and sense hat Bot with camera, buildhat and sensehat (side view) Looking forward to hear your feedback / comments. Have a good weekend! /cheung 8)
-
@Toastie and @Lok24 - I will certain start a new thread on my adventure with the build hat. And thanks to suggestion from @Tcm0 I will once again check out the python libs for connecting to the 4 port control+ hubs as well ( I couldn't figure out how I could miss those libraries, perhaps I will have to start learn to use a search engine properly again =P) Have a good weekend everyone!
-
Hi Thorsten, My intention of using the Raspberry Pi + the Build Hat is to make a smallish autonomous robot that would run around my house and do different things. 4 motor connections from the build hat should be enough for now (if not I will look into connecting the RI5 hub using bluetooth to control more motors / sensors) and the RPi will be used as the primary "brain" to drive things around. My first task is going to be hooking up a camera and train the Pi to do object recognition (so that later on I can play fetch with the bot as it can then use the build hat to drive the bot to pick up the object and return it to me :)). It is probably going to take a few months but that's part of the fun I suppose :) /cheung 8)
-
For those of you having the same issues as I had, it turned out the BuildHat doesn't support the latest version of Raspberry OS (bulleyes). To get the buildhat to run you have to use 2021-05-07-raspios-buster-armhf.zip, and then do a sudo pip3 install buildhat Hope this will help someone out there using the BuildHat, good luck!
-
I am starting to experiment with the Raspberry Pi Lego Build HAT now and so far things are looking good (apart from the need for using an older version of the RpiOS) and I am enjoying the python based coding experience so far. The build hat only has 4 ports which means I can only hook up 4 motors, but with a bit of clever gear switching I should be able to create quite a bit of useful actions :)
-
Hi all, My build hat arrived today and I am just testing it now but is already facing some strange issues. The moment I plugged in the a motor to any of the port the motor will start to spin like crazy. The only way you can stop it appears to be to write a python program and issue a stop command.Is anyone facing similar issue? Thanks for your help in advance. :(
-
Thanks ord, I did use the PowererUp App to program another biped (for more details, refer to the video https://youtu.be/4cuJaQPoVP4, it was controlling 2 hubs) but the programming experience for me has been painful (I do programming for living). I think during one of the LEGO fan session some rep from LEGO was saying a new powered up app will be coming later this year and all the sensors will be supported (and potentially find a way to store the program into the brick without using a smart device to send commands through, therefore should provide better performance). But let's wait and see. Thanks Lok, I will definitely check out the beta version of pybricks :)
-
Yes, you are correct Lok24, with Control+, I meant using the Technic Hub (with 4 ports). The main reason why I switched to the Mindstorms hub was because it would be faster for me to test the build without having to go through all the PoweredUp App drag and drop programming :( There are quite a bit of challenges using 2 technic hubs, with the weight of the battery being the main issue (which means I have to strengthen the tilt and move mechanism). I also checked out Pybricks as well but I am not sure if it would offer remote control based functions (I want to be able to control the bot using a remote) and at the same time pressing a button to allow it to perform some "autonomous function" (like the object scan and move to the closest object sequence). Perhaps it's time for me to dig deeper into Pybricks documentation :) Thanks for your feedback!
-
Does anyone know if the multiple build HATs can be stacked together? I saw a discussion on the RPI4 Build Hat page but there isn't a clear conclusion on this subject (apart from saying refer to the communication interface spec) :(