
Pybricks
-
Posts
81 -
Joined
-
Last visited
Content Type
Profiles
Forums
Gallery
Everything posted by Pybricks
-

Pybricks Q&A
Pybricks replied to Pybricks's topic in LEGO Technic, Mindstorms, Model Team and Scale Modeling
For installation on the Prime Hub and Inventor Hub, please see this page. Please note that Pybricks for those hubs is still in beta at this time, so not everything will work yet. The main issue is that the City Hub, Move Hub, and Technic Hub do not have dedicated storage space for this kind of thing. Viewing this problem from another angle, perhaps you can make a program that doesn't turn the hub off when you press the button. It would be interesting to investigate how long the batteries will last in this case. -
Pybricks Q&A
Pybricks replied to Pybricks's topic in LEGO Technic, Mindstorms, Model Team and Scale Modeling
You can save almost any amount of data in a program by including it when you install the firmware. For example, if you install a program with: data = 5 Then you can import it when you run a new program: from main import data -
Pybricks Q&A
Pybricks replied to Pybricks's topic in LEGO Technic, Mindstorms, Model Team and Scale Modeling
Have you tried setting the name via the settings menu when you install the firmware? Which use case cannot be achieved in this way? -
Pybricks Q&A
Pybricks replied to Pybricks's topic in LEGO Technic, Mindstorms, Model Team and Scale Modeling
Yes, it's already working: But just like for SPIKE Prime and MINDSTORMS Robot Inventor, the main thing missing is the easy installation via our web app. These hubs can only be updated via USB, and we don't have USB support in our app yet. But everything else is pretty similar to the other hubs, so that's why most things (sensors, motors, lights, etc.) are working already. -
Pybricks Q&A
Pybricks replied to Pybricks's topic in LEGO Technic, Mindstorms, Model Team and Scale Modeling
They are the same. One is just an alias for the other. You can read about that here. -
[WIP] Mindstorms 51515 Plotter
Pybricks replied to ord's topic in LEGO Technic, Mindstorms, Model Team and Scale Modeling
That is true. It sounds like we need to add a method where you can specify both target angles, while the robot will figure out the speeds such that they arrive at the same time. I'll add it to our wishlist! -
[WIP] Mindstorms 51515 Plotter
Pybricks replied to ord's topic in LEGO Technic, Mindstorms, Model Team and Scale Modeling
That is fine. When you increase acceleration to infinity, it just tries to get to the target speed right away. That's a bit closer to PF 1.0: turning on full power right away. But you might want to try the track_target function. It skips the acceleration phase entirely. Then you can make both motors follow your own angle as a function of time. That also ensures they synchronize. -
Glad to hear the update works with the latest version! Thanks for reporting the motor issue as well. I can reproduce the problem and we will fix it soon. In the mean time, it should already work if you plug in the motor before you turn the hub on.
-
Thanks for reporting this! Could you give it a try via https://beta.pybricks.com/ ? This already contains quite a few fixes for Bluetooth connectivity. These should eventually come to the stable release as well.
-
Pybricks Q&A
Pybricks replied to Pybricks's topic in LEGO Technic, Mindstorms, Model Team and Scale Modeling
At the most basic level, you'll be able to send data using something like hub1_connection.write(data) on one hub, and do data = hub2_connection.read() on the other end to read it. In this case, hub1_connection and hub2_connection are connection objects you could make at the start of your program. We're still working on making this as easy and efficient as possible. The data is a sequence of bytes, such as bytes([1, 2, 3]) or b"Hello, world!". There will also be libraries to convert other data (like sensor values) to bytes and back again. We might add high-level APIs later like we did for the EV3, but we'd like to start with the basics first. This could certainly be used for a physical remote built from Powered Up components. Thanks for your question. Looking forward to see what you'll make :) -
[WIP] Mindstorms 51515 Plotter
Pybricks replied to ord's topic in LEGO Technic, Mindstorms, Model Team and Scale Modeling
Glad to hear the speed parameter helped a lot. That might be the best for now. Another thing to keep in mind is that both the program and all your variables share the same memory. This is especially tricky if you have one giant list, as you have found. This will no longer be an issue once the file system is enabled. Then you can read coordinates from a file, one at a time instead of loading the whole file at once. -
Pybricks Q&A
Pybricks replied to Pybricks's topic in LEGO Technic, Mindstorms, Model Team and Scale Modeling
Not yet, but it will be possible to communicate between all hubs in the future. We had to make a lot of progress on Bluetooth for the Powered Up Remote, and most of that will be useful when we add hub-to-hub communication later. However, this will have to wait until version V3.3. First we are planning to release V3.1 and V3.2. -
[WIP] Mindstorms 51515 Plotter
Pybricks replied to ord's topic in LEGO Technic, Mindstorms, Model Team and Scale Modeling
There's also this internal Hub API you can use within the official app. -
[WIP] Mindstorms 51515 Plotter
Pybricks replied to ord's topic in LEGO Technic, Mindstorms, Model Team and Scale Modeling
Thanks for sharing that. That is quite good already --- I was indeed curious about whether you used floats or not. Since speed is mostly constant, maybe it's worth removing it as a function argument. You could leave it constant altogether or use a global variable. And then you might be able to drop the program() function as well, so you're just left with a sequence of move/head calls. Scripts are compiled to MPY format and then sent to the hub. It might be possible to optimize more by storing the data differently or even compressing it, but this is probably not worth the effort. We better get that file system going! -
Pybricks Q&A
Pybricks replied to Pybricks's topic in LEGO Technic, Mindstorms, Model Team and Scale Modeling
That's right. Use LEFT_MINUS or LEFT_PLUS, and so on for the Powered Up Remote. We chose these names because they still work if you rotate the buttons. The other buttons you mention are used for other devices, like the EV3 (up, down, etc.) and the EV3 IR Remote. And you're also right about connecting to any remote. Feel free to open an issue for specifying the name/address. We tend to prioritize the most popular features. That is why the Powered Up remote was added. A ton of people gave that one a thumbs up :) -
[WIP] Mindstorms 51515 Plotter
Pybricks replied to ord's topic in LEGO Technic, Mindstorms, Model Team and Scale Modeling
Wow! We're impressed by what you've made (again!) Glad to hear you found the Pybricks motor features useful. And indeed, we still have to enable file system access. Then you can make drawings up to 30 MB. I don't think we've ever tried this. Thanks for testing these edge cases :) For now, maybe it's already possible to do larger images by storing the image data in a different way. How do you currently do it? -
Pybricks Q&A
Pybricks replied to Pybricks's topic in LEGO Technic, Mindstorms, Model Team and Scale Modeling
To check that a button is released, just check that it is not pressed . -
Pybricks Q&A
Pybricks replied to Pybricks's topic in LEGO Technic, Mindstorms, Model Team and Scale Modeling
Sounds good! We recently switched to a new code editor within our app, which should make code autocompletion possible in the future. Reading which buttons on the remote are released is already possible, and reconnecting too. Let us know if we should add a particular example. We're keeping a changelog ever since the stable 3.0 release. To suggest new features, it is strongly encouraged to post something here so we don't forget about it. -
Pybricks Q&A
Pybricks replied to Pybricks's topic in LEGO Technic, Mindstorms, Model Team and Scale Modeling
It's not impossible in a technical sense; we just haven't made a Visual Studio Code extension (yet). The same applies for multi-file projects like @Lok24 suggests. It's all a matter of priorities and focusing on the most-requested features. It's open source and we welcome volunteers to help us make all that happen. Sponsoring is possible too and greatly appreciated. -
Pybricks Q&A
Pybricks replied to Pybricks's topic in LEGO Technic, Mindstorms, Model Team and Scale Modeling
@Mr Jos: @Lok24 is using Powered Up Hubs using our online editor. All of the newer hubs use this. These hubs are much less powerful than EV3, so they can support only one script at the time. There is no Visual Studio Code support at this time. You can change this setting in your browser, so it will ask where to save the file and choose a name. Instead of putting everything in Downloads. Also quite useful in general. Powered Up hubs have limited storage and processing power, so you can have only one main script, without additional modules.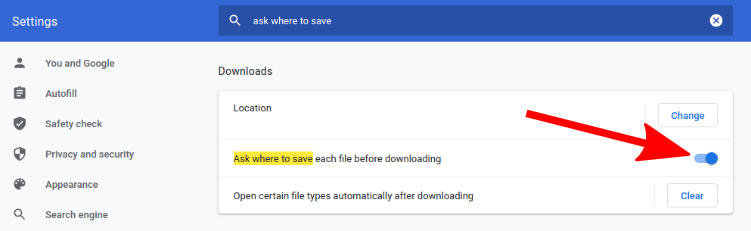
-
Pybricks Q&A
Pybricks replied to Pybricks's topic in LEGO Technic, Mindstorms, Model Team and Scale Modeling
@Mr Jos is right indeed. Also note that the error ‘the device is busy’ when you tried to change the motor settings is an indicator of what the issue could be. The docs at https://docs.pybricks.com/en/latest/ are a bit newer and cover powered up as well, but most of the control stuff is indeed the same. All motor trajectories are computed in advance, when you give the command. So that’s why we currently don’t allow the settings to be changed while it is moving. For most settings this is good enough. You usually choose them at the start of your script. It sounds like @Lok24 might be interested in a separate deceleration setting, instead of using the same acceleration value both ways. This is something we could consider if there is a good use case and a lot of people want it. -
Pybricks Q&A
Pybricks replied to Pybricks's topic in LEGO Technic, Mindstorms, Model Team and Scale Modeling
Thanks @dunes for the question and @Mr Jos for your quick response. Indeed, the default maximum speed is currently 1000 deg/s for the Powered Up XL motor. To find out, you can do this: from pybricks.pupdevices import Motor from pybricks.parameters import Port from pybricks.tools import wait # Initialize your motor. my_motor = Motor(Port.A) # Read the default limits for this motor. speed_limit, acceleration_limit, duty_limit, torque_limit = my_motor.control.limits() # Print the speed limit. print("speed limit:", speed_limit) # You can change the limits like this: my_motor.control.limits(acceleration=200) Changing the acceleration like this is nice if you want realistic behavior for some Technic vehicles. I think we have to add a documentation page where you can conveniently read this information. Thanks for the suggestion. -
Pybricks Q&A
Pybricks replied to Pybricks's topic in LEGO Technic, Mindstorms, Model Team and Scale Modeling
The hub name is a new feature that will appear shortly. We will make it visible in the documentation once it is actually possible to change the name. -
Pybricks Q&A
Pybricks replied to Pybricks's topic in LEGO Technic, Mindstorms, Model Team and Scale Modeling
You can read the hub name within your script as hub = TechnicHub() name = hub.system.name() print(name) And then use it as you like. -
Pybricks Q&A
Pybricks replied to Pybricks's topic in LEGO Technic, Mindstorms, Model Team and Scale Modeling
We're excited to share that the Powered Up remote now works with all hubs. This will come to the official Pybricks release eventually, but you can already try the next beta release if you're curious.