legotux
-
Posts
25 -
Joined
-
Last visited
Content Type
Profiles
Forums
Gallery
Everything posted by legotux
-
I acquired a fresh PF receiver and rebuilt the setup with an adjustable DC-DC converter, set to 10.5V. So far, and it's been used a few laps round the room, that works splendidly. I wanted to create a strong loc combination, what I settled on are 3 x550a 12V motors, two inside two yellow locs from the 724 set, and the third in a MOC tender holding the PF receiver and 4 AA batteries. That set runs splendidly: it successfully pulled 16+ mixed original and MOC wagons up a 5% slope with a curve (old blue track). But with added neodymium magnets. I'm not satisfied with how the modern wheel sets run on the blue track, they have too much play and thus derail easily. I added washers on the axles that improved it, but not enough. I await a shipment of various washers. When that is sorted I'll try make some pics and videos. Legotux
-
Yes, I double checked. And it worked for a while. I think I read they can handle 12 volt fine somewhere*, but with these experiences I'll play safe and keep to 10 volt max. * here: legotux Thanks for linking that topic, that was useful! The motor I used was older, the venerable x550a.
-
Following a successful build powering a seventies 4,5 volt locomotive via a PF receiver and a 4.8 volt 4xAA battery pack, I wanted to make a second one. But I had no spare 4.5V motors left, I have 4x 12 volt spares though. And the 12 volt motors run much faster than the 4,5 volt motors, so it would be great to build a similar thing with a 12 volt engine. I ordered a bunch of DC-DC converters, 3 pcs that convert 5V to 12V, and a few others, adjustable. I did some trials tonight. So a 4.8V battery pack, followed by the DC-DC converter, verified it's output is 12V, feeding that into a PF receiver, and its output to a 12V old seventies motor. The train ran very well in the test setup, both amazingly powerful and very fast. So I set out to build it together in a model. That's where trouble started. Upon connecting the battery with the DC-DC converter with connected PF receiver, smoke came out of the DC-DC converter. Afterwards, I connected the PF receiver to a lab supply, and it still worked. I reckoned I had a bad unit and took one of the other 3 identical units. That at first worked, but then I noticed that the same IC that had smoked on the first unit, got extremely hot here too. And the sad end result a few attempts later was that now, the PF receiver is dead. No light, no sign of life. No smoke either, but... And the lab power supply conforms it: it's dead. I don't think I did anything wrong. The DC-DC converter can handle 8 watts, which ought to be largely sufficient: I never observed a 12V motor drawing over 400mA current, not even when almost stalled. And the DC-DC converters started getting hot/smoking right away, so under no-load conditions. On the other hand, two devices failing in a row in the same manner seems no coincidence. I have other DC-DC converters that can handle more, but that is moot right now, because my PF receiver died so I can't continue doing tests. Did any of you have success with attempting something like this? I'll do a new attempt when I receive a new PF receiver, but any tips are of course welcome... Legotux
-
My first MOC: Tender for a dual 4.5V PF Train combi
legotux replied to legotux's topic in LEGO Train Tech
The layout is not finished by far, it's supposed to go across the room, etc. I had to rethink my whole setup because otherwise no way to make a train station long enough to fit a double 10233. I combined my frankenstein four points unfinished experiment with an extended 7822 station. A picture is in this thread here But note that it is very experimental still. For example I do not think the 10233 can switch tracks here, the nose 'swerves' too far out so there is not enough room. I'm still pondering on fixing that or not. The 10233 has a tendency to derail on these points anyway, so maybe it's just not worth the effort. But when/if I try to fix it, probably the best idea is to try and adjust the height of the platform to stay just under the nose of the 10233. And warn the minifig passengers to stay well clear The end goal is to make a 12V compatible layout with blue rails, with the extra grey sleepers I mentioned in another thread, and run the 10233, a PF-powered 4.5V train, and a 12V train on it. All of them with double engines, not just for power but also to make the 12V train+track more reliable. I had a 7.5% ramp that crossed the track first but I had to abandon that idea, I can't combine it with the station. Instead there will be several milder 5% ramps to overcome several obstacles in the room. I don't think the 10233 could climb the 7.5% ramp anyway. Legotux -
All the photos plus descriptions are here: https://imgur.com/gallery/Q90Jehx Finally, all the ordered parts have arrived and I could assemble and build and test it today. These are two 4.5V 70s/80s train motors, one in the tender and one in the 7720 loc. The tender also has a Power Functions receiver and a 4.8V NiMH battery pack. The charger is USB and the batteries can be charged via the plug, no need to remove anything. I tried to push-pull 17 wagons with it, which was succesful (engines in the middle). Then I tried to pull all 21 wagons I own (engines in front), which failed because the magnets wouldn't hold despite added thin neodymium magnet discs. I'll see about uploading a video if the quality is acceptable... Ah yes the roof of the tender wasn't finished yet in the video => And new attempt with all 21 wagons succeeded (23 wagons if you count the engines too): https://youtu.be/8dZ3aVw015E Legotux
-
Single lithium batteries for Power Function trains
legotux replied to LEGO Train 12 Volts's topic in LEGO Train Tech
That is true, but you can't equate an Apple iPad or an HP laptop to a battery pack you purchased on ebay or aliexpress. The big brands have reputations to worry about, and they do recalls. Chinese hoverboards are notorious, and many houses have burnt down as a direct result. So while your LiPo won't explode in your face when you look at it wrong, taking some precautions is still wise. In my country, the fire department has started educating users about safe handling and charging of especially the larger lipos, like in hoverboards, steps, ebikes, scooters etc. And I would point out that NiMH has a lower energy density than Lithium, but they won't explode, not even when you try hard to make them explode. So it's not such a bad choice to use NiMH when you can deploy either type. There is some truth to that, but there are some aspects worth noting: First off, we are not yet very familiar with such chemical battery fires. For centuries, fire fighters fought gasoline fires, and they know exactly what to do in such an event. But when it comes to lithium batteries we're still very much in the learning process. These fires are very hard to put out, if not impossible, and fire fighters often let Tesla's, E-scooters etc burn out (it must be said: also for fear of electrocution). In addition, some batteries suffered from manufacturing defects (remember the Samsung Galaxy Note 7, anyone?) and such catastrophes don't happen anymore with gas cylinders and petrol containers, because (see above) we've learned from previous mistakes during all the centuries we dealt with petrol. But 60 years ago, some car brands tended to explode when rear-ended, because the gas tank was placed unsafely. All these safety lessons we learn from accidents, we're still learning them with high-power batteries... Cheers Legotux -
Single lithium batteries for Power Function trains
legotux replied to LEGO Train 12 Volts's topic in LEGO Train Tech
I'm doing something similar but on the basis of a 4xAA 4.8V NiMH pack. They are hassle-free as opposed to Li-ion and don't suffer the risks of premature death when over-discharging and explosion/incineration when charging. If you deploy lithium-technology batteries please, please make sure you do so with an (integrated or added) battery protection circuit. And never, ever, charge them unsupervised / during absence. My first experiment involved an old '70s 4.5V train, so a voltage converter wasn't needed here. But with a converter, the possibilities are endless; you can make 9V (or 12V) from a two-AA set of 2.4V if space is a concern. I cannot recommend using a DC-DC voltage converter enough. It's simply brilliant. Legotux -
Is a single PF receiver able to drive two motors?
legotux replied to legotux's topic in LEGO Train Tech
To conclude my «quest» : I decided the clone motors were unusable due to that friction-overcome problem, so I ordered a genuine Lego PF train motor, reversed the internal wires, mounted it and the train runs super smooth now with two motors. Even very slow starts seem possible, and a 5% incline can be taken just fine with the front engine plus three wagons. I haven't finished yet, there's still two wagons to finish building. I did convert the bogies, so there's less friction on account of less axles. I'm in the process of modifying / converting a legacy 7822 station to accommodate the extra long horizon express, and with double track instead of single. Legotux
-
Yeah. But right now it's unfeasible. The max total size of attachments is 0.1MB. 100kB gets you maybe an 800x600pix image, 1280x800 if lucky. That lacks much detail And I bet that if you post 6 messages, each with one picture, some admin will yell at you that that isn't how the forum is supposed to be used... In 2031, in 10 years, people will express rage and disappointment at how all the imgur and flicr images no longer work because those sites died. Legotux
-
Which is why it is unwise for a forum to force external hosting of pictures, yet that is still the case here. We're not learning from the dead links. Why is that? In this day and age gigabytes are no longer expensive. I've spent the past months scouring through old threads and it's a true massacre. Ranging from links that are 404 to just blank space where, I presume from the context, once were pictures. It's horrid. Legotux
-
Is a single PF receiver able to drive two motors?
legotux replied to legotux's topic in LEGO Train Tech
I'm having some bad luck with my various motors. One is a secondhand genuine Lego, two others are not. Equipped with two motors, a train with just two wagons can't ascend a 7% slope. Now, I realize that a 7% slope is tough and should therefore not be the reference. Still, I started looking for causes, and strangely it is the genuine Lego motor that is weak. It is much much weaker than the clone motor. Since I've bought a second set I replaced the Lego motor with another clone, but this one has bad problems. It often cannot overcome its internal friction so it needs a nudge to even start spinning, even at max power. And when it does, it is loud. Visual inspection gives no clues, there is ample white grease, no obvious defects, runs fine when open. But when I close it the trouble is back. It is also notably tough sometimes to turn the wheels in one direction by hand. So I suspect the cogs are badly formed or damaged, but I did not verify this yet. But that's on me... the inherent risk of buying non-Lego parts... sometimes you get a dud. What bothers me though, is the apparent weakness of the genuine Lego train motor. I can buy another secondhand Lego train motor for €12 plus shipping, but... I could also try to swap gear/cogs or the motor between the Lego one and the noisy one to try and make one without defects. And there's another motor in the mail now, which I hope does not have such quality issues... Is this a known issue? I was hoping to eventually pull a 6-car train or even longer, but at this rate it looks pretty hopeless, even on flat track... Oh, for completeness sake, I run on 12V blue track. I don't think that makes the difference, but I would be amiss to omit this information Legotux -
Not entirely sure. The (cut-up) track between the ends of the top points measures 18 studs, and a normal track is 16 studs. so there is a 2 stud difference. Normally, to make such a layout requires 8 track lengths, so yeah, it saves (almost) 3 track lengths in the upper section. For the lower section it adds up to two points plus two tracks equals 6 track lengths, so minus two. I think that to be able to reliably add servo's there that track must be irremovable, so the two blue track sections must be indivisible part of the assembly. Alternatively I could shorten these too, but I'm not sure what advantage that would bring me, if any. But the trains not swaying back and forth (so much) when diverting is an important goal too I think. I might be able to shave of the last two studs, bringing back the 18-studs track to regular 16, but it's hard and I'm not sure if that's worth it. Obviously, the problem is that now I've increased the distance between tracks from 0 to 4 studs (or from 8 to 12 studs). If I start to move the points two studs closer together horizontally it will also mean that that even 4 studs distance will no longer be true and it'll end up 3.something studs distance, which is very impractical. One last possibility I'm contemplating, now that I've started sawing through rails, is to add a fifth point, where the 18-stud section is now, shortening the rails as required. That way you get a two-to-three track thing. But I'm not sure that is a good idea. Yeah I went and bought a set of 11 damaged points off ebay for €25 so I can experiment without fear. The servos I plan to use are regular, non-Lego $2 servos which I plan to control with an arduino. Not to automate them, just to interface between a pushbutton switch and the points. Lots of things to still figure out, like suitable connectors, etc. So, no Lego parts involved there. Legotux
-
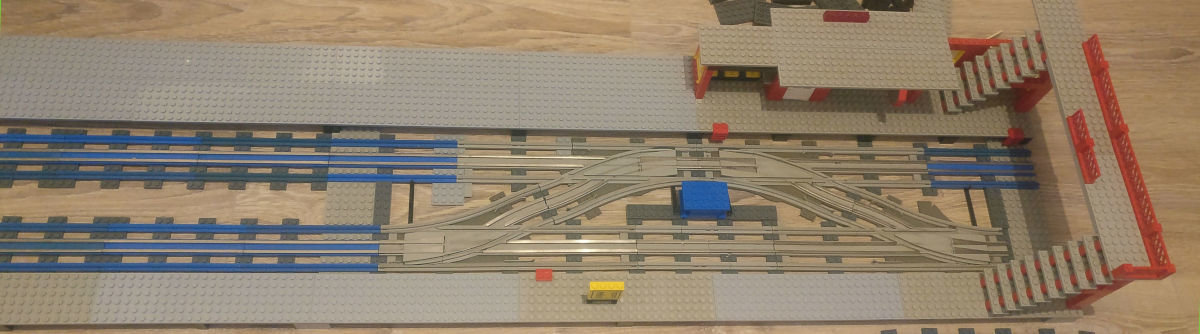
Sure, I was planning to do that anyway when finished. But no real harm to post a pic of the thing now. I'm uncertain this is going to work out well. As you can see this causes both vertical and horizontal offsets in the track. The vertical offset is welcome I think, 12V tracks are normally too close together anyway. But either offset will have to be corrected with the rest of the layout, either by taking advantage of any tolerances there, or by adding other nonstandard tracks/points etc. Also on my todo list is to add 4 servos to control these. The physical connection details of the moving parts is the hardest part. Some sections are very dirty, that's on purpose, I selected some of the worst & damaged points I had because I was (and am) unsure if this will become something useful and worthwhile... A thing I'm not totally happy with is the small wobbly bit that is still there. Perhaps the cuts must be done a bit closer still, but that is a bit more complicated because then the cuts cannot be in line, if I'm making myself clear. And I'm not yet sure how to strengthen it. It's weak in the middle, and glue won't really work there, because then an adjacent part may break. It needs something else...
-
Hi. I just tried it. To help cool it, I used a large wrench, that you can see behind it. I did two attempts. Equipment: standard 1mm 60/40 solder with resin core, Weller WTCP-S soldering station. The one on the right is without sanding, and I needed to rub the iron back and forth a dozen times to make the solder stick, and you can see it is only on a tiny patch still. The one in the center is after I lightly sanded, and that helped a LOT, it easily tinned and flowed. I was a bit careless with the solder tip, some of the ABS melted because I touched it, but not due to overheating the metal. Getting this result took no more than 2 seconds contact with the soldering iron. Attaching a wire is easy now, and left as an exercise for the reader. (full disclosure: I have been soldering for decades, I'm not exactly a beginner) @Phoxtane I know the trick but no way I'm letting moisture anywhere near my lego rails, I've seen what it can do to it... L Legotux
-
Hm. I am planning to solder those, if only because I've made a custom 'Frankenstein' 4-point monstrosity where I had to shorten several conductor rails. I have postponed it until now, mostly for fear of the ABS melting and the fumes and damage that come with that. I was thinking how to best conduct heat away by clamping it, but how... So I can't comment on the process yet. From your description it isn't clear to me whether you've used plumber solder or electronics solder? If the former, abandon that. I would use electronics solder for sure, as it has flux/resin core inside it. As for soldering, I'd use a bit of sanding paper in preparation, like grain 800 or higher. And remember that with soldering you must always tin both parts before you join them. If that still proves unsuccessful, which I doubt, you could look into using lead-free solder and its associated flux, since flux for lead-free solder is often more aggressive. But I highly doubt that's necessary. If I solder them I'll report back my experiences. good luck! Legotux
-
Is a single PF receiver able to drive two motors?
legotux replied to legotux's topic in LEGO Train Tech
Ah good to hear, thanks! But does that mean 3 motors total (one extra added in lead power car) or 2 motors total (motor moved from hind power car to front power car) ? My situation could be different because I drive on blue rails now, but still Legotux -
Is a single PF receiver able to drive two motors?
legotux replied to legotux's topic in LEGO Train Tech
I assembled the first and second carriage, the third is still in pieces. I also added the second motor. With this setup, I can go up a 7.5% slope (one brick per rail length), come to a full stop, and restart climbing it (albeit just barely). So that is purely excellent. I doubt that I can still climb it with the full three carriages. We will see. Obviously though, the Horizon Express was never conceived for taking 7.5% slopes, I know that. And this was with NiMH rechargeable batteries, not alkaline. I was so impressed by the set that I ordered a second set, to make the train 'complete' (or more complete at least). I'm reading the thread dedicated to it now, but it's very long so it'll take a while. I wonder whether the 6-carriage train would require 2 motors or 3/4 motors (on flat track). And if 3 or 4 motors, whether that is smarter to do with two receivers on the same channel or 3 (or even 4?) motors on one receiver (and a very long extension cable) if even possible. Both methods have drawbacks. The main drawback for using two receivers is that both receivers might not get all of the IR commands and thus might do different things, wreaking havoc. But what a mighty set the 10233 is!! wow. All this ingenuity and strange parts just to place windows sideways. Instead of just making a new lego window, which lego is capable of. Insane and inspired at the same time. Crazy and Genius. Lego sometimes is just a very subtle little tiny innocent brick-Rube Goldberg machine... Legotux -
Is a single PF receiver able to drive two motors?
legotux replied to legotux's topic in LEGO Train Tech
Sorry I'm not clear what you meant? I'm just asking if mentioning / discussing non-official-Lego parts/sets here is a mortal sin / discouraged / allowed. I'm new here and don't want to step on any toes... I just assembled the front carriage, with the motor. Holy moly, I'm in awe at the level of detail and ingenuity that went into this. And I saw a couple dozen lego parts that I didn't even dream of possibly existing. Wow. legotux -
Is a single PF receiver able to drive two motors?
legotux replied to legotux's topic in LEGO Train Tech
[Edit: translated my post, I inadvertently wrote in Dutch instead of English] By the way: funny, I just received my (cough) clone-10233* and lo and behold the clone motor turns in the opposite direction compared to the Lego motor I purchased off dutch Ebay. So no mod necessary. And both on the same channel seems to work fine, albeit that is without load. * Sorry, don't know if that is frowned upon here Legotux -
Is a single PF receiver able to drive two motors?
legotux replied to legotux's topic in LEGO Train Tech
Ooof! That is a really long train! With only two PF motors? That is amazing! I have two 70's 12V motors (set 724) pulling around 10-12 wagons, but shorter/lighter ones. Albeit on regular lego track, so tight corners. And I read here that 70's train wheels have much more friction than the modern ones, though I don't know why that is. What limits the length of my train is usually the magnet couplers, not the motor strength per se. And occasionally, wheel grip. I'm waiting impatiently on my order of 10mmx1mm neodymium magnets... -
Is a single PF receiver able to drive two motors?
legotux replied to legotux's topic in LEGO Train Tech
I know there are several ways; a PF switch, hack an extension cable, or do the swap inside the motor. From what I've gathered these motors are not glued like earlier ones but are trivial to open with a torx #6. And cutting all 4 wires of the cable is no problem, a motor doesn't use the two outer wires anyway.I have an extension cable back-ordered. It will depend on the available room which solution is best, but swapping the wires inside the motor is the most elegant and doesn't do any damage whatsoever. And I can solder like a pro. cheers, Legotux -
Attempt to improve the blue track / '70s trains
legotux replied to legotux's topic in LEGO Train Tech
Thanks! I hope to finish my track in the next days/weeks. I wish it didn't take up so much space... Legotux -
Is a single PF receiver able to drive two motors?
legotux replied to legotux's topic in LEGO Train Tech
Thanks for your answers! I have multimeters, but it's hard to judge how much current a motor pulls in practice, because the torque is hard to predict or emulate. Legotux -
Hi! I'm thinking of replacing the second (non-motorized) bogie of a 10233 with another Power Functions train motor for extra strength and grip, if I can. I am aware that I may have to open up one motor to swap the C1+C2 wires to make them go in the same direction, this is not a problem. I have heard of the elusive V2.0 version of the PF receiver but I only have the normal, regular version. Can it drive the two motors or will it suffer from overheat/overcurrent shutdowns regularly? What are your experiences with two train motors on a single PF receiver? Thanks, Legotux
-
Hi I recently took interest in my old Lego train from my youth. While buying extra track and points secondhand I discovered the 'new' grey '80s 12V rails. But excitement quickly turned into disappointment; the track is very tedious to disassemble and those clips break very easily. I started looking at the old blue rails. Could I add an extra sleeper there? Well, no: the outer rails would allow it, but the electric conductor rail doesn't: there are plastic ridges in the way. My initial idea was to 'dremel' those off, but that has bad drawbacks: extreme amount of work, and damaging the rails. Then I realized that adding one sleeper was hard, but adding two sleepers was possible. But a rail being 16 studs long meant that you can't evenly divide them into threes. That is, unless you can live with either uneven gaps between sleepers, or... you can make one in two connecting sleepers twice as wide: 4x8. The white sleepers were badly discolored anyway, so getting new, more realistic sleepers was welcome. I placed a monster order for 360 dark grey sleepers. Also a bunch of 4x8 dark grey wider sleepers. I contemplated brown sleepers but feared brown + blue might not go together so well. The curved track, as opposed to the straight track, offers arbitrary positioning of the sleepers except for the middle and end positions. So three sleepers, evenly distributed, can be added to curved track. These discoveries made the blue rails very attractive suddenly: one more sleeper than the '80s grey track, no breaking clips. The blue rails are remarkably more robust with 3 sleepers per length instead of one. So much so that you can step on the track with near-zero risk of damage. And by its nature, blue track with 12V conductor rails is compatible with all Lego trains, except 9V. All others, 4.5V, 12V, PF, PU will run fine I believe. My only surprise was that nobody before me discovered and embraced this...? But I haven't found a trace of that (to date), and never did see pictures of blue track with added sleepers. Obviously, everyone just migrated to grey track, then 9V, then all-plastic PF and beyond... quite logical. On slopes, having 3 sleepers per length also works out well: one plate per sleeper adds up to one block per rail, with is 7.5% inclination which most if not all Lego trains can still handle ok. Many of the parts I ordered have now arrived so I have some photos to share of how this 'new' blue track looks: Entire album here: https://imgur.com/a/QAy6DMn Hope you like, Legotux