
osterum
-
Posts
51 -
Joined
-
Last visited
Content Type
Profiles
Forums
Gallery
Everything posted by osterum
-
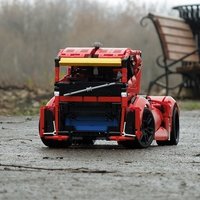
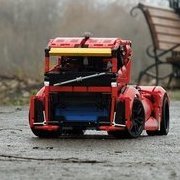 The history of this model began back in March 2021. Then I didn't even think how long it would take. Now I am writing from another city, being more than a thousand kilometers from my home and lego, and I am unlikely to return there for a long time. But let's not talk about sad things! At first, everything went like clockwork. In six months I have built literally more than half of the car. Periodically, everything had to be redone, because a joint appeared somewhere or I picked up the wrong shape. The engine in any case had to be working and, of course, the same as the original. Its creation was the starting point. I don't remember anymore, maybe I used the design of other people, maybe I saw it somewhere on YouTube, but it was assembled. Of course, this is not an exact copy of the original, but it is the maximum that can be achieved on such a scale. Then I created the main body line, but, as it turned out, not very correctly, and in further versions, the large technical panel that perfectly fit under the door sank into Oblivion. Undoubtedly, brakes are an important attribute of the car. It is difficult to create them on such a scale, but I used sausages, which became an imitation of calipers. The interior is an equally important part of the car. I also tried to convey it as close as possible to the original, although the door upholstery was added only at the end of development, in August of this year. Productive construction on the back and roof has ended. I couldn't build a front for two years. Of course, the new educational institution in which I spent high school also contributed, there was not much left for lego. And now it's time to enter the university, so it was decided to finish the long-term construction at all costs. The result is in front of you. Below we will consider the car in detail. You can see more photos on my Flickr, if anyone else remembers what it is) Headlights For a long time I was busy with another feature of this car — pop up headlights. As a result, it turned out to fit the lever of their opening only under the hood due to the complex layout Shaping When creating the body, I also could not do without sausages. They are perfect for the necessary rounding of the nose. There is an air duct directly behind the front wheel. An immeasurable number of options for creating this element were sorted out and in the end I was not very satisfied with them. But the back of the model, in my opinion, turned out to be the most recognizable part. But this is also the merit of the original design. The problem with the creation was the rear glazing. In a real car, it is a continuation of the descending roof line. Since it is difficult to recreate good glazing from lego, we had to resort to tricks and use black hoses, as if showing the bending of the glass. The roof also managed to make a rather complex shape. It seems to wrap around the driver's and passenger's heads from all sides, giving more space for the head. Rear wing Optional addition to the model. Right from the factory, these cars were equipped with a similar wing, but I prefer the look without it. Interior The interior was recreated in sufficient detail. It was possible to emphasize some lines with the help of a lego string. Also in my model there are door upholstery, which for some reason designers of lego sets and MOCers always forget to do. Steering The model, of course, also has steering (with a working steering wheel in the cabin). The HOG is a CV-joint part, which can be easily removed. Perhaps not the best solution, but it made it possible to place the gears very compactly without interfering with the appearance. Functions: -Opening the hood with a lever in the cabin, opening the trunk; -Opening doors on the "virtual axis"; -Differential and rear-wheel drive for a two-section rotary engine; -Steering with a HOG on the hood + rotating steering wheel in the cabin; -Pop up headlights. In the video you can see the work of these functions, as well as a couple of unusual angles :D More photos on Flickr, Instructions on Boosty, Design and 3D printing of wheels - 469customs (The wheels are the same size as the regular wheels from the Mustang) Thank you all!
 -
42154 - 2022 Ford GT
osterum replied to Ngoc Nguyen's topic in LEGO Technic, Mindstorms, Model Team and Scale Modeling
I made a short instruction. Since I can't attach the pdf to the message, I uploaded it to the boosty: https://boosty.to/osterum/posts/25dd4c45-a9c7-490c-b2e9-ced90cc30829?share=post_link -
42154 - 2022 Ford GT
osterum replied to Ngoc Nguyen's topic in LEGO Technic, Mindstorms, Model Team and Scale Modeling
I really like the Milan's model, but I think the headlights are the only thing that doesn't look like the original. Milan spoke about this in the review. Therefore, I want to offer my own version of headlights for Ford GT If you want instructions, say about it -
[TC24] Space Thieves' van
osterum replied to osterum's topic in LEGO Technic, Mindstorms, Model Team and Scale Modeling
More detailed photos. 1. Chassis and bottom engines 2. Rear lighting equipment 3. Left main engine 4. Left main engine too 5. Dashboard (Sticker from the set 42107 Ducati) 6. Cargo compartment You can see the spaceship completely in Entry topic: -
Space Thieves' van Functions: - Fake stabilization engines on the bottom (decrease-increase of flames)- The same thing with main engines- Opening backdoor- Moving chassis See them in the video Work-in-progress topic:
-
[TC24] Space Thieves' van
osterum replied to osterum's topic in LEGO Technic, Mindstorms, Model Team and Scale Modeling
For several days I was engaged in the design of the body. In fact, it looks very much like sketches, nothing surprising. The design is quite simple and strict, because it is essentially a utilitarian van, the only purpose of which is the transportation of goods. I thought that the people driving the van should get into it easily, so a ladder is needed. In this regard, I abandoned the "garage" door mechanism in favor of opening downwards with built-in ladder. One of my goals is to create not just a spaceship, but a spaceship captured by thieves. I want to make it a little shabby. To do this, I decided to make the left engine supposedly replaced in a hurry, so it will not have most of the skin. The detailing is not finished yet. -
Body shapes look impressive I think everyone is really interested to know how engine control works
-
[TC24] Space Thieves' van
osterum replied to osterum's topic in LEGO Technic, Mindstorms, Model Team and Scale Modeling
A little progress. Today I have completed one of the main functions - changing the size of the rear flames. And I have finished the "platform" of my spaceship. Now its main functions work without interfering with each other. It turned out quite compact. Unfortunately, I could not make a supports-control lever strong enough in the cabin, so it is located on the bottom. However, the lever for the driver is still present, but it works only visually. Now i'm going to do the design. Today progress you can see in the short video: -
[TC24] Space Thieves' van
osterum replied to osterum's topic in LEGO Technic, Mindstorms, Model Team and Scale Modeling
Some progress today. I have completed the stabilization control system and chassis on right side. What is stabilization control system? This is a thing that allows you to tilt your spaceship for perfect maneuvering in space and atmosphere. If you pull the lever towards you, spaceship will lift its bow up. If you push away from yourself, the stern will rise. The same with sideways. -
I started my vacation, so I decided to participate in this competition. The theme is very interesting and inspiring. A couple of years ago I already started doing something similar to a speeder on the scale of a technic figure. Now I'm thinking of sticking to the same scale. I chose the side of the criminals because it will make a more charismatic model. Honestly, I could not come up with the functionality of my spaceship for a long time, and so far I have stopped at: - Fake stabilization engines on the bottom (decrease-increase of flames) - The same thing with main engines - Slide backdoor - Moving chassis Something like this: As for the design, I was figuring out several forms and so far I have stopped at the one in the picture on the right (with the inscription "GP") The lore is banal and simple: 2 thieves stole a completely ordinary civilian Galactic Post van, because it's a great disguise. In addition, it will fit a lot, A LOT of money and other valuable things... I started the construction with the control mechanism of the stabilization nozzles on the bottom. After several versions, I came to an elegant and simple, "reliable as a Swiss watch" You can see it in short video:
-
Thank you for your feedback about the model! I think that curved panels are too large for a small car, because I tried to bring all the dimensions of the model closer to the original I agree, but the technic parts (liftarm thin?) would be too wide
-
4. 5541 (10151) Blue Fury remaster Original set: 5541 Functions: openable trunk steering using the steering wheel in the cabin working fake v8 Discussion topic
-
Here is a comparison of my model with the original. I think you may notice inconsistencies, but you should understand that this model was built from scratch, and not just according to the instructions from new parts You can download a 3D model for the stud.io program from this link: https://rebrickable.com/mocs/MOC-82217/osterum/5541-10151-blue-fury-remastered-in-technic/
-
Okay, the main part is completed. Someone may say that I am in a hurry, but I am leaving my hometown the other day, so there is very little time left. Soon you will see more detailed photos and a comparison with the original
-
Oh, thanks, this was the best variant of all that I went through Hey, @Jim, can I use such a connection, or is it illegal?
-
A little progress on exterior
-
Hello everybody! After a long break, I return to the model again. The working chassis is ready. There is an engine with working pistons and a steering system. All dimensions are identical to the original set, including width, length, wheel position, steering system. At the end of the work, I will build a model in stud.io, so that you can see for yourself my words. (sorry for the photo quality)
-
May be, but my task is to make the engine no wider than 6 studs (as close as possible to the original).
-
Yes, I really mean an engine with moving pistons. After all, the essence of the competition is to build a model in technic style. So I think this would be appropriate in the event that the engine in the old set is important (not just the slightest or even hidden part of the model) So I built what I want to see in my model. I seriously think that it is better than a not working moulage (at least for the technic car)
-
I'm thinking about V8))
-
Hi, everybody The new contest promises to be interesting, so I decided to take part. My choice fell on the set 5541, also known as the number 10151 (reissue). He is quite famous among the fans of the LEGO Initially, it was decided to build a set in the studio to determine the dimension. In fact, the old build view imposes some features on a building of MOC. For example, a wheelbase of 19.5 studs and an even width. I don't know yet whether to leave it like this or make a new-style body with an odd width. There is also the question of whether to add a working fake engine. On the one hand, this would be appropriate here, but on the other hand, there is no such function in the original set. So, what do you think about the width and the engine? Write your opinion about it, thanks
-
There are photos, but very few
-
Thank you, I wanted to make something bright and colorful)
-
One day, the guys from Mercedes and SWatch decided to create something different from other cars, something unusual and original. Then they opened a new brand - Smart. They got out of a small city car with a coupe body and two seats. But that's not all. The drive was carried out through the rear wheels. Unfortunately, the first generation Smart was completely boring due to the incredibly weak engines. In the second generation, everything became much more interesting: there were more horses and already the weakest engine produced 71 (whereas in the first generation 45). Anyone who understands cars will say that 71 horsepower is just about nothing. However, the small size and weight allowed to overcome the speed of 100 kilometers per hour in 13.7 seconds. In addition, there was a more powerful version: 84 forces with turbo, which, if properly configured, easily allowed you to leave 10 seconds. For such an urban micro-car, it's great. Once again, I start building with the chassis. It turns out to be as close as possible to the original: independent MacPherson-type suspension at the front and semi-independent deDion suspension at the rear. The model has steering with castor (tilt of the front axle for better handling and suspension operation), the steering wheel in the cabin also rotates, as well as HOG (Hand Of God). You can take a look at the suspension operation in the video (HOG is not on it yet): Then I took up the design, most of which was done in 1 day, the deadlines were burning :D. The headlights were different, more clumsy and square, now they are more elegant and more similar to the original. The car's doors open, as well as the trunk lid, which consists of two parts. Behind it is a proprietary three-cylinder engine. In the cabin there are 2 seats, a dashboard, in the depth of which there are branded watches. The steering wheel is made from a part of the UniKitty scarf (set 70848). There is also a rear-view mirror. From the chips, the passenger seat is lowered, forming a comfortable armrest, as in the original. This feature makes this car more of a "ForOne" rather than a "ForTwo". But what difference does it make?) Thank you for your time
-
Ok, I added a video