
osterum
-
Posts
51 -
Joined
-
Last visited
Content Type
Profiles
Forums
Gallery
Everything posted by osterum
-
 Once, when I ordered parts from bricklink, I saw very unusual wheels - they are small and narrow, with a diameter of 37mm and a width of only 15mm. I've never heard of them. It turned out that they are very rare and were only in 5 racers sets from 2003-2005. They also have non-removable tires I wanted to build a motorcycle on them. Since I am a technic-builder, I had to add a classic functionality for a technic - a working engine. After thinking about it, I put together a design like this, where the crankshaft was a hammer: Then the construction of the frame began. I thought for a long time how to correctly conduct the torque from the wheel, the rubber bands did not work as it should, I had to use a bulky chain. On the other side is a fairly compact gearbox of 3 gears. When the frame was ready, I moved on to external parts such as the tank, seat, fenders, mirrors, steering wheel switches, exhaust pipe. In fact-this is a purebred model team, even the technic-bricks on the spot, though small :D Functions: Thanks for watching
 -
Six months ago, after the start of sales of Ducati, I wanted to create an alternative. But from one set you will only get a motorcycle, since there are only two wheels, and those are of different widths. I want to build a motorcycle in the future, so it was decided to create a car from 2 sets. The panels suggested something futuristic. Construction began with the gearbox. From two motorcycles, you can easily make 4 gears (you can do more using 2 switches, not 1, but the gearbox will be much larger and more expensive in details). The result was 3 forward gears and one neutral. Behind there is a limiter that does not allow you to switch gears in a circle, only N-1-2-3, 3-2-1-N. Learn more about working in the video. Then the box began to be built around the frame, which was then attached to the suspension elements, engine, panels. Windshields of motorcycles formed the cockpit cover. The steering handle is located in the cab. The gears are switched under the model, which is more convenient and efficient than anything else. The shift shaft is also extended forward so that the pilot can also control the box. Next, I started designing, this stage took much less time than building the chassis. By the way, the model, in contrast to set, there are brake caliper. I think this is a necessary thing. Other photos: Video: Instruction: https://reb.li/m/56238 Thanks for watching
-
[MOC] GAZ-2402 - Soviet wagon
osterum replied to osterum's topic in LEGO Technic, Mindstorms, Model Team and Scale Modeling
Yes, Soviet engineers and designers looked back at the United States because they had no experience in the automobile industry. By the way, the first mass production of cars in the USSR was also organized by Ford at the GAZ plant in 1932 :D -
Hello everyone. This car was created as part of a competition in the LTR community (one of the Russian RLUGs). A little about the competition: the competition consists of several stages. At the very beginning, it was necessary to build a family car, which was inherited by the child on his 18th birthday. In the next stages, there will be car modifications. Before starting the build, I carefully selected a car that could perfectly match the history of the competition. I thought that it should be: 1. old enough that it was not a pity to modify 2. I live in Russia, so it must be created on the territory of the USSR or the countries that remained after it. It is also possible that it may have been imported from Europe during/after the collapse of the Soviet Union. If the car is suitable for this, then finding spare parts is not a problem, and the car will be quite recognizable. After a little thought, I came to the Volga 24 in the back of a station wagon. I began to calculate the dimensions. It turned out that the body will be 15 wide (in the peak of 16, you will soon understand), and the wheels wanted to sink inside the body, as in the original. At the same time, the goal was to make an authentic independent suspension in the front. After several versions, the result exceeded expectations. It was possible to make everything so compact that there was even a place for the engine between the levers (if you notice the part in the middle, which was done later). The problem was mainly in the size of the rods (only 6 and 9), without which it was impossible to do everything compactly, simply and effectively. The decision to insert the joint with bar into the joint with technic pin saved me. Then began assembling the body and assembling the rear wing with headlights. This was followed by the connection of the front subframe and the body, the rear axle was attached to the springs of flexible axles, and from it the drive through the cardan to the fake inline four-cylinder engine, which perfectly stood between the levers. After I finished the back of the car, held the steering shaft on the HOG on the roof. At the same time, I managed to make the steering wheel movable due to the combined thrust. Yes, the angle of rotation is small, but it's definitely better than nothing. (sorry about this photo) After that, I took up the interior, where I made 2 rows of seats, a central tunnel, pedals, a gearbox handle, a torpedo and a dashboard sticker. Then the engine compartment, doors, front, and small details were finished. On the hood there is a characteristic hump, from the detail of the engine compartment - an air filter and a backup. Oh, I almost forgot: there are mudflaps at the back. In general, you can consider everything yourself. By the way, about 15-16 studs width. As in the original, there is a bulging line along the body, which in the model is offset by 0.5 studs. Other photos: Suspension test: Video about front suspension: Instruction: https://reb.li/m/50241 Thanks for your attention!
-
I dare not agree. In most of its details, it is Technic. Only the headlights and radiator grille, the engine panel, a pair of body lines at the rear and the dashboard are made of System parts. If we are talking about functions, yes, it is closer to Creator Expert than to Technic
-
Thank you very much! I will try to continue in the same spirit
-
Yes, alas, they are missing. I focused on design
-
I came across this car on the Internet and was eager to take up such unusual forms. The car was created by YAMAHA either for Honda, or for Nissan (different sources have different information), but was refused. Yamaha did not think for a long time and went to the Toyota. The car was made under the inspiration of European supercars (Jaguar F-type), and most of these Toyotas went abroad. I started building from the back of the car, which is typical for this car, then moved on to the roof, interior, and front In the model I tried to correctly convey the lines and features of the body. Functions: steering, lever to open the hood and opening sleeping headlights I decided to take photos both outdoor and indoor: More photos under the spoiler: Comparison with the original. The door should be longer, but due to the use of a large panel between the door and the front wing, this could not be done. The project is also presented on the LEGO IDEAS. I would be happy if you would support it: https://ideas.lego.com/projects/e39bdf86-0424-4b95-8ef8-4beb23d050d5 Thanks for your attention. Leave comments and feedback
-
[TC18] H&C F6 in technic
osterum replied to osterum's topic in LEGO Technic, Mindstorms, Model Team and Scale Modeling
I didn't even think about it. But I wouldn't change it just because my model has too much system already Thank you -
[TC18] Porsche 911/964 AWD
osterum replied to Limga's topic in LEGO Technic, Mindstorms, Model Team and Scale Modeling
The main levers go in an arc, so to compensate for the suspension moves on the sides, a rubber part is used. I can say that this is an excellent and interesting solution. About connectors #1, they are great to keep in such a bundle. -
[TC18] H&C F6 in technic
osterum replied to osterum's topic in LEGO Technic, Mindstorms, Model Team and Scale Modeling
I agree with you. Technic parts are too square, which is why I can't make some shapes, or it turns out to be leaky. I'm really sad that I can't implement everything from technic, sorry. And I would like to make the interior out of technic, but I do not have the necessary quantity of parts and the chance to order them. -
[TC18] H&C F6 in technic
osterum replied to osterum's topic in LEGO Technic, Mindstorms, Model Team and Scale Modeling
@super-jaschka @arijitdas @MattL600 Thank you for your comments -
[TC18] H&C F6 in technic
osterum replied to osterum's topic in LEGO Technic, Mindstorms, Model Team and Scale Modeling
Perform diagnostics and additional configuration of the car -
[TC18] Mix of Porsche
osterum replied to NoEXIST's topic in LEGO Technic, Mindstorms, Model Team and Scale Modeling
Completely in red it looks much better -
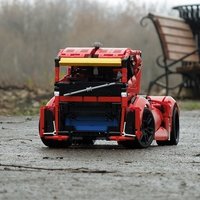
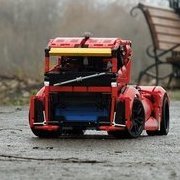
1. H&C F6 The model was based on a fictional car that my friend built (check the WIP topic) There is a HOG and a working steering wheel in the cabin, rotating with the wheels. The HOG can be easily removed. The doors, hood at the back and trunk at the front open (there is nothing in trunk, a lot of space is taken up by the steering system). Moves the spoiler, under the hood of a mini oppositional engine with 6 pistons. The interior has been worked out. There are cavities on the bottom for attaching the model to the 42098 car carrier. Length - 35 studs, height - 11 studs, width - 15 studs (without mirrors). Distance between wheels - 19 studs. Video: WIP and discussion topic: https://www.eurobricks.com/forum/index.php?/forums/topic/176644-tc18-hc-f6-in-technic/&tab=comments#comment-3221259
-
[TC18] H&C F6 in technic
osterum replied to osterum's topic in LEGO Technic, Mindstorms, Model Team and Scale Modeling
Slightly modified the bottom -
@Jim, can i also post a description of the model in addition to photos and names in entry post? I'm sorry if the question seems stupid
-
[TC18] H&C F6 in technic
osterum replied to osterum's topic in LEGO Technic, Mindstorms, Model Team and Scale Modeling
The length and height, the width can be clearly seen on the photo -
[TC18] H&C F6 in technic
osterum replied to osterum's topic in LEGO Technic, Mindstorms, Model Team and Scale Modeling
Later I will make a collage and be ready to post the work. Question: do I need to show that the car fits into the specified dimensions? Anyway, L - 35, H - 11 with HOG (it can be easily removed), W - 15 (without mirrors), length between the wheels - 19 Other photos: There are cavities in the front and back of the bottom that can be used to fix the model on the car carrier (the photo was taken earlier, they are not finished yet) -
[TC18] H&C F6 in technic
osterum replied to osterum's topic in LEGO Technic, Mindstorms, Model Team and Scale Modeling
Тhe front end looks like this. I also changed the doors to make them longer. Added mirrors and I can say that it is almost ready. -
[TC18] H&C F6 in technic
osterum replied to osterum's topic in LEGO Technic, Mindstorms, Model Team and Scale Modeling
I don't have much time, so the progress is small -
[TC18] H&C F6 in technic
osterum replied to osterum's topic in LEGO Technic, Mindstorms, Model Team and Scale Modeling
seats and dashboard -
[TC18] H&C F6 in technic
osterum replied to osterum's topic in LEGO Technic, Mindstorms, Model Team and Scale Modeling
Oh, hi, did you come to the contest, too?) What are you building? -
[TC18] H&C F6 in technic
osterum replied to osterum's topic in LEGO Technic, Mindstorms, Model Team and Scale Modeling
I started making a body. Back so far looks like this -
[TC18] H&C F6 in technic
osterum replied to osterum's topic in LEGO Technic, Mindstorms, Model Team and Scale Modeling
Yeah, it is based on a Porsche Little progress today. I made a chassis with a fake engine and a working steering wheel. There is also a HOG that will be displayed on the roof. The gear from the differential holds up unusually, but everything works well