
Wurger49
-
Posts
378 -
Joined
-
Last visited
Content Type
Profiles
Forums
Gallery
Everything posted by Wurger49
-
 Fair points, tried my best with this alt.
 -
Awesome mod, plus love the quality of your photoes.
-
After around 50 Star Wars MOCs, I finally did my first Stinger Mantis, another alternate build from the 75399 Rebel U-Wing. To be honest, I am not really a gamer thus didn't play the Fallen Order or Survivor, but looking at models from fellow designers like Codyander and Zsoltom made me study and design this ship. The Stinger Mantis is an luxury yacht which acted as the transport and home for its crew, one notable member being Jedi Cal Kestis. The Stinger class used a asymmetric rotating wing design, with a large fin counterbalancing an outrigger engine pod. The entire front of the cockpit was a framed glass canopy, created by a trans-clear panel on hinge plates. Dual laser cannons were located in the bow, above the cockpit. The grey centreline section has the greebling with a trans-clear tile acting as a top-view window. Behind the cockpit there are folding doors on ball joints where you can open up to put a minfigure inside, it's a tight fit where the minifigure will need to lay back really low. Ideally, each folding door should be connected on two joints, but I needed two for the outrigger engine connection, so I used additional horizontal opening ball plates to support the doors while they are closed. The curved and cutout slopes formed the edges of the top panel, leading to the bulky white paneled section, I also used various slopes to build up this section. The outrigger engine pod's wing frame was made using technic beams and bricks, connected by ball joints and can rotate to both landing and flight positions. Overlapping plates are used to prevent this wing from disconnection due to play. With the piece limitations, the large fin was built independently, on its own hinge plate connection, I tried to recreate the yellow, blue and grey patterns on both sides. It can fold down to horizontal position, but not rotate on the same plane of the outrigger engine. Finally the back section with two thrusters are connected to the front section via overlapping plates and long technic axles, simple but solid. You can pick up the model from the centre white panels and the back thrusters and swoosh it around with no problems. The edge curved slopes can be knocked off easily, and the single connection side doors tend to be pushed into wrong positions if you don't pick it up from the centre white panels. A tall stand was built from round bricks to display the model in flight mode, this model will display nicely alongside other mid-scale Star War ship. Instructions are on Rebrickable: https://reb.li/m/221373
-
haha, thanks, the yellow really pops, you can remove one plate of height, but it gets mostly buried.
-
Following the successful launch of the Rebel Z-95 Headhunter, I decided to follow it with an E-Wing, as I can make use of designs utilised in the Z-95. The E-Wing was notable for being the first fighter designed entirely under the rule of New Republic, intended to match and exceed the performance the preceding X-Wing in every respect, and replace the older designs in the New Republic service. However, despite being a more advanced design, no starfighter can achieve the same popularity of the famous X-Wing. I started the design with shortening the nose, there is a minimum length that needs to be due to the tapering from hinge plates. The nose cone was reduced to two studs, and the windscreen was moved forward by one stud. Proportionally, the back section, which housed the power and deflector-shield generators should be similar length to the nose. Next thing I worked on is how to hang the two engines on the wings, my initial attempt wasn’t strong enough for my liking, and redesign took more time than I expected. In the end, a very strong four studs connection on brackets was used. Once the connection point was worked out, the rest of the engine pods and wings progressed quickly. 1x4 slopes look great for wing struts, and pin hole plates with a technic pin on top looks like a fake connection. In reality, the wings are connected on two towball sockets each, their angles are set by the studs from the brackets on the fuselage and a 2x8 white plate on the belly of the fuselage to prop it up. The bent wingtips is achieved by a towball connection with a bracket setting the angle. A plate built yellow and black astromech sat behind the cockpit, and twelve cutout slopes are used to create the shape of the back fuselage, with grilles and tiles for greebling. I built a small stand using spare round bricks which is tall enough to stand the E-Wing without the engines touching the table. After putting all the sections together, the wing connections are strong enough to hold the entire E-Wing up by itself. One area of weakness is the connection for the bent wingtips, the overall model is very solid and thus very swooshable, you can hold it anywhere on the fuselage. Its distinctive and battle-worn blend of white, grey, blue, and yellow gave the design a grounded, authentic feel appropriate for a frontline fighter. This cool E-Wing starfighter will make another fine addition to any LEGO Star Wars collection. Instructions are on Rebrickable: https://reb.li/m/220701
-
The Z-95 has a long history of seeing active service from before the Clone Wars to the New Republic, as a part of my Blue Squadron Rebel Ships from 75399, I decided to design a Z-95 Headhunter based on Bode Akuna's ride from Jedi Survivor. It makes total sense for an upgraded Z-95 to be a part of Rebel fleet as a light-weight counterpart to the legendary T-65 X-Wing, just like the F-16 and F-15 in the USAF. My Z-95 would share many common components with the X-Wing, like the windscreen, engines and laser cannons, its wings has non-swept leading edge and swept trailing edge like the X-Wing, without the complications that comes with the movable S-foils making it cheaper to build and simpler to maintain. The wingtip laser cannons so iconic for the X-Wing and Z-95, I started with just using the U-Wing 's design, but they are too short, I tried to explore other options before settling on that. Luckily there are two 12 stud long axles remaining after two were used on the engines, I connected them on pin hole pieces and my Z-95 now has two imposing cannons! I managed to create a taper on the Z-95 nose using hinge plates, going from 2 studs to 4 studs wide. Brackets with tiles and curved slopes formed the fuselage sides along the cockpit, leading up to the back hump where the hyperdrive and power generator are housed. I am getting pretty good at using various slopes and bricks in building up fuselages. The engine pods are an evolution of the U-Wing design, the technic pins connect the wings through the engines. Due to the brick built engines I can place a 2x4 plate to connect each engine to the fuselage, this removed the wing sag issue that comes with only connecting via technic pins. This also helps to make the overall model even more sturdy, pick up from the core and swoosh it around like you are an ace! I used the Blue Leader's X-Wing from Rogue One has the inspiration for the colour scheme, Its distinctive and battle-worn blend of white, grey, blue, and yellow gave the design a grounded, authentic feel appropriate for the Rebels. A little stand was built from round bricks to display the model. I really love how this model turned out, the windscreen, cannons and choice of colours just works so well. This could be the first Z-95 I keep in my collection instead of disassemble it for a another model. Instructions are on Rebrickable: https://reb.li/m/220440
-
Thank you, the windscreen worked alright. The doors can't move.
-
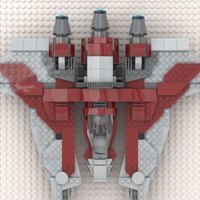
Another LEGO set, another Gunship! This time in the white and blue colour scheme! The Low Altitude Assault Transport/infantry gunship was a military repulsorcraft. Besides serving as an infantry transport, it was also used to provide air to ground support like the Mi-24 Hind and UH-60 Black Hawk. The X-Wing style windscreen made me think about how to design the canopy, reversing the orientation of the windscreen allowed me to fit two pilots inside the canopy, a similar look to the AH-1 Cobra’s plexiglass canopy. The gunship was operated by both a pilot and gunner, who were seated in a stepped tandem arrangement in which the commander was placed in the rear seat while the gunner occupied the forward position. The cargo bay can stand 4 minifigures, it’s also tall enough for the K-2SO. The back side panels have a slit window thanks to their implementation on the U-Wing. This gunship packs a punch. There are two nose mounted laser cannons with a massive missile launcher on each wing, the missile launcher design is based on the engine pod design of the U-Wing. This combined with the angular windscreen can be seen as an early Imperial Gunship model as the Empire prefers the industrial look over the organic shapes of the Republic-era ships. Like my other gunships, building this model is a breeze as I broke it down into multiple sections. The back thrusters were built into the design using grille pieces. The back ramp does open up but the entrance into the gunship is blocked by the structural column. Round bricks from the U-Wing engines serve as another structural column behind the cockpit. The wings are attached via towball plates and their angles are set by a support 2x6 white plate on the dorsal spine of the gunship. Thanks to the many brackets inside the set, this is a very solid model for swooshing around. You can pick it from the spine and swoosh it around holding the cargo bay floor or the 4 side panels. Do not try to pick up from the wings. After comparing to the gunship I made from the 75402 ARC-170, it’s surprising to see how similar in size they, even the cargo bay opening and location are similar. It would be awesome to see they go onto many different missions together supporting each other. This gunship is an evolution of my different gunship alternate builds from different sets, it’d be a fantastic addition to any LEGO Star Wars collection! Instructions are on Rebrickable: https://reb.li/m/220055
-
cheers mate, seeing different designs from everyone provides impetus!
-
During the lull of Lego Star Wars releases between Jan and May, I look for other themes to do alternate builds on, like the military aircrafts I did with the Creator 3-in-1 Race Planes. While I was browsing for other sets, the Ninjago Ras and Arin’s Super Storm Jet in its blue and orange colour scheme sparked my interest. The Milano is the home for the Guardians of the Galaxy. Sleek, fast and packed with personality, it’s Peter Quill’s prized M-Class starship. With its vibrant orange and blue paint job and unmistakable silhouette, the Milano soars through the cosmos on wild adventures, from daring heists to galaxy-saving missions. I love the bird-like profile of the Milano, with its back-swept wings and feather like winglets, plus the vibrant colour scheme. I started off with the beak of the Milano, the two panels are attached at a 90-degree angle, nestling against sloped curves on the top. I literally spent the first night working on this beak, especially on its connection to the rest of the fuselage, before giving up and call it a night. The design finally got going on the second night after working out how to connect the triangular pieces and worked out how the wings will connect. The canopy is clipped on, and you will need to take it off before placing the minifigure. The cockpit is very spacious and sits a minifigure, trans-light blue pieces made up the dashboard. I tried to smooth the transition between the nose and the wing leading edges via more curved slopes and pentagon tiles. The wings are angled through the swivel hinge plates, they deliver the back-swept wings with straight curved slopes. Ninjago swords and blades are used to represent winglets, I can’t believe this jagged blade piece is still not on Studio even though it was released in 2021, I had to use a different piece to substitute it on the Studio model. Two large rotating thrusters are positioned on the side of the fuselage, and a small central thruster is mounted on the tail. Trans-light blue pieces are built under the trailing edge of the wings to represent vents. Plates and 4x4 inverted slopes are stacked to build the back portion of the fuselage, all the way to the swallowtail of the Milano. I like how the two triangular inverted slopes visually connected the tail to the 4x4 corner wedges. Due to the stacked construction method, the core fuselage of the Milano is rock solid, much stronger then the connection of the beak and wings. After building the model, you would know to pick up the model any where from the central fuselage to the tail and swoosh it around with no concerns. I used four sloped wedges to create a crossed-shaped dock for the Milano, trying to maximize parts usage. This is by far the most vibrant design I have done, the bright light orange really pops out from the black and dark blue pieces. It’s really rewarding to see this alternate build achieving the bird-like profile while being sturdy enough for play. I hope this would be a worthy additional to any LEGO spaceship collection.\ Instructions are on Rebrickable: https://reb.li/m/219578
-
My Su-35 was extremely well received so I decided to follow it up with the current Russian 5th Generation jet fighter Sukhoi Su-57 Felon, featured in the movie Top Gun: Maverick. The Su-57 is the first Russian fighter aircraft designed with stealth technology and is expected to succeed the Su-27, and acts as the competitor to US F-22 and F-35. Sukhoi used existing Su-27 airframes for testbeds for various subsystems and concepts, which was reverse implemented to the Su-35 to bridge the gap with existing fourth generation fighters. The aircraft has a wide blended wing body fuselage with trapezoid wings, two widely spaced engines and has all-moving horizontal and vertical stabilisers. I moved the 12x6 wedge plates out to create the blended wing body, with 10x3 curved wedges smooth out the connection from the leading edge root extensions to the cockpit. The aircraft has two separated podded engines and a twin tail. The space between the two engines housed two internal weapons bays, and smaller side weapons bays in fairings near the wing root, I used two technic 1x5 round plates to represent the weapons bay fairings. Internal weapons carriage eliminates drag from external stores and enables higher performance compared to external carriage, as well as preserving the stealth shaping. A pair of 4x1 inverted curved slopes are used for the rectangular intakes, and the two engine pods are built by stacking plates. The twin tails are brick built, I can’t do the canted version but the horizontal tailplanes are done quite well using different cut tiles. The 45° cut tiles in white, dark azure and dark blue gave me the chance to try out many different splinter camouflage patterns, this time for the original user of the plane, instead of aggressor squadrons. My Su-57 is slightly smaller than my Su-35, but it looks bigger due to the wide blended wing body fuselage, it has a shorter nose for an active electronically scanned array radar, longer engine pods for large internal weapons bays. Like the other models from this series, it’s very swooshabilty. Instructions are on Rebrickable: https://reb.li/m/217605
-
cheers, that particular design got to credit LEGO, haha.
-
Thank you! the colours sure do match, they now use the digital pixel camo pattern.
-
As I was doing the 3D modelling of the Super Hornet, who is in the aggressor splinter camouflage, the idea of doing the Sukhoi Su-27 Flanker got cemented in my mind. The Su-27 and its derivative Su-35 had been on news during recently times due to the current Russo-Ukrainian War. The Ukrainian Air Force had inherited the Su-27s after the collapse of the Soviet Union in 1991, this created an interesting scenario where two oppositions are fighting each other with the same weapons. The Sukhoi Su-27 was the Soviet’s response to the American F-14 and F-15 in the 1980s. The Shenyang J-11 is a Chinese license-built version of the Su-27. The airframe used blended wing body fuselage plus LERX (leading edge root extensions), they are vortex generators to reduce overall wing load to enhance high alpha maneuvering capabilities. I used the 10x3 curved wedges on top of the 12x6 wedge plates to create that look. The entire wings of the Su-27 needs to be more angled on the leading and trailing edges compare to what I can do with the available wedge plates. The aircraft has two separated podded engines and a twin tail. The 'tunnel' between the two engines, as on the F-14 Tomcat, acts both as an additional lifting surface and hides armament from radar. A pair of 4x1 inverted curved slopes are used for the rectangular intakes, and the two engine pods are built by stacking plates. The twin tails and ventral fins are brick built, not the most accurate of shapes but the horizontal tailplanes are done quite well using different cut tiles. The 45° cut tiles in white, dark azure and dark blue gave me the chance to try out many different splinter camouflage patterns, this time for the original user of the plane, instead of aggressor squadrons. My Su-27 Flanker is bigger than the F/A-18E Super Hornet, the two stud-wide central protruding spine pushed apart the engine thrusters and the twin tails which used up a lot of pieces. The nose of the Flanker sits higher relative to the ground due to the blended wing body fuselage. Like the other models from this series, it passes the swooshabilty test. I kept the black display stand as it is, so you can build a spare stand and use it for your other MOCs. The Su-27 looks great in-flight on display, you can easily remove the landing gear pieces from the model if you prefer to see it flying. Instructions are on Rebrickable: https://reb.li/m/215524
-
is the hornet called a racer?
-
Cheers mate. Yes, a lot of compromises for the chin intakes.
-
After designing the F-16, I wanted to design the F/A-18 Hornet as I am a fan of “The Mover and Gonky Show”, where two ex-fighter pilots, who have flown the F-16 and F/A-18, and their guests discuss everything from aviation to racing to life and anything in between, highly recommend to check them out on YouTube! https://www.youtube.com/@themoverandgonkyshow McDonnell Douglas F/A-18 Hornet is a twin-engine, midwing aircraft, it also served as the baseline for the later Boeing Super Hornet. While it does not have a blended wing body design, it does have leading-edge root extensions (LERX), which the 10x3 curved wedges can be used again. The 12x6 wedge plates are perfect for the F/A-18’s wing, a trapezoidal shape with a 20-degree sweepback on the leading edge and a straight trailing edge. While I managed to recreate the shape of horizontal stabilators very well, I couldn’t do the canted vertical stabilizers with the pieces available. A pair of 4x1 inverted curved slopes are used for the rectangular caret intakes, this combined with the large leading-edge root extensions made this alternate build a mix of the original Hornet and Super Hornet. The 45° cut tiles in white, dark azure and dark blue gave me the chance to try out many different splinter camouflage patterns, I tried to emulate the camouflage used by the Fighter Squadron Composite 12 (VFC-12) from the United States Navy Reserve, those patterns replicate the ones deployed on Russian fighters like Su-35s. VFC-12 serves as an aggressor squadron, simulating enemy tactics and aircraft to prepare US Navy pilots for real-world combat scenarios. The Hornet is bigger than my F-16 alternate build even though it uses less pieces. Like most of my other designs, it’s solidly built and passes the swooshability test from my son. I kept the black display stand as it is, so you can build a spare stand and use it for your other MOCs. The F/A-18 looks great in-flight on display, you can easily remove the landing gear pieces from the model if you prefer to see it flying. Instructions are on Rebrickable: https://reb.li/m/216889
-
My second design takes us back to the current age, the General Dynamics F-16 Fighting Falcon, now part of Lockheed Martin, is one of my favourite single engine fighter jets. It has frameless bubble canopy, cropped-delta wing incorporating wing-fuselage blending. A blended wing body has no clear dividing line between the wings and the main body of the craft. Not only it looks cool with the 10x3 curved wedges around the cockpit, it reduces drag and creates more lift. A conventional tri-plane tail arrangement is built with two tiled horizontal stabilizers and a brick built vertical stabilizer. The wings uses 12x6 wedge plates, the 72° angle is too high compared to the actual wings of the F-16, ideally the 63° angle wedge plates should be used. Though I think 12x6 wedge plates will be perfect for F/A-18 wings! Wingtip rail launchers are represented by 1x5 smooth end technic plates. The air intake is built using 4x1 inverted curved slopes, it’s also not the right shape but it will have to do. At least the tricycle landing gears are at the right places and the overall shape of the model is close enough to a F-16. The 45° cut tiles in white, dark azure and dark blue gave me the chance to try out many different splinter camouflage patterns, I tried to emulate the camouflage used by the 64th Aggressor Squadron from the USAF, those patterns replicate the ones deployed on Russian fighters like Su-35s. The F-16 model is a bit smaller compared to the P-38 Lightning I have done, using about 100 less pieces. However, it’s more solidly built and great for swooshing around. I kept the black display stand as it is, so you can build a spare stand and use it for your other MOCs. The F-16 looks great in-flight on display, you can easily remove the landing gear pieces from the model if you prefer to see it flying. Instructions are on Rebrickable: https://reb.li/m/216286
-
cheers, really tried to get the camouflage to pop!
-
I have updated my design to make it sleeker, lengthening the nose by 2 studs.
-
haha, thank you, great potentials from this set! Happy to give ideas to others.
-
I was really impressed when I first saw the 31160 Race Plane, it’s the perfectly priced Creator 3-in-1 set. I can straightaway see myself using 2 sets like what I had done for the 60430 Interstellar Spaceship to create multiple fighter planes. The first one I have done is derived from the main build, a single piston engine race plane who looks like a mix between the late model Spitfire and P-51 Mustang. The original plan was to design the De Havilland Mosquito, which around 200 were built at the Bankstown Aerodrome which is close to my home. I used to visit the aviation museum on the airport until it was permanently closed back in 2016. Unfortunately, like some of my other adventures, it didn’t work out. I couldn’t figure out how to use the 10x3 curved wedges effectively; then it struck me that those curved wedges could help lengthen the engines into booms of the iconic Lockheed P-38 Lightning. The P-38 incorporated a distinctive twin-boom design with a central nacelle containing the cockpit and armament. The twin-booms contained the overly lengthy turbo-superchargers, engines and tail assembly. I want to point out while my LEGO design has a taildragger landing gear layout due to the pieces available and weight distribution, the P-38 had a tricycle undercarriage. The 45° cut tiles in white, dark azure and dark blue gave me the chance to try out many different disruptive camouflage patterns, I settled on the current version of opposite white patterns on the wings and dark azure patterns on tail plane. My boy loves propeller planes as the propellors spin when he runs around the house, I had to promise him a bigger and better one before I disassembled the original LEGO race plane. I didn’t disappoint; I taught him to hold the P-38 where the wings are connected to the booms while swooshing it around. For adults, it’s easier to hold it from the back of the cockpit nacelle. The model is just strong enough for play, just need to be aware of the weak points around the tail assembly. I kept the black display stand as it is, so you can build a spare stand and use it for your other MOCs. The P-38 looks great in-flight on display, you can easily remove the landing gear pieces from the model if you prefer to display it on the stand. Instructions are on Rebrickable: https://reb.li/m/214020
-
thank you!
-
Remember when I said I hit a road block when designing the Gauntlet and had to change to the Fang fighter? Look how things can change in a few days. I managed to improve upon the design and delivered the Gauntlet with a better wing pattern arrangement. The Kom’rk Class Gauntlet was the original Mandalorian starfighter that first appeared on the Clone Wars series. Its signature cranked arrow wings can pivot 360 degrees around the cockpit to reduce the G-force on the pilot while doing heavy maneuvers. The essential pieces are the 1x6 technic bricks with 5 pin holes, and the 1x2 technic bricks with 1 axle hole. They allow the 360 rotating cockpit to be mounted on the centerline. It is connected using a technic axle pin with friction ridges, which you do need to push the cockpit back after a bit of play. I originally had both wings on the same connection, but there is no way to hold the wings in place during flight so I scrapped it. This means the wings cannot rotate into an upright position for landing. The underside of the central fuselage is built with inverted slopes and bricks so the Gauntlet can rest on the table without any unnecessary movements. The Gauntlet has twin engines on each wing, while the Fang Fighter has only one on each wing with a central engine behind the cockpit. I modified the wings to accommodate the twin engines. The four engine outlets are made by two 2x2 round plates connected on axle hole bricks, I had to use the spring loaded shooters as engine mounts. The Gauntlet has long forward mandibles with twin laser cannons in between, while the Fang Fighter has the cannons on the wings. Due to the different wings I managed to design a much cleaner dark red pattern with the tiles and plates available to me. The placement of those 3x6 round half plates are not only for looks but also for structural reasons, the overall wings with layering are very solid. There are enough technic beams and pins to build a stand with 2 angles to display the model; The stand allows for the Gauntlet to be displayed with its wings on a pivot, showing its quintessential feature. This cool starfighter will make another fine addition to any LEGO Star Wars collection. Instructions are on Rebrickable: https://reb.li/m/214280
-
I didn’t realize that I have passed double digits for my 75402 ARC-170 alternate builds when I did my V-19 Torrent, that’s a new record for me with more to come! A big thank you to everyone that has watched my videos and bought instructions, or just a like and a comment on the video and design pages. The Fang Fighter was designed to build upon the successes of the Kom’rk Class Gauntlet. It presents a sleek, angular silhouette with a double delta wing, featuring non-straight leading edges. The central fuselage accommodates the cockpit at the front and a single ion engine at the rear. The distinctive double delta wings can pivot 360 degrees on a swivel, equipped with laser cannons and ion engines. This reduces the G-force on the pilot while doing heavy maneuvers. The essential pieces are the 1x6 technic bricks with 5 pin holes, and the 1x2 technic bricks with 1 axle hole. They allow the 360 rotating cockpit to be mounted on the centerline. It is connected using a technic axle pin with friction ridges, which you do need to push the cockpit back after a bit of play. I actually started with designing the Kom’rk Class Gauntlet but hit a road block and changed to this eventual design, not everything works out in the end in alternate builds. The white wheel piece and the sloped wedges make great engine mount going from narrow to wide, while the wing engine mounts are rather rudimentary using slopes and grilles. The underside of the central fuselage is built with inverted slopes and bricks so the Fang fighter can rest on the table without any unnecessary movements. A technic pin and an axle made the laser guns mounted on a pin hole plate attached the underside of the wings. Due to the lack of dark red wedge plates I didn’t have what I wanted for this design, so the dark red patterns are a bit forced, especially with the those 3x6 round half plates on the wings where they need to stick out towards the nose. However, with a heavy layering of plates and tiles, the wings are very solid. The stand is built using wheel, barrel and cylinder pieces held together by technic pieces. The stand allows for the Fang fighter to be displayed with its wings on a pivot, showing its quintessential feature. This cool starfighter will make another fine addition to any LEGO Star Wars collection. Instructions are on Rebrickable: https://reb.li/m/213857