20feet
-
Posts
58 -
Joined
-
Last visited
Content Type
Profiles
Forums
Gallery
Everything posted by 20feet
-
 I built my own version of this Mod, with a bunch of added details. Changes include: • Reintegrated hinges, with 2 studs added depth • Working hoist • Full interior floor with central well • Throne room is 1 stud longer, added doors and a fancy balcony • Blacksmith’s forge has wood storage and extra tools • Larder, armoury and secret treasure cave in the gatehouse • Second treasure chest behind removable wall under the stairs • Phoenix shrine becomes a cage for the red dragon, with feeding window and a wooden balcony above. • Decorative shields and cattle skull • Moved gargoyles to the left side and added vines to a big grey wall • Expanded the moat from 2 studs wide to 6 • Added several desks, tables, benches and chairs • Dragon has a larger snout and bottom jaw • A duck More pics on Flickr. Thanks Richard for your excellent creation! Building this was a lot of fun and I wouldn't have tried if I didn't have your version to work from.
 -
Ya, both pairs of wings are loose when in a middle position because of the play in the gears. They're only tight at the end positions. But if the worm gears are misaligned, one pair of wings will hit their end position first and the other will still be loose. @Thwomp and I are on the same page.
-
That's not my experience. When I start with the worm gears in different positions I get one wing looser than the other, even if I don't turn the gears after. Also, when you add the central bevel gear it locks the worm gears to each other, so it shouldn't be possible to change their alignment later after adding the 8 tooth gears, right? The worm gear has no symmetry, so if you give it a quarter or half turn it then the 8 tooth gear will mesh with it at a slightly different angle. But it's possible that I did something else wrong. I'd be curious if others have the same issue and which solution works for them.
-
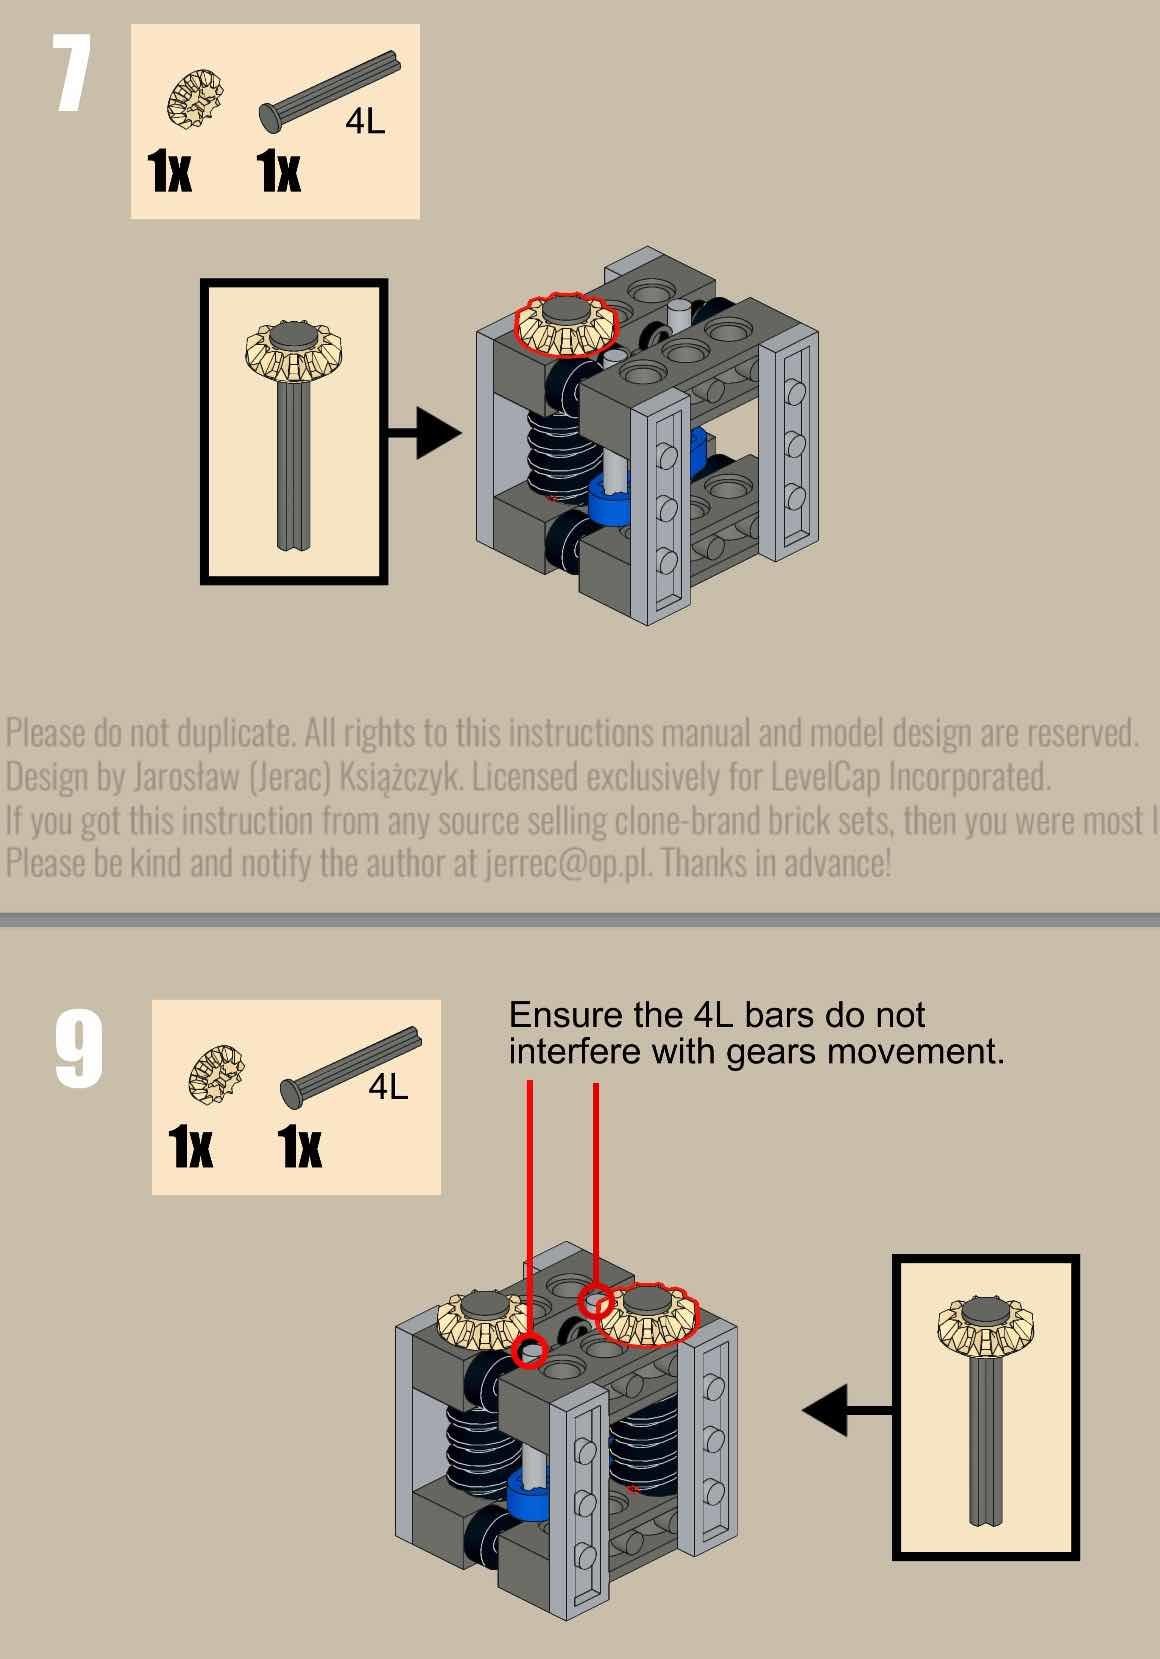
I finally solved a problem I've been having with the wing mechanism in this model. I always had one pair of S-foils that were loose in either position. The issue is with the alignment of the worm gears - if you don't have them exactly in the right position initially, the S-foils will always be slightly out of sync. Looking back at the instructions, there are tiny red highlights at the bottom of the worm gears on steps 7 and 9. Maybe these are meant to indicate the correct position of the worm gears? But these pictures suggest that the worm gears should be in exactly the same position. In my testing, I think one should be turned 180 degrees from the other. It's finicky because the 12-tooth bevel gears create 12 different positions for the worm gears to be in relative to each other. But 180 degrees seems very solid, so I think that's the ideal position. The way to check is at step 37. If you turn the big gear as far as possible to the closed position, the front and back plates should be locked equally tightly. If one is loose, you need to pull off the bottom, turn one of the worm gears, and try again.

-
Ya, you have to look pretty closely at a 1x8 tile to notice that it's in the "wrong" sans serif font. I'm not really a font obsessive, but I'm quite persnickety with my MOCs. It's like that Steve Jobs quote about the back of the cabinet. And you're right about the change! I didn't notice but it looks like the Singapore and Great Pyramid labels are set in Cera Pro. Lego does like to make minor tweaks to their pieces for no obvious reason. Nice catch Mr Arial
-
I found the answer! According to Adobe Reader the PDF contains a font called "LEGOChalet60" in different variants. Seems to be a proprietary version of the font family Chalet - very similar if not identical to Chalet London Nineteen Sixty. BTW I tried a bunch of online image font finder tools looking for this - they're all terrible.
-
Hey does anyone know what font TLG uses for the printed city names in architecture sets? I'm making my own city skyline, and I've been hunting around the internet for the font and I just can't find it.
-
Ah, ya I should have a look at those 3D models. I was referring to this image: It's not terrible, but there are some issues. I've been looking for photos of original props, and came across an infuriatingly rare Japanese book that apparently has pages of prop photos for every X-wing model in ANH: It's annoying to know these photos exist and have no way to access them. But there are a few good pictures shared here. I think they'll be my main source if I ever get around to building my own X-wing. Is your second X-wing closer to the proportions of the Rouge Squadrons model than your first version?
-
Hi @Jerac, I'm just now taking a closer look at this and I'm curious what you're using as a reference for the X-wing proportions. Your previous version looks like a pretty close match for the blueprint in the Owners' Workshop Manual, but the new one's a bit different - particularly the longer nose. I don't completely trust the OWM (it led me slightly astray with my TIE Fighter) but it's hard to find more a definitive source. The perspective in photos can be a nightmare, as you noted.
-
Thanks! It's a fun challenge to build something from the pieces of just one set. But it's rare for a set to have such an awesome "B Model" that also leaves so many pieces for a cool side-build.
-
Ya I get that some people would prefer a subtler colour scheme, but for a set aimed at kids (or adults nostalgic for classic Pirates) the bright colours are great.
-
Hi all, I'm late to the party, but I finally got this set for Christmas and once I built the "B model" ship I knew I wanted to do something with all the leftover island pieces. If I'd seen this thread at the time I might have built one of the MOCs above instead, but I'm glad I spent the time to create my own! I built a "Traders' Cay" with a working crane to hoist cargo from a rowboat. Also features discreet treasure chest storage: And a gem buried by an unfortunate prisoner: It's fun to have an island side-build for the pirates to interact with. More pics on my Flickr! What do you think?
-
White or LBG is the eternal question of X-wing building. I generally prefer LBG, but this white version looks really sharp. Nice work! I just checked and I have trans clear studs with bars in 2 distinct heights. This is very troubling! Are you saying that Lego includes 2 different molds of this piece in the same colour in the same set? WTF?
-
It's really interesting to see the different versions. I do think the final version looks best from those options. The ones with built clear sections have a nicer shape but they're clunky and distracting. This persuades me that the only alternative would be a built frame without "glass" (which would look out of place in your lineup). It looks like the fuselage is basically the same shape in each version. The too-wide canopy doesn't look too out of place on the narrow hull.
-
Ya, I won't hassle you any further about using the glass canopy. It makes sense to stick with a consistent style when you're designing a whole fleet of ships, and that means making bigger compromises in some cases. I was curious whether you had to compromise the shape of the T-70 fuselage to fit the canopy - specifically the width and angles at the top.
-
Congratulations on beating the final boss! I'll always prefer the T-65, but it's definitely an achievement. I think the canopy extension technique you settled on is probably the best possible, if you have to use that stupid piece. It just makes me want to see a version with a build canopy - maybe someone will oblige. Did you have to alter the shape of the fuselage to accommodate the canopy piece? I like the round shape of the back end of the canons - looks like just some plates with pin holes to attach them to the wings. Should work on the T-65 too, right? I guess they're too narrow, but might be worth it for the shape. I'd be interested to read more about the design process and the compromises you had to make if you care to share. This is the most exciting part TBH :)
-
Thanks Jerac! I did figure out how to do most of it in Studio so I'll probably share that, even though it doesn't include the hoses and rubber bands. I don't plan on releasing instructions because 1) it sounds like a lot of work, 2) I used several rare pieces that wouldn't be practical on a larger scale, 3) I used techniques that would be hard to describe in instructions and would probably try the patience of most builders, and 4) I'd rather see people incorporate some of my ideas into their own MOCs than build duplicates of mine. I like the freedom of designing a one-off MOC. I wouldn't want to give that up to try to compete with Jerac and Brickvault, and I think trying to turn something like this into a product would be frustrating for all involved. But I do feel the need to brag about some of the techniques I used, so I'll probably share more about that even though no one's asking :)
-
I don't - yet. I've been trying to learn Stud.io and working on building this model digitally. The problem is I used a LOT of illegal techniques which I'm having trouble duplicating in Stud.io. (Any digital pros out there who can tell me how to position pieces precisely in ways Stud.io doesn't think will fit?) If I can make a good digital model I may share that (along with a lengthy disclaimer).
-
That's a great-looking AT-AT! Can you describe how it differs from the other big AT-AT MOCs you mentioned?
-
I made a video comparing the stability of this MOC with Lego axles vs metal ones from Dark Ice Designs. The difference is dramatic. So which do you prefer: 1. Sturdy blocky spars like Jerac's 2. Wobbly, cylindrical, all-Lego spars, or 3. Sturdy, cylindrical spars with non-Lego metal axles?
-
Lol sorry, that's a bit of a troll. I looked into this recently and the bottom line is there are several inconsistencies between the interior TIE Fighter set and the exterior model—the set designers back in the day just weren't that concerned with accuracy. You can read my hard-hitting investigation starting here.
-
Thanks everyone! I agree that the wing rim and spokes look too smooth in comparison to the hub and other details. I thought about covering everything with hoses, but it would just get way too thick. Would look better from straight on but worse from the side. The only way I'd consider to add more detail there is stickers—a sticker running down the middle of the tiles would be closer to the right thickness than a hose. But philosophically I'm reluctant to add tons of stickers.
-
I’ve finally finished my first real MOC! My goal was simply to make a minifig-scale TIE Fighter that is as accurate as possible in its proportions and details. (Note: if any of my terminology confuses you, feel free to consult the glossary.) I started working on this in March, after completing my mod of @Jerac’s TIE Fighter (working from his first version). My mod changed a lot of the details, but kept the internal structure of the cockpit and spars. It also kept the wings mostly unchanged—not because I was satisfied with them, but because as a novice, reworking them felt daunting. Wing Hubs I knew that the technic 6-blade rotor had potential for a wing hub (thanks to Koen Zwanenburg) but it doesn’t come in LBG. I found a way to skin it that closely mimics the ship’s greebling, and isn’t too thick. Once I made these wing hubs, I knew I wanted to make a whole new TIE Fighter to match them. Wings I built a rim with the correct size and shape, and filled in the wing panels with my stacked 1x1 technique that suggests ridges running perpendicular to the wing edges. Coincidentally, 1 stud is very close to the right spacing for these ridges, so the overall look is quite accurate. I wanted to minimize gaps around the spokes, which meant using a lot of 1x1 plates (almost 150 per wing). I placed pairs of plates together where possible, to give a suggestion of the subtler parallel ridges. For the spokes I wanted smoothly tapered tiles rather than the standard steps and exposed studs. The spokes are less sturdy this way, but the wings overall are reasonably solid. The angles are a perfect 60 degrees. It’s annoying that TLG printed a tile for the central wheel with quite accurate details, but shifted the angles to 45/90. Spars Once I had the wings I moved inward to the spars, which present a trilemma: ideally you’d want your TIE spars to be cylindrical, sturdy, and free of non-Lego parts. You can have two of the three. My cylindrical, axle-based construction looks far better than stacked plates, but makes for wobbly, droopy wings. With standard Lego axles, this model is for display only. Following Cereal Eating Builder’s lead, I caved and bought metal axles. The hardest detail in the whole model to render was the “shoulder plate” on either side of the cockpit. I made a couple dozen prototypes (some early ones here) before finding one that represented all the angles (so many angles!) and wasn’t too chunky and distracting. I don’t love the gaps and exposed studs, but this is the best solution I could find. Cockpit Exterior I still prefer quarter domes for the cockpit. They really limit interior space but the smoothly rounded shape can’t be beat, and the greebles I wanted to include fit nicely in between them. The main inaccuracy in this model is the size of the canopy and top hatch, which should be 5 studs in diameter at this scale. The only solution would be to scale the ship up to match the 6-stud canopy, or down to the 4-stud version. Maybe someday. The canopy hinge and the quarter domes also push the cannons too low and wide, but I was able to get them just a bit closer than my previous version. I’m convinced that space binoculars are the best piece for the “bowties” beside the canopy, but they seemed impossible to attach. I struggled for a long time to make even an asymmetric connection with a clip or minifig hand, and I almost gave up before hitting on a sneaky solution. Can you guess how I did it? There’s a hint in the interior shots below. Rear The rear cone was a challenge. My previous TIE had a crude version with handlebars and 1x1 clips. I wanted something cleaner, and posing stands (now in LBG!) seemed promising. The trick was filling in the gaps between them. Purists may feel that I’ve cut my pneumatic hoses too short, but I’m pretty pleased with the result. The main issue again is that it’s a little oversized—6 studs wide rather than 5—but I’m ok with it because it’s in scale with the hatch and canopy. I was able to include the cone hump at the top—another oft-overlooked greeble. To me the dark bowties around the engines are an essential detail, and I was determined to include the red engines, which I couldn't fit in my previous TIE. I considered cutting a red hose, but I was ultimately able to work in a nipple tile. Cockpit Structure It was challenging to attach the spars securely to the cockpit. 1x2 bricks with axle holes are the obvious choice, but I couldn’t handle the asymmetry. There aren't many other options, so I ended up using 2x2 bricks with pins, reinforced by 2x4 technic plates and brackets. With metal axles they're almost solid—in spite of the reinforcements, with swooshing the spars can pull free and rotate forward slightly on the pin bricks. The quarter ellipse liftarms are structural, and not only do they make for a smoothly rounded exterior, but their half-stud width is ideal because the details around the edge of the cockpit—the hatch side greebles and the shoulder slopes—are 1 stud wide. TIE builders who prioritize smoothness and disapprove of my wanton greebling might still be interested in this technique. Cockpit Interior I wanted to include the shape of the dark grey “dashboard” and the triangle at the top of the canopy, since these are visible on the exterior model (although missing from the cockpit set). The interior is very constrained by the quarter domes and the structure holding them together. I was less concerned with modelling the interior accurately, but I did want to make sure that it fit a TIE Pilot (with oversized helmet) and that it looked reasonably cool. The pilot sits quite centred in the cockpit. There’s no space for a seat, but the movie set didn’t have one either. I was tempted to add a bunch of interior details with stickers, but once you start with that it’s hard to know where to stop. In the end I restrained myself to just 2: the iconic targeting display, and a tongue-in-cheek tribute to the rear “window”. Other designers have included transparent rear windows in their designs, but I haven’t seen any that put the interior window the correct position—high up behind the pilot’s head. Struggles with Scale This is my first attempt at scale modelling, and in the end I found the proportions are not as precise as I’d hoped. Part of the problem is that the hubs, although reasonably flat, are much thicker than the “real thing”. I wanted to define the overall width by the centre of the wings from the front view, meaning that the chubby hubs encroach into the spars’ space, and the T-shaped end plate gets squashed. But beyond that, my spars ended up being a bit shorter than the reference, for reasons I don't fully understand. I may try to fix this at some point, but I’d probably need to learn digital design to really nail it down. The side view, however, fits like Cinderella's slipper. Acknowledgements & References I’ve enjoyed discussing TIE Fighter building with Jerac, Cereal Eating Builder, and others. (If anyone else would like some feedback about a TIE in progress, get in touch! In building this I’ve gained a lot of knowledge that is really only useful to a freelance TIE MOC consultant.) My primary reference (the white overlay above) was the blueprint from the TIE Fighter Owners’ Workshop Manual. Unfortunately, I’ve recently noticed some inaccuracies compared to physical models. The EFX prop replica seems more reliable, and you can find some pictures of the original props here. Glossary I tried to keep this introduction short and sweet (seriously) but I am prepared to discuss every detail of this model at length if anyone cares to ask. In anticipation, I’ve created a visual glossary of all the greebles I tried to include, so we have some shared vocabulary. What do you think?
-
Thanks everyone! Well, with Lego axles it's wobbly, but "shelf-stable". With metal axles, fairly solid. There are several greebly bits that are easy to bump out of place - I had to re-take some pictures because I later noticed something was crooked.
-
I finished my new TIE Fighter! Will discuss in a new topic here shortly.