Alex Ilea
-
Posts
781 -
Joined
-
Last visited
Content Type
Profiles
Forums
Gallery
Everything posted by Alex Ilea
-
[TC27] Crane Dump Truck
Alex Ilea replied to Alex Ilea's topic in LEGO Technic, Mindstorms, Model Team and Scale Modeling
Thanks guys! I built this model first in Studio, and I had prepared some Work in Progress renders of it, but my hard disk got corrupted and I lost all of my files on it, including this model completly. I used a recovery tool, and managed to save the digital file of it, so I was lucky to even have an entry this time. -
[TC27] Telehandler
Alex Ilea replied to CK28's topic in LEGO Technic, Mindstorms, Model Team and Scale Modeling
Awesome stuff, it's really nice looking! -
Crane Dump Truck Truck mode - 1st gearbox position -Working steering -Drive (rear 4 wheels) -Tipping bed Switching changes between the two modes and also deploys the stabilizing outriggers. Crane mode - 2nd gearbox position -Rotating turntable of the crane -Main crane elevation -Secondary crane elevation Extra functions:-Rear suspension on the 4 wheels-Working steering wheel-Working fake engine-Tilting cabin-Opening bed sides-Winch mounted to the crane-Opening doors YouTube Presentation: Discussion topic here:
-
Hi everyone! I built this motorized truck for the latest EB contest, that has many cool functions under the skin. It has a 2 position gearbox for truck mode and crane mode. The model is powered by a BuWizz 2.0 brick and it uses 3 PF Large motors for the functions and 1 PF Medium motor for switching. Truck mode - 1st gearbox position -Working steering -Drive (rear 4 wheels) -Tipping bed Switching changes between the two modes and also deploys the stabilizing outriggers. Crane mode - 2nd gearbox position -Rotating turntable of the crane -Main crane elevation -Secondary crane elevation \ \ Extra functions: -Rear suspension on the 4 wheels -Working steering wheel -Working fake engine -Tilting cabin -Opening bed sides -Winch mounted to the crane -Opening doors The model uses 1875 parts, many gears, motors and actuators, so it is very complex in a compact package. Mandatory underside photo: Internals of the truck: Here is a video presentation I did for this truck showcasing all of the functions: More photos here Thanks for having a look at my build, and I hope that you like it!
-
This October (5th to be precise) we will be organizing our annual RTXP (RoLUG Technic Xperience), in Bucharest, Romania. The challenges will be mini racers, mini triak truck (pick-up style), tatra 8x8, and pullback cars. HERE are the rules translated to English, if you want to have a look.
-
I also want to buy a spare set to keep this myself ;) Thanks!
-
This is a good reminder that I need to build my entry IRL. Still need to finish a quick project first.....
-
42177 Unimog 437 Snow Plow
Alex Ilea replied to M_longer's topic in LEGO Technic, Mindstorms, Model Team and Scale Modeling
The idea of making portal axles is really impressive. The overall build looks good and is, of course, a natural alternate of the G class. I also quite like the way you used the suspension arm in the front for the plow. Nice! -
Hello! Can you please get into more detail on how to do this? I have had a pc crash and my studio file was saved, but when I restarted the pc and opened my model it says that it has 0 parts. The file has 2 mb of data in it, and a fresh studio page with the same "0 parts" has 2kb. I would really appreciate some help.
-
Really appreciate that, have fun!
-
Instantly recognizeable, well done Eric!
-
Thanks guys! I quite like building with these part limitations. It forces you to be creative and innovative in different places.
-
Actuallyyyyyy.....I have tested the tractor tires on big trial trucks, and you have better grip overall with them in the "wrong direction" for crawling. And placing them the "correct way" is better for speed and handling.
-
Thanks guys! Yeah, the front lacks those bulging arches, it makes it look a little flat, and the vent were loosely represented. I appreciate your feedback!
-
That is indeed a big challenge every time. I also hate blue pins sticking out, they just ruin builds. I have learned that there is (most of the time) an alternate solution to avoid keeping them exposed. I wanted to add a manual hood prop shaft, but it kind of feels cheap. As an alternate, I wanted to make an autoblocking mechanism for "hood open position", but didn't manage to get anything relieable in. Thanks for the feedback langko!
-
Thank you very much Milan!
-
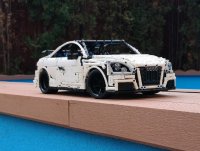
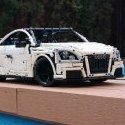
Hi eurobrickers, This is my Ferrari 12Cilindri, which is a B-model alternate build of the 42143 Ferrari Daytona set. The model is built exclusively with the parts from the Daytona set, so no additional parts are needed, and it is in 1:8 scale. Features: -suspension -steering -opening doors and hood -working steering wheel -V12 engine -8 speeds paddle sequential gearbox This model uses 3200 parts, and besides the car, I built a display stand which allows the model to be displayed without the wheels touching the ground. Weight: 2505 gr/88.4 Oz Length: 54 cm/20.5 in Width (with mirrors): 26 cm/10.23 in Height: 15 cm/5.9 in Talking about the design process, I have started as I usually do, nowadays, in studio. I imported photos of the car, as it was a new release at the time of building it, and no actual blueprints were released. I started with the front axle, and with the gearbox. It all went straight forward, as it isn't something that hard to build. Then I continued with the rear axle, which is joined to the front one with the help of a strong center tunnel. Using the 3x19 frames helped to make the middle as rigid as possible. The shifter is very similar to the one found in the Daytona. I then built the dash (the #3 connectors in blue came in handy in order to make the dash look authentic next to the real thing) and the seats. After making sure everything works properly it was only a matter of trial and error in order to make the bodywork as accurate as possible. Is it 100% accurate? Well, of course not. But I am very pleased with the end result. I am proudly displaying it in my cabinet, next to my Porsche GT3 RS 42156 B-model and Toyota Supra MK4 -42154 B Model I have made a display stand for it, just for fun from the remaining parts: The wheels of the car are off the ground, so there will be no sagging in the future if displayed on the stand. A massive photo library with the model ->here Building instructions -> Here Please follow my Instagram for more about future projects and builds -> here Thanks everyone!
-
[MOC] Ferrari F40 1:12
Alex Ilea replied to paave's topic in LEGO Technic, Mindstorms, Model Team and Scale Modeling
Overall the proportions are ok, but the front needs a lot of rework. Where are the headlights ;)? On the plus side, the rear end looks really good! -
42172 - McLaren P1
Alex Ilea replied to Ngoc Nguyen's topic in LEGO Technic, Mindstorms, Model Team and Scale Modeling
Yes unfortunately. It looks better in photos and videos.... But on the plus side, the color is superb! -
42172 - McLaren P1
Alex Ilea replied to Ngoc Nguyen's topic in LEGO Technic, Mindstorms, Model Team and Scale Modeling
Just today, I had the opportunity to see the P1 set in flesh at a Lego Store display and it is a disappointment in my book. It looks amazing, but from 10 meters away. When you get up close, everything looks unfinished, and unprofessional. The only part that looked good on the car was the roof. I thought that: "ok, take the pictures with a grain of salt, let's actually see it", but after seeing it, it is easily the worst looking one from the big supercars. As functions go, it is incredibly well done, but it feels like an incomplete model overall. In comparison, the G class is spot on, and it's big! -
[MOC] Crawler v2
Alex Ilea replied to Pufarine's topic in LEGO Technic, Mindstorms, Model Team and Scale Modeling
The suspension flex is crazy! Well done -
Thank you!
-
How did you find this? Can it be done for the other new sets also?
-
42172 - McLaren P1
Alex Ilea replied to Ngoc Nguyen's topic in LEGO Technic, Mindstorms, Model Team and Scale Modeling
I usually like Lego's sets, but the front of this one looks like it had an accident. Everything seems off with the front, besides the intakes in front of the front wheels. I think a conversion from the current bad front to Bruno's McLaren front would be a superb improvement. To be honest, I expected more from the exterior of it overall, considering the price increase and using the Daytona as reference. They kind of took a step back with this one.... I simply view this set as a parts pack, as the new parts are really awesome! -
42172 - McLaren P1
Alex Ilea replied to Ngoc Nguyen's topic in LEGO Technic, Mindstorms, Model Team and Scale Modeling
12 tooth clutch gear Speedbuild video: