krtwood
-
Posts
72 -
Joined
-
Last visited
Content Type
Profiles
Forums
Gallery
Everything posted by krtwood
-
 You aren't going to get much power out of a motor that is 2 studs long. Certainly less from 3 of them stuck together than one big motor that is 6 studs long. Besides which you need an axle hole on one side so the motor itself only gets to be 1 stud long. They could make a part that looks like the top of an engine that fits over the existing XL motor, but that sort of defeats the purpose of the fake engine having moving pistons.
 -
[TC5] Foxy
krtwood replied to Zerobricks's topic in LEGO Technic, Mindstorms, Model Team and Scale Modeling
Thank you! I really appreciate it. I think my nieces will really get a kick of it. -
[TC5] Foxy
krtwood replied to Zerobricks's topic in LEGO Technic, Mindstorms, Model Team and Scale Modeling
This is great and so different. Any chance of us seeing instructions/ldd? -
I understand what you mean. With 42030 it wouldn't sit flat enough on its own to be able to see the needed parts for the step without having to hold it open for the first 1/4rd and last 1/4rd of the build. I would have rather had the separate thinner books while building it, but after it's easier to store the one book.
-
I seem to recall having assembled the boom in such a way that it couldn't move but I don't remember what I had done wrong. I don't think the problem is in your gearing though, I think it was something in the boom.
-
It's also possible they put the set together really quickly for the purpose of taking pictures to sell it and didn't really care about the details. While the instructions are usually good, once in a while it's a little ambiguous exactly where a part goes. For example on 42030 the black panels that make up the front edge of the rear mudguards, because there is a gap between that part and the rest of the fender and the angle of the model in the instructions it's hard to tell whether it goes flush at the top edge with the parts behind it or shifted up one pin. I've seen it in both positions in people's photos on here.
-
Any company that is on the scale of mass producing knockoff bricks and sets can just buy one set for the instructions. If the set has any new parts in it they would need the parts to make a new mold anyway.
-
I totally see the enjoyment people get from the challenge of reverse engineering something from photos. It doesn't take anything away from anyone's individual enjoyment of a set but I think the leaked photos and reverse engineered sets aren't so great in general for a community because here we are with the 2H sets only having been out a short time but hardly anyone is talking about them because they are old news. People are only interested in talking about sets that won't be in the average person's hands for four months. Theres' a disconnect between what people are talking about and what is actually new in the stores. But that sort of thing is just inherent to today's world. There's no point in trying to pretend information doesn't exist.
-
Building Tray
krtwood replied to krtwood's topic in LEGO Technic, Mindstorms, Model Team and Scale Modeling
Thanks! I updated the WIP thread for the band saw with "final" pictures http://www.eurobricks.com/forum/index.php?showtopic=96826 -
[WIP][HELP] Band Saw
krtwood replied to krtwood's topic in LEGO Technic, Mindstorms, Model Team and Scale Modeling
Here is the "finished" version, and by finished I mean where I ran out of parts and money :) I had to add a quick and dirty tracking adjustment to get the chain to stay on the wheels, basically just pushing the far end of the upper axle up. The chain would run without the cardboard around the wheels but it was vibrating all over the place. There wasn't room to use the same blade guide as above the table under it, without moving the table up another unit, so I used one end of a U joint instead. You can't really see that in the pictures. The table does tilt and locks in place at 90 degrees, though with the amount that the frame flexes under tension you have to tilt the table about 5 degrees to get it perpendicular to the chain. The fence can move and be adjusted for blade drift, which is basically the tendency of the blade to cut at a slight angle. -
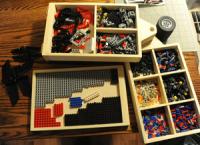
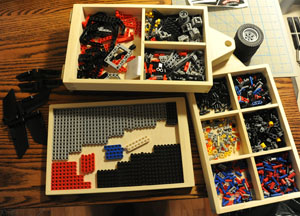
This is my solution for making the building process easier. It's a hinged tray so you can hang it off the edge of the table and look right down into it to see everything. If you need to stop it folds up quickly and doesn't take up much space. What I've been doing with technic is to sort out the longer beams and maybe panels, wheels if there are a lot of them and if you do that then there is enough space for everything else on even a large set. And I have a video showing how I build it with some special lego guests that you might enjoy
-
[WIP][HELP] Band Saw
krtwood replied to krtwood's topic in LEGO Technic, Mindstorms, Model Team and Scale Modeling
Thank you for the suggestion, that would work on a little bit smaller scale. I make woodworking videos and am doing one very soon that is lego related so I thought it would be fun to have at least one lego tool and pretend it actually cuts wood. So I need a very specific capacity that it could theoretically cut and I am already pushing it on the proportions with these wheels. I got the upper section mostly worked out. There is a little more play in the wheel than I would like but I think it will work. There is very little clearance around the wheel so I think I'm going to end up just wrapping it in some thin cardboard, at least for the time being. Hey, cardboard from a lego box is an official lego part, right? ;) -
[WIP][HELP] Band Saw
krtwood replied to krtwood's topic in LEGO Technic, Mindstorms, Model Team and Scale Modeling
It won't ride in the center no matter what. For lack of better terminology, I'm going to refer to outer and inner rims and the tire normally seats in between the two on each side. The chain is too wide to fit between the inner rims but too narrow to sit on top of them very well either because the sides of the chain are very thin. It would ride straddling the inner rim well, and the edge of the chain would be in the center of the wheel which is where it's supposed to be, if it weren't for the pin connections. The only part of the rim that is round all the way around the wheel is the outer rim, so the chain would have to be straddling the outer rim which would make half of it hanging off the edge of the wheel which isn't acceptable. Even if I find something that can wrap around the wheel I will probably have to find something to shim where the flat pin connections are to keep the chain from vibrating. The other possibility might be rubber bands in between the inner and outer rim that might build up enough of a flat area for it to ride on at the edge of the wheel, but I kind of doubt that would work and I don't have any official rubber bands to try it with. -
Working on making a woodworking band saw and I want to use the 75mm motorcycle wheels and chain for the blade. My problem is that the chain can't ride on the bare wheel because of the pin connections inside the rim. Band saws, at least smaller ones, do have rubber "tires" but they are really thin so not really visible. I'm hoping to find some other solution besides using the 88516 94.2mm racing tires. The x1681 tread looks like it could possiblly work better but i have no idea if it would fit on the wheels or how wide it is. The other treads don't seem to have a smooth side that could work. I'd be open to other ideas. I'm not ruling out using something non lego but if I can find something that works all the better. I think it would be a cool B model for a motorcycle set as there's not much else you can do with a motorcycle besides another motorcycle, but it needs about twice as much chain as a motorcycle would use. I also have to figure out what to do with the upper blade guides which need to move up and down. Larger saws may have a rack and pinion here but smaller ones just have the post slide through a hole and held in place by a screw. My non elegant solution is to just pull the pin holding a lift arm and put it back in after you move it if I can't come up with a really compact rack and pinion that doesn't have too much play that can move about 6L. Functions: Blade spins Blade tension Upper guides up/down Table tilts Doors on wheels and base
-
Technic 2H2014 Reviews
krtwood replied to Sariel's topic in LEGO Technic, Mindstorms, Model Team and Scale Modeling
I imagine I'm not the only one who would get the bulldozer set but convert it to being a larger scale D9 rather than a mini D11. Pretty much just changing the cab. Maybe add some mini-la's for blade tilt? I bet someone has instructions on doing just that before I ever have a chance to buy it. -
While I'd like to see a fire truck (maybe tiller style with rear steering for that unique functionality and some new open truss panels for the ladder) it's probably too close to a crane in functionality to follow so closely to 42009 which is still available. My guess is it's time to revist the bulldozer for the flagship construction vehicle since it's been 7 years going on 8. I missed 8275 so that'd work for me :)
-
Yeah. Apparently the "It'll be easier to leave as much as possible the same as the original model" approach leads to us building it twice :) I originally got the drive for the linear actuators to the knob via umpteen 16T gears running along the frame, because I thought that would be easier than two right angles or something. It was a mess. Both ends of the axle holding a gear should be supported or you get that slipping. As long as it's the gears driving the linear actuator and not the linear actuator itself that is slipping then you're okay with one, I should think.
-
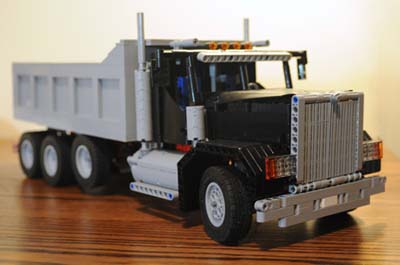
I had the same idea but I went a lot further with the changes. I decided to do the bed with bricks instead of technic for a better looking truck and my lack of technic parts. I designed it around the 6x5 panels since they seemed to be the best compromise for looks and keeping the weight down. I got rid of the power functions since it's either going to sit there on the shelf or sit there while the 8043 or the new front end loader have all the fun anyway. This is my first technic moc/mod so I wanted to keep it simple on the technical side anyway. I got the mechanics of the lift axle from the 9397 B model, though I reworked it to make it more compact. The lift axle there really made it more complicated to do everything else. I didn't like the openness of the front end so I filled that all in. It's the same width as 8043 now, not counting the mirrors. Increasing the width might solve your problem with the lip, but it's a lot to rework. I think it really helps with the proportions. On the technic parts side I mostly used 9395 as the source of extra parts but there were a number of others including more wheels and the second linear actuator. Still missing a few parts here and there. I ended up tearing apart my first go at it where I had the linear actuators mounted up higher on the frame. They were bending the frame and it was too hard to raise the bed. Maybe with the redesigned frame it would be okay now but I didn't want to chance it, and the angle the bed is able to get to is good enough for me. Click on the picture for more/larger pictures.

-
I originally intended to have a clamp that would slide into the bottom of the tray to attach it to the table, but I found it really wasn't necessary. You can hang the lower tray most of the way off the table and the weight of the upper tray keeps it from tipping over. It's heavy enough that it doesn't slide around when you're fishing for pieces. I don't think I'd want to do it like that if there were young kids running around, seems like a recipe for getting all your parts catapulted across the room :) I'll make a few to try selling once I've settled on a final design. Of course I'll have to thoroughly test it first with some more sets. It's a cross I must bear.
-
Motorized Crane Platforms
krtwood replied to DrJB's topic in LEGO Technic, Mindstorms, Model Team and Scale Modeling
It makes sense to motorize it on a RC model like 8043. 42009 you have to have your hands on the platform anyway, so what would be the point? And how are you going to add another position to the control switch? You can make an argument that there should be another motor in the base that just does the outriggers and that would free up the 4th position for rotation, but it's already an expensive set. -
Moz, I think they look good :) I like the way you angled the compartments in the back. I really intend the tray for only building official sets so there definitely should be a finite size it needs to be to work well. Once you get past a certain piece count they usually start numbering the bags so there's only so many pieces you have to deal with at once. It could maybe be handy for mocing too, if you had a big enough collection you could maybe use the tray to go shopping for parts rather than bringing whole trays to the build area. Right now I have very little technic and not much more regular lego so storage isn't too much of an issue yet. I do plan on building a modular storage system to get ahead of the problem though :) I gave all my childhood lego to my sister to use for break time in her 3rd grade classroom. Luckiest classroom ever. I guess I will get it back when she retires but I'm not sure I want it back after 40 years of daily abuse by a room full of 10 year olds. On the filtering subject, you can buy mesh that comes in all different sizes. I like mcmaster.com for random stuff like that in the US. I think these would work well since they are coated with plastic and come with a range of opening sizes that could be useful. Under $10 for a 12" square. http://www.mcmaster.com/#wire-cloth/=qtmcnj
-
I'm a woodworker by trade so every problem looks like something that can be solved by making something out of wood. I came up with a prototype folding tray design. http://www.krtwood.c...o/lego tray.jpg What I like about this setup is you can hang half of the tray off the edge of the table next to you so that everything is right there where you don't have to reach and you can see down into the compartments. If you need to stop it just folds right up to be put aside. All I did for this set (9395 ~950 pieces) was dump a bag into each compartment and then sort out all the straight liftarms into the shallow tray. When I make a final version it will be a little bit longer as some of the compartments were a little too small so it was harder than it needed to be to find that one odd part. I'll also make the shallow tray a double tray too. I'm also thinking about making a stand for the instructions rather than try to build on top of them.