
ScottishDave
-
Posts
366 -
Joined
-
Last visited
Content Type
Profiles
Forums
Gallery
Everything posted by ScottishDave
-
Thank you for the kind words! I had a lot of fun & some frustration adding the details: I'm glad someone appreciated it :-). I did consider that part you linked but decided that making it curved was more important. I think the actual front is rounded enough to justify that. I agree that a 1 brick tall hollow cone would be best, as you describe: but I'd also like it slightly rounded - more of a dome than a cone. The new official set is using a new part as you pointed out - and it looks like it might be hollow? I can't quite tell from the box art but it looks like the center is an existing part, a printed round modified tile. If it is hollow all the way through, I plan on using it may be the best option we'll get
-
I know I've already posted, but: After I uploaded the first version, I kept on finding things to improve. I think I'm done now. Notable improvements: - Grogu's dome now fits a minifig (at the expense of being too large but that's minifigs for you) - Better angle and detail on the front of the wings - Better solution for the tail - More detail on the engines There's a couple more photos in this album, where you can also see my first set of photos for a before/after comparison.
-
I'm glad it's working for you cehnot, and I'm a bit stumped, as i's not happening for me at all. No discount visible, it took me all the way through to payment without a single sign of a discount. EDIT: It doesn't work in some browsers. It won't work at all in Firefox and took several goes in Chrome. In the latter, I had to have the X-Wing in my basket and then open the link from the email in the browser.
-
@JeracThe "Save 50% Now" link in the email doesn't seem to be working, as in, it was going to charge me full price when I clicked the link. Is it meant to apply a discount coupon at the end after you've clicked "buy" or something?
-
Since there is a ring here, let me throw my own hat into it: It's based mainly on inthert's design from Brickvault. More photos in my album on flickr
-
I really, really like this colour scheme. It looks just right, and I vastly prefer it to the grey. Also, I might have quite a few of the needed parts... https://flic.kr/s/aHsknxbfgz I have the parts for the Black One on order. Looks like I need to order whatever white parts I don't have, and some more black studs with bars!
-
[MOC] Minifig-scale B-Wing (with instructions and LDD)
ScottishDave replied to krispy's topic in LEGO Star Wars
I have no idea why the link stopped working but here it is again @ManOBricks https://www.dropbox.com/s/o2y95dhcoshgsiq/B-Wing.1.3.zip?dl=0 -
No problem, and that's perfect. Thanks for the file!
-
Hey @blbills it looks like you are sharing your own link to the file. The link text looks like "https://www.dropbox.com/preview/Public/T-70 complete.io?role=personal". That link will only work for you, as it assumes the browser is logged in with your account. To share with everyone, you need to go to the .io file in File Explorer, right click it, and select the option which says "Share" (and on Windows at least has a little dropbox icon beside it). You then go to the bottom of the dialog which appears and click "copy link". You should get a link which looks more like this: https://www.dropbox.com/s/zjmn7jlf4ybhtv3/Executor.lxf?dl=0 (And yeah, that's a lego LXF file for a midi-scale model of the Executor SSD I did a while back, based on the work of Pelleaon - thread is here.) I hope this helps! -- David
-
That looks great . The bars with clips look fantastic in there. re: the holes, if you look at some good reference material, e.g.do a google search for the Hasbro Haslab Razor Crest model, there is a ring of vents right behind the engine opening. I bet your holes match up pretty well.
-
I really like this one. I may give it a go myself. Thanks also @Jeracfor sharing other ideas. I like them all better than the clip tiles .
-
Can't do much about the friction, but how about the inverted bracket plus a plate? https://www.bricklink.com/v2/catalog/catalogitem.page?P=36840#T=C&C=86
-
May I suggest a slight alternative? This creates a slightly larger diameter (8 studs as opposed to 7) which ought to work better with Jerac's original front. I don't have enough pieces to try this myself right now but I might give it a go at some point.
-
This looks very interesting. It looks better than the 1x1 clips for sure.
-
Says one non-purist brick painter to another.
-
Tell a lie, it was this part, not ARC 170 at all, sorry. I did think about using the ARC part but it was too small. I haven't come across that train part and can't seem to find it in the Bricklink catalog. Do you have a link perchance? @Hold0511I think you crashed Jerac's brain. Anyone here know how to reboot a Master Builder?
-
Yes to the ARC-170 parts. I think the red doesn't look too bad, but I might design some stickers and put them on blank dishes at some point. Thank you for the nice comments :-).
-
This looks absolutely stunning. It's beautiful, I love it. The patchwork effect of slightly different colours really helps sell it. I also feel better that someone else felt it worthwhile getting out the paint for this model .
-
Not too hard. The trickiest bit was moving the centers of the engines out by a stud to accomodate the extra girth. I've been looking for the "perfect" Razor Crest engine fronts for a while now. Yours come close in many ways,but I wanted something that was mine :-). Thank you for the nice words about the cockpit and guns.
-
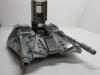
I finally got my build finished this week. As you can see, I made a few minor adjustments. It isn't visible, but internally I substituted a lot of pieces which were not going to be seen (basically anything tan or brown was fair game, barring pieces for the cockpit and sides). I was building my own MOC of the Razor Crest when Jerac posted his first pictures. I had my own engines and guns 90% completed. They were about the same scale, so I decided to use them on Jerac's model. I used parts of Jerac's gun design, as I liked it better. I've shortened the cockpit tube and moved the windows around, and lengthened the area in front of the escape pod to compensate. Finally, I used the three-piece window solution (because I had the parts) and created a set of custom stickers to complete the cockpit. Here is a copy of my window stickers, in case any of you want them for your own builds:
-
It took me weeks to build it: but I went slowly and savoured the process. Enjoy!
-
I read what Jerac suggested, and did it. I used Bracket 99207. https://www.bricklink.com/catalogItemIn.asp?P=99207&colorID=11&in=A I put it 1 plate further away from the location of the hinge brick. I ended up removing the hinge brick as it was just getting in the way.
-
I was having similar issues. This fixed it for me.
-
I modified my UCS shuttle about six years ago. Flickr Album: https://flic.kr/s/aHsjXcYDdm I also did the ramp, an interior and tried to motorise the wings. I learned a few things which might be of use to you: 1) It is possible to remove the entire top fin and fit a full interior. 2) If you have two "M" motors, they quickly get out of sync with one another , so that (especially on the upstroke) one wing is moving at a different speed to the other. I never tried a single "L" motor so I have no idea if that would have the same issue.
-
[MOC] Midi-scale Super Star Destroyer Executor
ScottishDave replied to Pellaeon's topic in LEGO Star Wars
@Tanner, PM sent.