

Madoca 1977
-
Posts
183 -
Joined
-
Last visited

.thumb.jpeg.ee9f4c610e20ae266cdf7b2b392449f6.jpeg)
About Madoca 1977

- Birthday 09/22/1977
Recent Profile Visitors


-

[MOC] Chevy K5 Blazer
Madoca 1977 replied to Madoca 1977's topic in LEGO Technic, Mindstorms, Model Team and Scale Modeling
For now I’m not going to share new models until I finish physical building and making instructions. Because I have left many abandoned projects which I could not complete. Currently I’m working on a new 4x4 model. It will be shared in a few months. (Not in a few years!) -
[MOC] Chevy K5 Blazer
Madoca 1977 replied to Madoca 1977's topic in LEGO Technic, Mindstorms, Model Team and Scale Modeling
Thank you for building! I chose those old/new gears on purpose. The 20t gear on steering link should be old(double bevel) one. New azure square gear touches 7L liftarm when front axle articulates to the limit because of larger diameter than old ones. The 12t gears under the chassis should be black(double bevel) ones. They have smaller diameter than new blue ones and rounded edges. Which means slightly better for ground clearance. -
[MOC] Chevy K5 Blazer
Madoca 1977 replied to Madoca 1977's topic in LEGO Technic, Mindstorms, Model Team and Scale Modeling
I built that one last year. It was highly experimental model which had front and rear independent suspension with self-locking differentials. Instead of 2 speed gearbox, it had M motor for locking 3 differentials simultaneously. I didn't share it because of poorly outdoor performance. But now I'm thinking if I combine those mechanics and Blazer's together, off-road performance would be much better. You are absolutely right. Actually I used old red 2L driving rings during WIP because I had dozens of those parts. The only reason I used new (and still rare) 2L driving ring was to avoid discontinued parts in 2025. Also, I got 42209 as a donor for this MOC. -
[MOC] Chevy K5 Blazer
Madoca 1977 replied to Madoca 1977's topic in LEGO Technic, Mindstorms, Model Team and Scale Modeling
Since all gears and shifters are in 5 studs width, using shorter 2473(2L) was the only choice. If you use 18947(3L), you also need to replace red differential to older DBG one which has smaller housing. My Dacoma 4x4 model has rear diff lock using 18947. With major modification to both axles, you may use 18947 with DBG diff gear. I think performance would be almost the same thanks to planetary hubs. -
[MOC] Chevy K5 Blazer
Madoca 1977 replied to Madoca 1977's topic in LEGO Technic, Mindstorms, Model Team and Scale Modeling
Gears are meshing quite smoothly. But gear tooth touches at very small area(A) compare to normal square tooth gear meshing(B). Transmitting high torque will damage gear teeth. In this MOC, transmitting torque (diff-locked) situation is limited. So it worked. By the way, I also learned interesting/annoying size difference of those gears. Maybe you all have already known it though. I tested flat fenders and they fit well. But with this chassis setting tires touch fenders when suspension articulate to the limit. So I used curved one which have more space in it. (This time I stick to maximum suspension travel.) I think widen the body 1 stud would be solution. Instructions available at Rebrickable! I know sometimes my photo-sequence instructions would be hard to follow. I'm very sorry but I prefer somewhat challenging instructions (back in 1980s) to recent "18+" instructions. -
[MOC] Chevy K5 Blazer
Madoca 1977 replied to Madoca 1977's topic in LEGO Technic, Mindstorms, Model Team and Scale Modeling
Thank you for your kind words! Since I had abandoned old projects, I will have to build everything from scratch once again including Land Cruiser 80. But I learned there are plenty of useful new parts available nowadays. So new one could be better in terms of both functionality and appearance. As for the model, I found this kind of self-locking diff was not enough for driving on low-grip surface. It should be remotely locked when needed, or some kind of brake lock differential like Suzuki Samurai and Jeep Wrangler. -
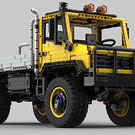
Hello, everyone! Here is the first creation I have completed in 6 years. I used only pure LEGO parts and Powered Up components. Weight: 1475g (including 6 AA batteries) Features: - 2x L motor for propulsion - 1x L motor for steering - 1x M motor for High/Low gearbox - Self-locking differentials - Linked pendular suspension - Detachable body and removable top - Openable hood, doors, rear hatch and tailgate Video: The main feature is self-locking differential system. Basic idea was the same as I put into modified rm8's Toyota Hilux in 2019. When one axle articulates to the limit, orange shifter rotates and diff lock engages. This time I also added center diff lock which engages when axle linkage moves to the limit. Since both axles and the linkage between them move together, all three diff lock engage simultaneously when suspension couldn't soak up the bumps. Rear suspension travel is longer than front because the pivot of linkage is off-centered. Additionally, rear axle is positioned slightly lower than front. This can be done thanks to the flexibility of some connection point. Steering system has a pivot on the same axis as roll center of front axle. Therefore suspension movement barely causes bump steer. The upper body looks narrow because of one stud width of the edge of beltline like 42213 Ford Bronco. Last but not least unique feature is the way of fixing body to the chassis. First, hook the back side of grill on the front end of chassis. Then switch four levers to fixed position. In a way, this model is the successor to my Jeep Wrangler built in 2017. I tried to pack more features in the same wheelbase as Jeep. Eventually its heavier weight required the use of planetary hubs. Which means the model became powerful but very slow. Unexpectedly off-road capability wasn't so good. Since diff-lock system depends on the movement of suspension, it didn't work when any wheel lost their grip and started spinning even on a gentle incline or slippery surface. But I am happy with the result because I realized that I still could make something even after losing love, money and lots of hair! Building instructions at Rebrickable.
-
[MOC] SUV Racer Mk II
Madoca 1977 replied to KirTech LAB's topic in LEGO Technic, Mindstorms, Model Team and Scale Modeling
Fortunately I had a chance to see you driving this monster in the event. Amazing model. I especially love the bodywork. It looks like a Moby Dick, but also runs unbelievably fast! -
That picture is rm8's studio. I'm surrounded by HIS creations! Anyway, I drove this truck in Russian community event. Pictures and videos of the event can be seen on the site of LEGO Technic Russia. From now building instruction is available at Rebrickable. And the picture below is how it looks with 120mm tires. I think these RC4WD tires are the same ones as Sariel had used for his Crawler and Baja Truck.
-
Last night I visited the studio of my friend rm8. We made a review of my Monster Truck! Now we arrived Moscow and will join the event of Russian Technic fans. Instruction will be available after coming back to Japan.
-
Thank you for watching! I wanted to use dual shocks only because its look. As the black version does, using single hard shock for each wheel is enough to hold the body. But dual soft shocks was a little bit unstable.
-
Hello everyone. As a monster truck MOC was one of my earliest creations, the time has come to remake it! Weight: 2030g - Powered by 2 SBricks - 4 XL motors for propulsion - 2 Servo motor for steering - M motor for switching steering mode (normal/crab) - M motor for raising front hood and rear bed - LED lights for headlights - Openable doors and tailgate Those old-school power functions components still work sufficiently in this MOC. The body was inspired by 80's monster trucks made from lifted and modified Ford pickup trucks. The under structure was designed for robustness. Eventually it looks more like modern tubular chassis. There could be multiple options for the sets of dual shocks. (Hard/Soft, Hard only, H/H, S/S) Vertically placed M motor moves Polarity Switch connected to rear Servo motor. Horizontally placed M motor is for two functions. Front hood opens via worm and 24T gear. On the other hand rear bed is raised via small actuator. That requires two driven axles of different torque and rotational speed for each side. Center differential enables single motor to transmit the power to both sides. One of the benefits of portal hub is easy to change gear ratio. Body parts could be replaced with different color scheme, though they are not fully modular. On November 2nd and 3rd, Monster Jam live was held in Japan for the second time. I did go to the event and took photos of amazing real monster trucks and drivers. Thank you, Bari Musawwir and Neil Elliott! Building instructions available at Rebrickable.
-
2: 10 5: 6 4: 4 7: 3 1: 2 8: 1 Actually I fell in love Seasider’s custom sticker of technic pin flying over the mars:)
-
Nothing has changed in using parts and building results. Just a few parts were connected before they should be in older 24-25 steps photos. Perhaps builders who noticed that may jump step 23 to 26 and follow the rest. Don’t worry, I see you built it perfectly right. Thank you for building!
-
I am very sorry, I rechecked instructions again and noticed that I have used wrong photos for step 24-25. I just fixed it. If you have already copied early version of instructions, please check the (tiny) differences and use correct photos. Turns our concentration on working became lower than in my 30s...