

z3_2drive
-
Content Count
794 -
Joined
-
Last visited
Posts posted by z3_2drive
-
-
This would definitely get my vote!
-
You're always so good with bodywork...I would send you some of my chassis' for you to work on them

I've got another large car on the way and I'm going to try and come up with a light body...god help me

-
I mean make the rear suspension sit flat rather than be angled outwards-this can be done by adjusting the placement of the shocks or making them softerI am working on an ldd file of this, although there are some pieces like the rc motor that aren't there.
@z3-2drive, what exactly do you mean by centering?
Tibivi

-
Yeah the motor controller alone is about $90, and I run it at 11 voltsWow! That is incredible motor controller there. I am very interested how the servo performed with this. Also what is the voltage your are running this at. Is there a voltage regulator for the servo here. It is amazing to see all four buggy motor running on one channel. Looks great a little expensive though but that is some serious power with this.

-
First here are the links to all the parts in the system excluding battery and project box:
*Motor controller: http://www.pololu.com/product/777
Receiver/Transmitter: http://www.rcplanet...._p/futk3100.htm
*The motor controller I linked is the heavy-duty model that I used in my models, but there is a smaller, less powerful and cheaper version too*
Ah I guess I'll link it too...
Motor Controller(smaller option): http://www.pololu.com/product/767
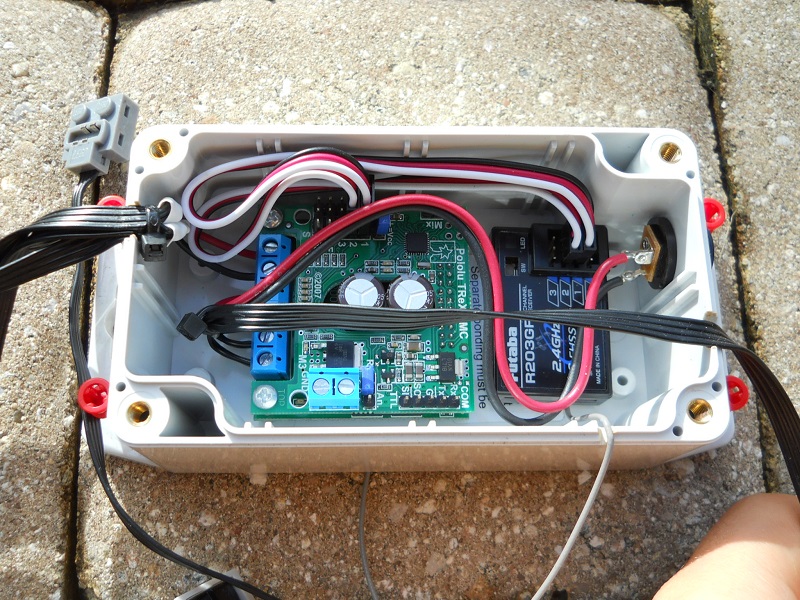
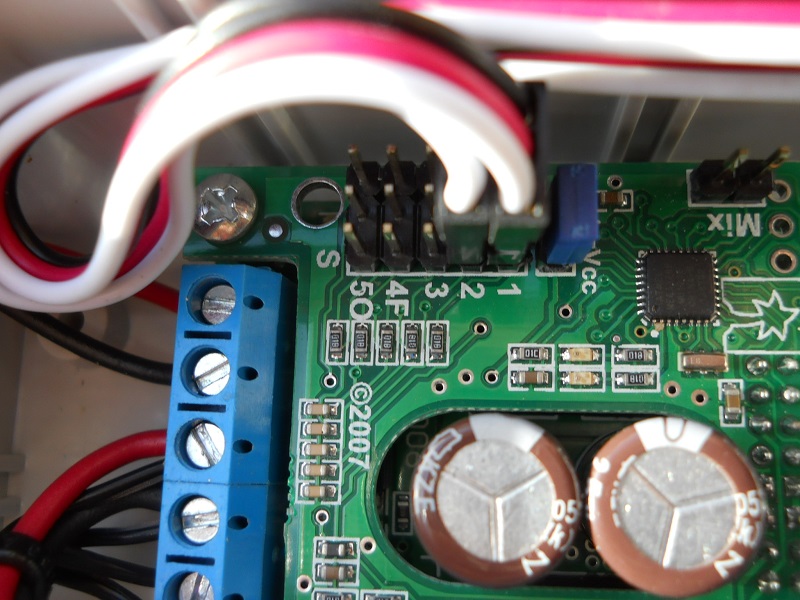
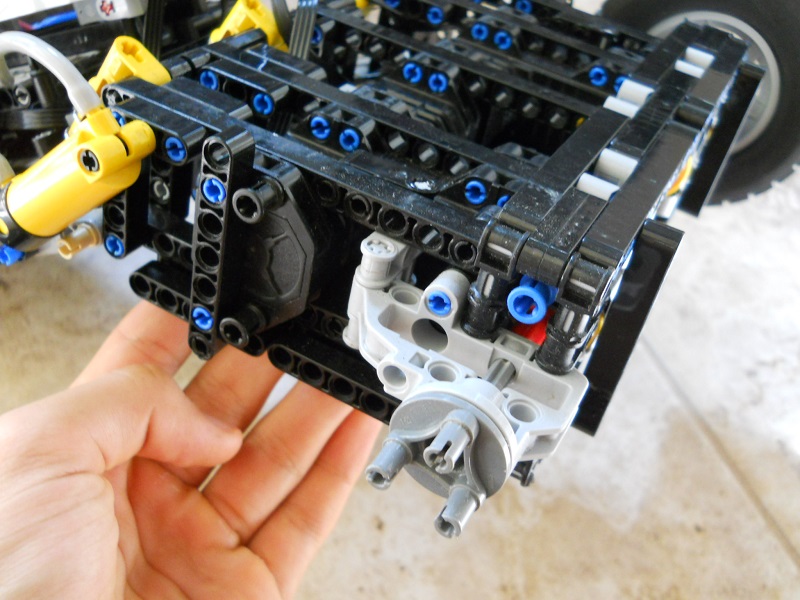
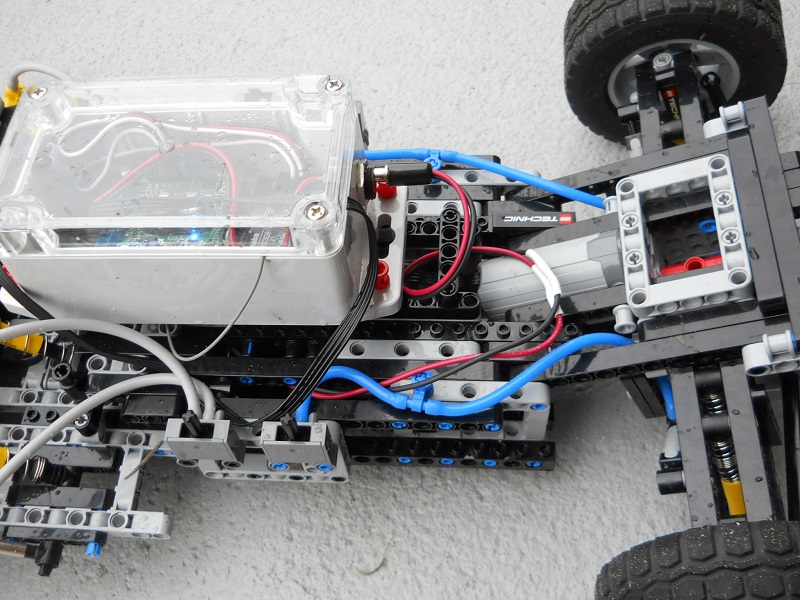
Now, Here is the fully explained system:
First:
- the jumble of lego wires on the left are the four wires that connect to the RC Buggy motors.
- the lego wire coming from the left is an extension to the servo.
- the red/white wires connect the controller and receiver
- the black and red wires connect to the port on the right, which you then plug a battery into.
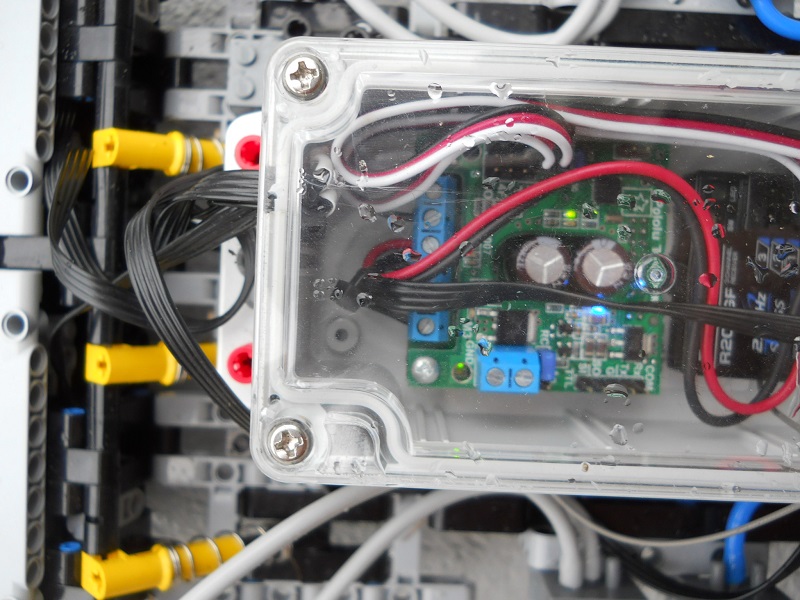
Second: the four lego motor wires are put together into one pair, which connects to the first two ports of the controller-
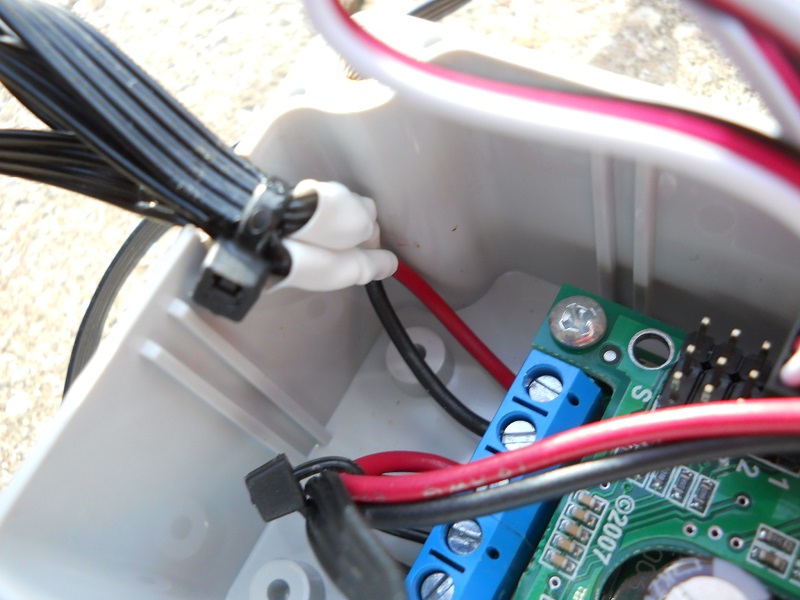
Third:The red/black wires, which supply the power from the battery, connect into the 3rd and 4th port.
*(There are six ports in total, where you see the screw-heads)*
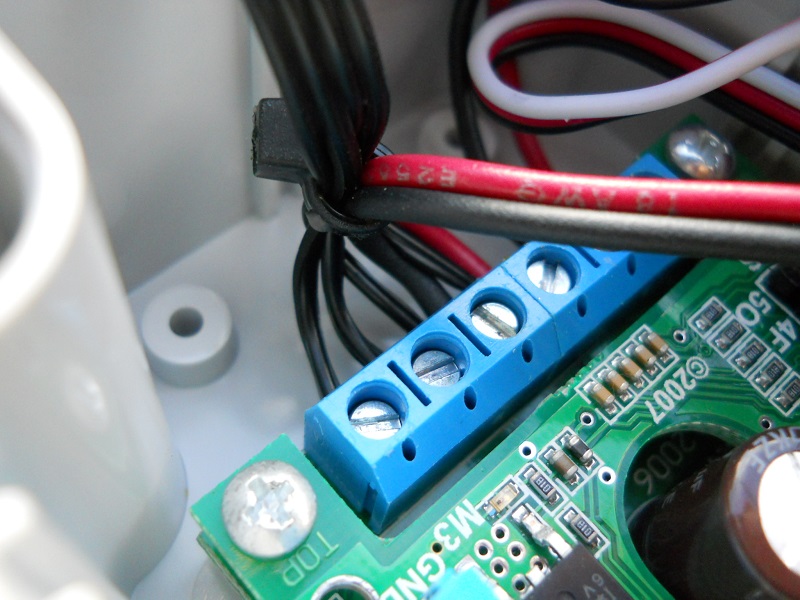
Fourth: Here is the tricky part
The servo wire is made up of four small wires. Two of these supply power, and two control the movements of the servo.
-
The two that supply the power are connected to port 3 and 4, with the battery wires.
- The two that control movement are connected to port 5 and 6, all by themselves.
^^^ so the way it is seen here is:
SERVOCONTROL1--SERVOCONTROL2--SERVO/BATTERYPOWER1--SERVO/BATTERYPOWER2--MOTORCONTROL1--MOTORCONTROL2
Ok, so port 1/2 control buggy motors, port 3/4 give power to the system, port 5/6 control servo
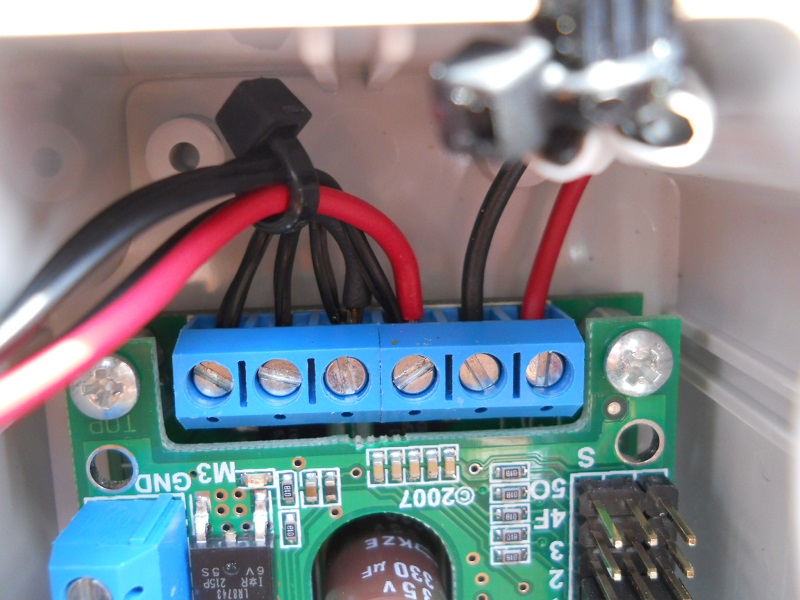
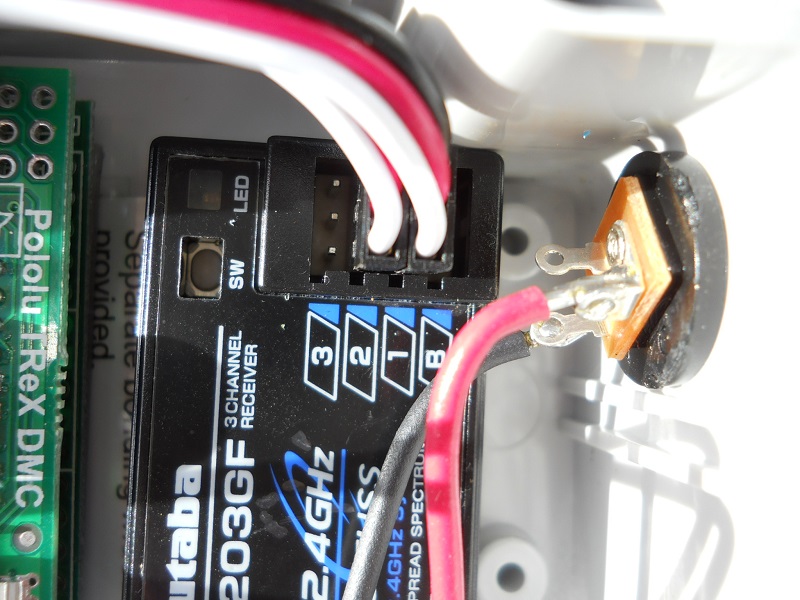
Here it shows how 1/2 and 5/6 correspond to two channels on the receiver:
The red/white wires connect to channel 1 & 2 on the receiver:
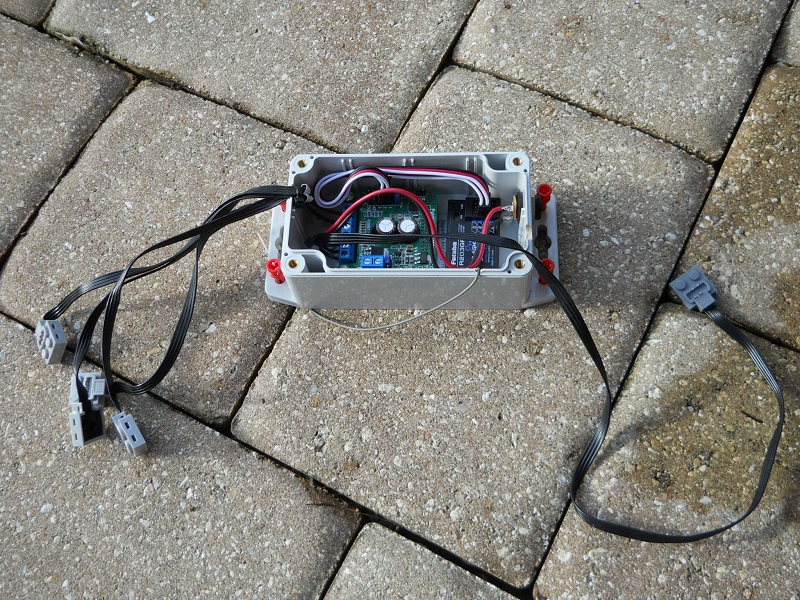
And finally here it is all together again:
Sorry for the baby steps but I wanted to be clear. To know which wires from the servo control and give power, simply test with a multimeter and have this at your disposal:
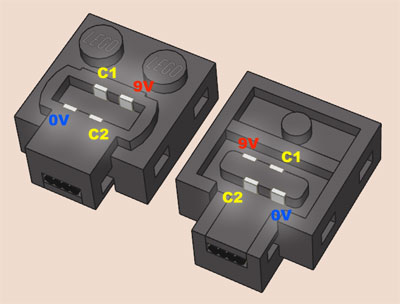
- the jumble of lego wires on the left are the four wires that connect to the RC Buggy motors.
-
Hey I just remembered the links...after some searching I found the items. Here they are!
*Motor controller: http://www.pololu.com/product/777
Receiver/Transmitter: http://www.rcplanet...._p/futk3100.htm
*The motor controller I linked is the heavy-duty model that I used in my models, but there is a smaller, less powerful and cheaper version too*
Ah I guess I'll link it too...
Motor Controller(smaller option): http://www.pololu.com/product/767
Hope it helps!
-
Rok Lox 1.9 are taller but I think there are ones with better grip out there.
-
Amazing work, everything about it is perfect-chassis, suspension, body...I can't wait to see the video!
-
Nice! I like the body but I would center the rear suspension a bit, by the way, did you get the rear suspension idea from my rally car?
Would like to see how you made the front axle too, I like the negative camber
-
Later I can find links to the stuff I bought, but just so you know the motor controller I bought is for really high power needs so it was $80 If I remember correctly. With less voltage and no intention for future hobby RC use then you can go for the cheaper version which is $30-$50 dollars less. I am not sure about the receiver and transmitter but It shouldn't be that expensive. You also want to purchase a project box with the correct dimensions to mount everything inside.
-
Yes, precisely why I will be getting the snowmobile, if not 2I see you used new suspension arms from coming snowmobile (front suspension), right?
Curious about how he set up the steering though.
-
Looks great! I hope those u-joints survive
-
Every child has some painful learning experiences
Even when not intentional accidents happen...I had a XL with some strong gearing and while testing I accidentally got my finger in...took a tiny piece of my finger out and it hurt like hell but it makes you more cautious for the future -
Ah if only lego made ultra strong but compact u-joints!
-
Nice! I like that you are offering the hubs...I may be interested.
-
I completely agree with you.This would be easiest with the drift car idea since there's no extra stress on the motors. As for non-lego motors, that's where I draw the line because although they offer crazy performance the rpm/torque would be too much for a plastic drivetrain, even if it's a drift car. I want to see how much one can achieve with buggy motors. Although in the future i would want to make my own metal chassis vehicle and use my current electronics. I think I'll experiment with some new rear independent suspension and if I come out with a breakthrough I'll make the big decision between speed demon and drift machineYou should make a body for it,none of this half done stuff.....
-
Now that I perfected My latest chassis, I want a new challenge. I know my limits of weight/strength/power now and I want to build something different. Also I am going to make another Bricklink order with some random parts I currently lack, so I want to make a list of things I may need.
Here's what I am thinking of at the moment:
- Drift car-either AWD or RWD using fast output of buggy motors. As for wheels:
- A car similar to Chassis V1 for outrageous top speed-suspension would be the main issue.
- A remake of a crawler using either XL motors or NXT motors with Doc_Brown's Reaper axles.
Any other ideas would be appreciated. I would hope to build it before the end of this year, as I then plan to build a small, possibly non-pf vehicle using the new snowmobile suspension pieces.
- Drift car-either AWD or RWD using fast output of buggy motors. As for wheels:
-
Still baffled at how your 12t gears stay together after pulling a damn CAR! Awesome MOC
-
Here my servo is connected to an additional Lego extension wire that then connects to the motor controller. The lego wire is made up of 4 wires, and two of them control the movements of the servo. Connect those two to the motor controller and then connect that port to the servo port on the receiver...it's very hard to describe with words and it's not really helpful as it depends on what RC parts you purchase. If you want info on how the servo works, visit Philo's page about it here: http://www.philohome.com/pfservo/pfservo.htmI just ask agin :D How the heck did you connect the lego servo to the rc system?
Which reminds me, special thanks to Philo-your charts and specs of all the motors definitely helped me with this build

-
The four large shocks on my RC chassis are under constant compression but they have not deformed at all. So you probably have a defective spring. Is it only the one?
-
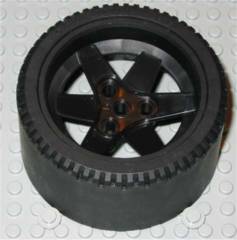
the pumps and cylinders are not linked together, but the torque of the motors causes the rear to go down under braking and raise with acceleration, as the suspension is always somewhat compressed when driving(like in real cars), a perfect balance between soft and stiff. The switches just switch between normal and extra-soft. As for tires, these Unimog tires keep the car more steady and under control, especially in wet conditions. As for return to center I believe it makes no difference, but balloon tires IMO result in less wheel-vibration when steering. This is because they can lean while the flat unimog tires skip across the surface, if you know what I mean-since Lego rubber is extremely hard and plastic-like, so the tires can't deform when turning. Non lego tires would be perfect but you would need a good balance between soft and hard to get the best handling. And non lego tires tend to weigh moreVery awesome man, so the pumps communicate? I remember back to an anti dive system in a race car, where the front was somehow mechanically linked to the rear, and under heavy braking when the front dived downwards, it would pull the rear down as well, just as a anti roll does left to right this car did front to back. The reason for this setup was because of a lot of down hill braking. Anyway it looks like you came up with a similar idea, yet you have reversed it so when it dives the back raises?...
Also yes the castor at the front is an awesome way to get a return to center, it's a must in my cars, because of the slack in the steering. Those tyres you have would make the return to center very good I would imagine, better than my balloon tyres, do you think this is the case? Balloon vs flat.

-
Awesome! I had a go at a 4-buggy motor Trial truck but it was so powerful It stripped my gears(especially 12t), in the future I plan to make a stronger, simpler version of it. The suspension you made is incredible!
-
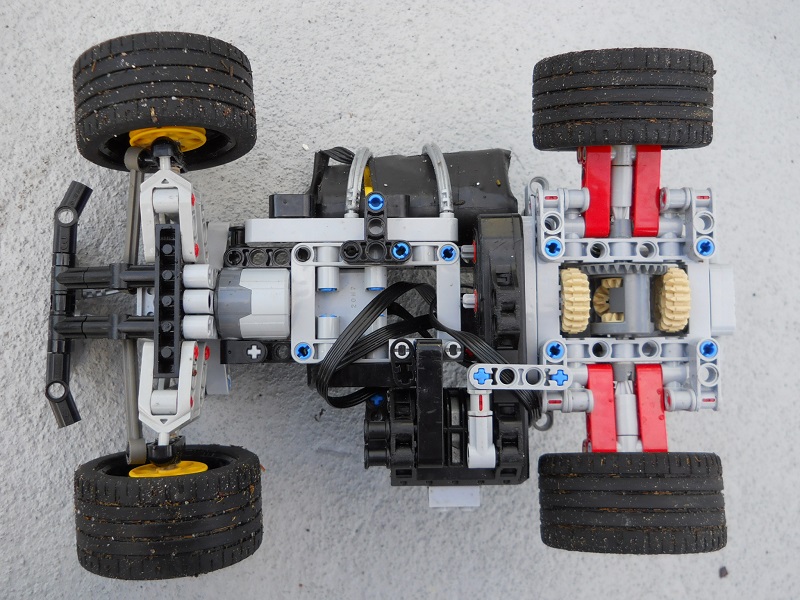
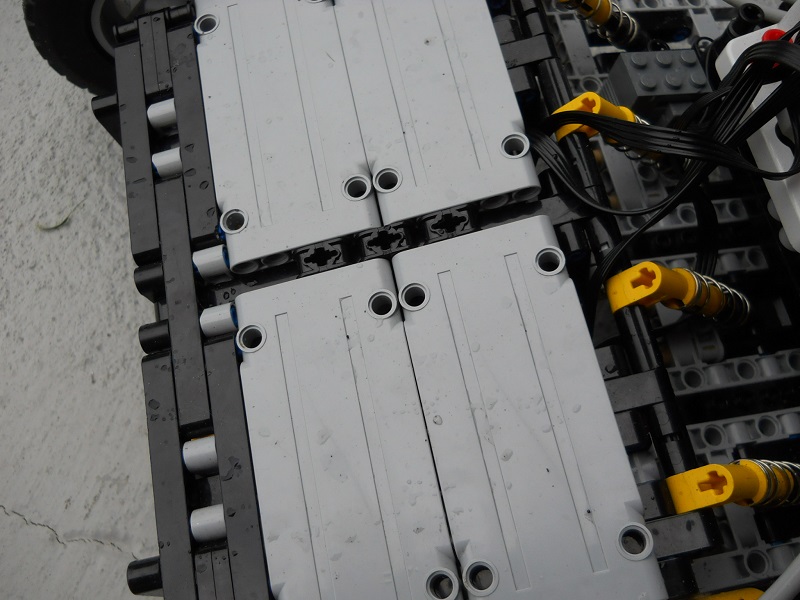
The long-delayed pictures:


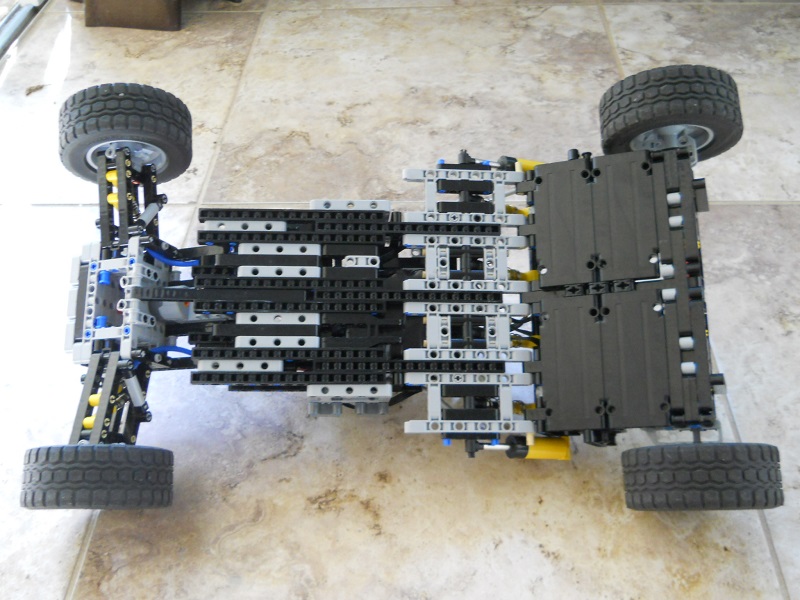
^the dust guard keeps the motors safe
^the battery fits very snug between the beams.
And if you were wondering, the batteries used to make the pack are similar to these: http://www.ebay.com/...=item43bedcd4a8
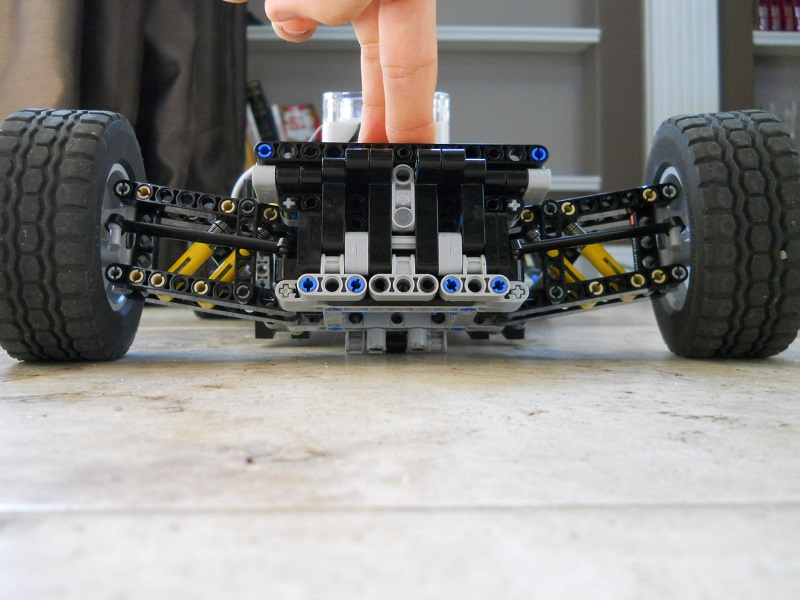
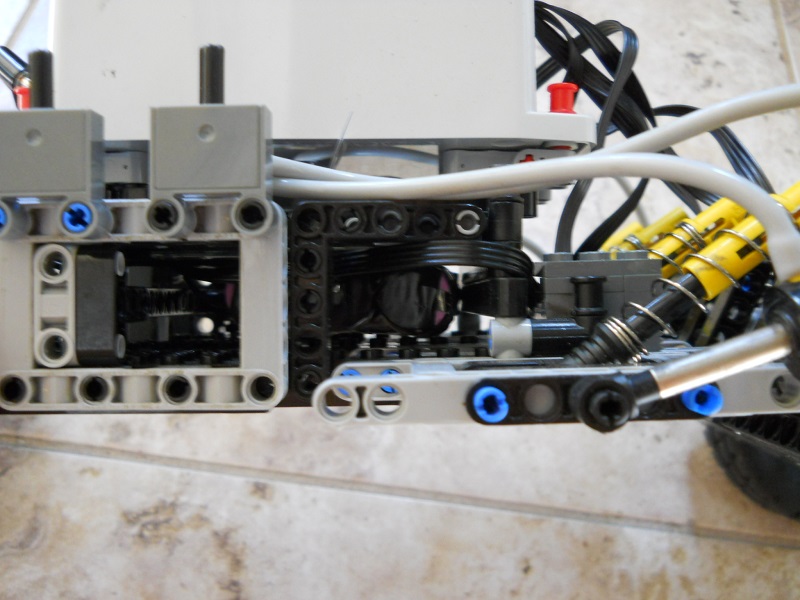
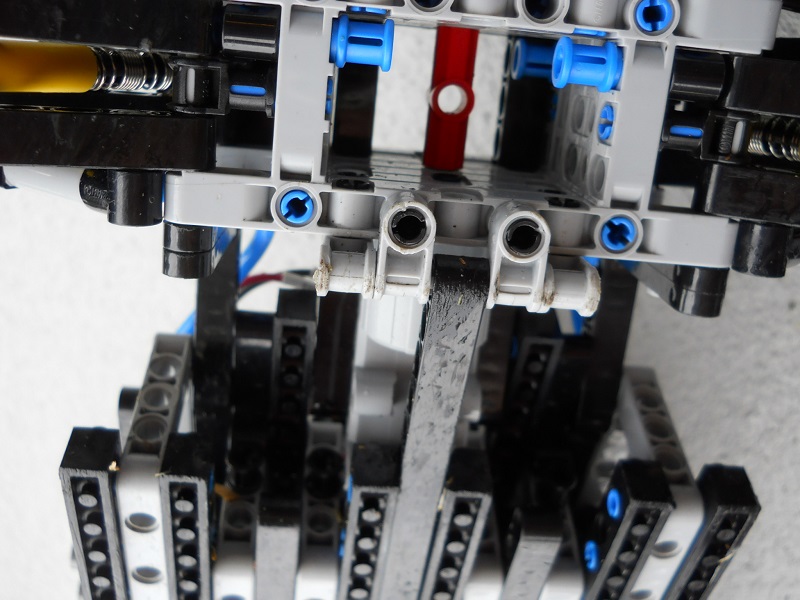
^the rear of the chassis does bend a bit under full compression.

^the pneumatic pump provides some extra stiffness when engaged, just like the large cylinders at the rear.

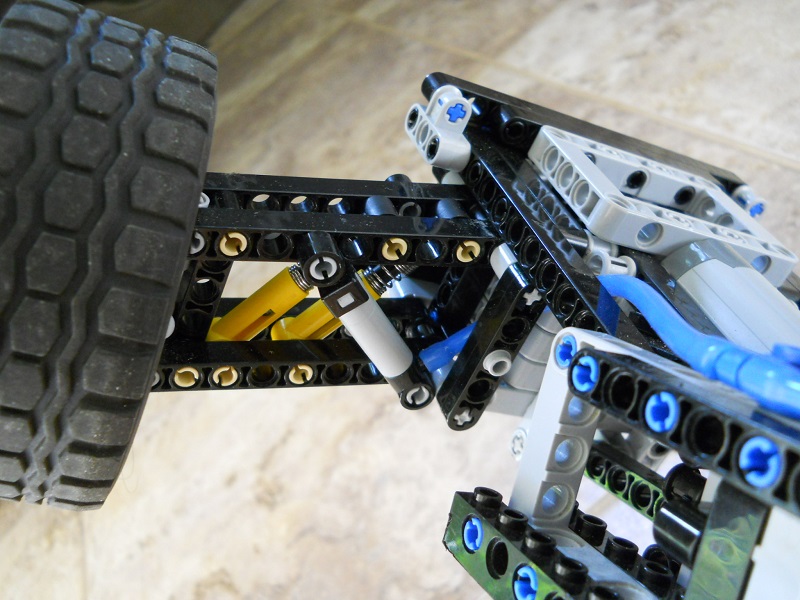
the front subframe is angled up in order to have positive caster without weakening/complicating the suspension and increases overall handling capabilities-the car can drive straight even when you remove the steering links

^I pulled off the symmetrical look I wanted
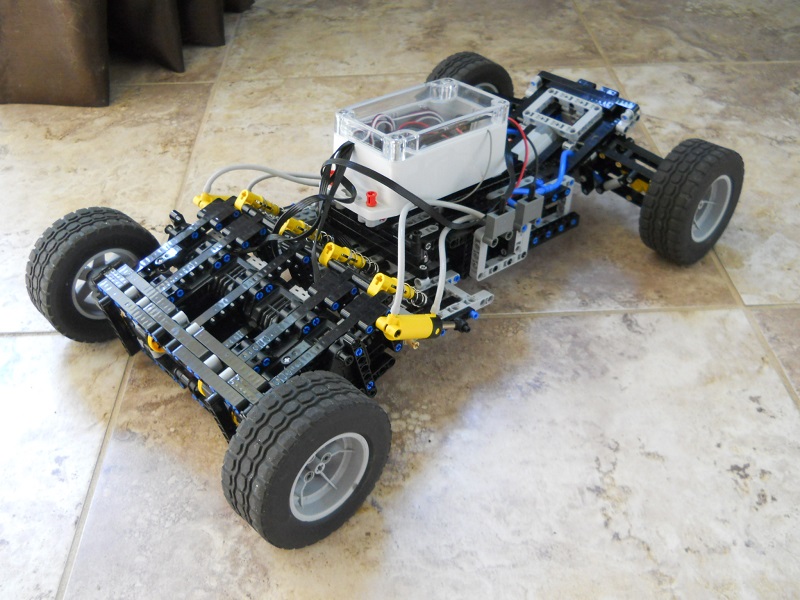
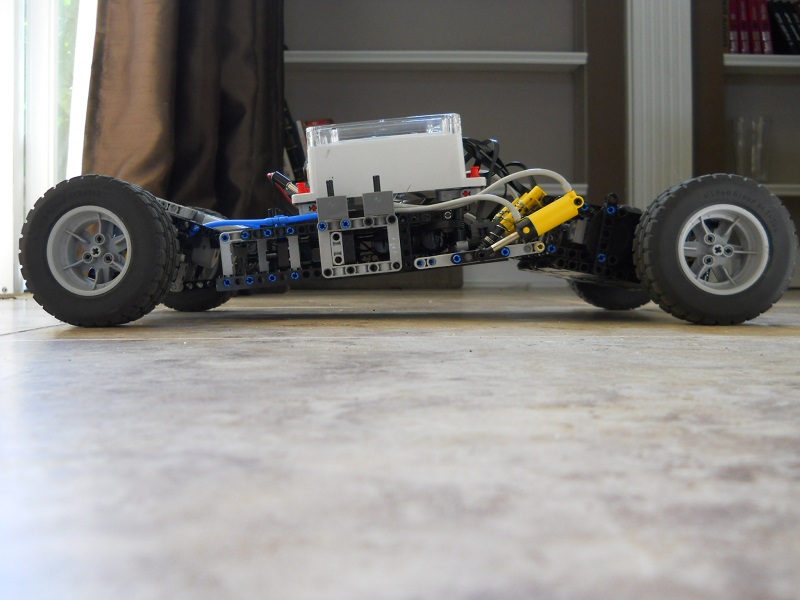
Here are some new photos with a few tweaks/add-ons I made:

^at the time of the photo there was a very light drizzle, so I put on the top motor-cover.
^everything is nice and protected so there is no damage, but I still only tolerate the lightest of rains as to not risk anything...
The black lego wire in the center is the servo wire, connected to the motor controller. You simply need to know which of the 4 sub-wires control the servo's movements and connect them properly. After that you can change the steering direction while mounting the servo or on the remote control.
^these are the only parts that ever get damaged-as you can see they are easily replaceable-no shame in being lost during battle
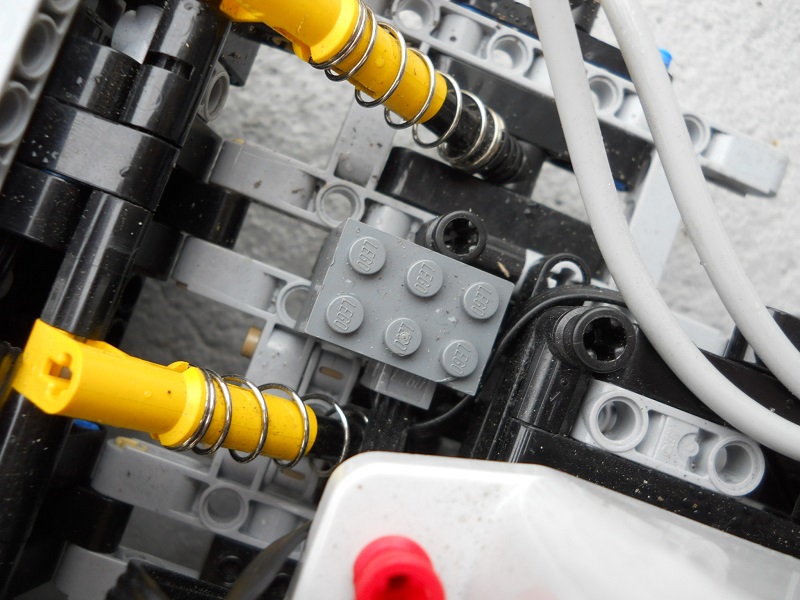
^I even went ahead and covered the end of the lego extension wire that connects with the end of the servo's wire.
And finally a burnout on the wet ground
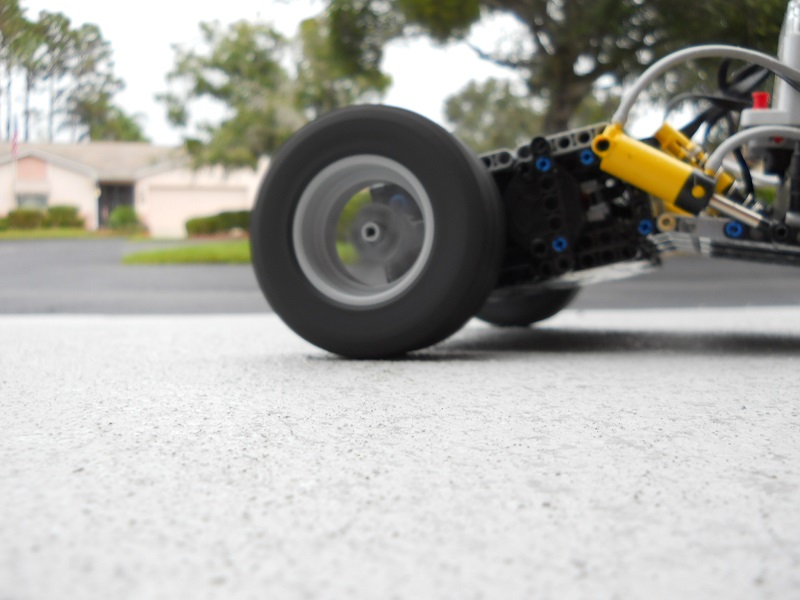
Hope it answered any questions or helped you in your own RC-MOC pursuits!
-
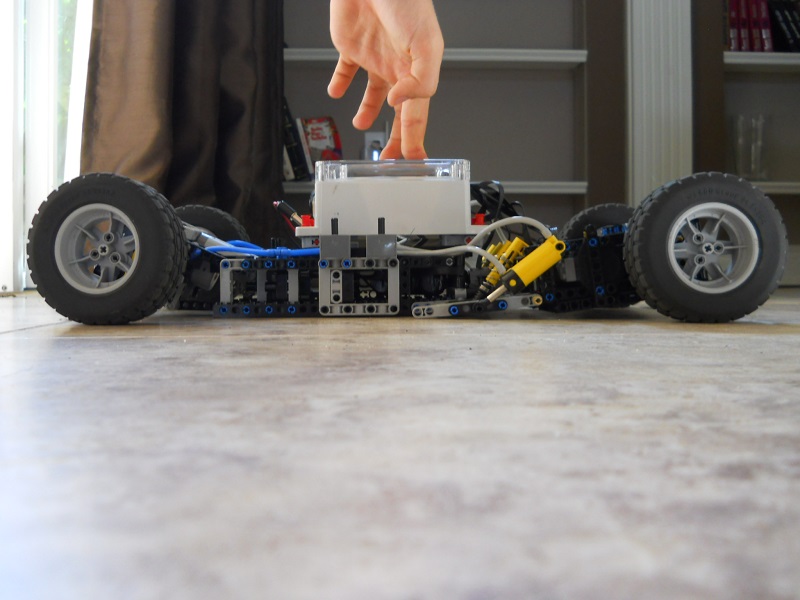
Possibly; it's Florida and it's not a public placeAre you going to make a body for it?
Why does everyone wear flip-flops?

Supercar Chassis - Crowdsource a Supercar
in LEGO Technic, Mindstorms, Model Team and Scale Modeling
Posted
Interesting idea...would a 4-cylinder boxer engine work? (Subaru anyone? ) If we were to base the model off a real-life vehicle, the style of the subaru brz would be a nice sporty platform. I like the idea of bringing out the best in all builders to make the ultimate design! But communication would be key here-making sure all systems fit with eachother and work smoothly.