Search the Community
Showing results for tags 'Plane'.
Found 17 results
-
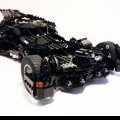
This is a pretty old MOC of the Quinjet from the Avengers movie and Agents of SHIELD. Cockpit has seating for 2 minifigs, and there's a lot of room for storage on the inside.
-
 Aircraft Fighter-Bomber Air Shark Lego Technic. All the good time! I present to you heed project fighter-bomber. It all started with a simple aircraft with a minimum set of functions and gradually grew into what you see today. Management of the Сab: 1. Aileron 2. The Elevator 3. Rudder + Rack Chassis 4. Flaps 5. Step Rotor 6. Turning machine guns 7. Clear Bombs 8. Bailout Exterior Features: 1. Opening а. Hood b. Lantern Cabs c. Technical compartment 2. Folding the front and rear rack chassis 3. The flaps front and rear chassis 4. Index Edition Chassis 5. Rocket Launch The model is equipped with a m-motor to drive the rotor, turn the machine guns and the landing gear. You can do without m-motor, and activate the function by rotating the screw by hand. By September I plan to make a instruction. Subscribe to the Shannel https://www.youtube....WOybIe6pfyvuH-w
 -
[MOC] Lego Technic Аircraft-Fighter NZF-1 Instructions I present you the model of Aircraft-fighter NZF-1 Style designed in Lego Technic. The model was created after some developments in the direction of construction of another fighter. Presentation: Instruction: Parts list: http://rebrickable.c...t-fighter-nzf-1 Functions + Schtick: 1. Closed Canopy 2. Open the Engine Compartment 3. How Technological Compartment 4. The Retractable Landing Gear 5. Engine Management of the Cockpit 1. Flaps 2. The Ailerons 3. The Elevator 4. Rudder Lego Technic Аircraft-Fighter NZF-1 by Nikolay Zubov, on Flickr Lego Technic Аircraft-Fighter NZF-1 by Nikolay Zubov, on Flickr Lego Technic Аircraft-Fighter NZF-1 by Nikolay Zubov, on Flickr Lego Technic Аircraft-Fighter NZF-1 by Nikolay Zubov, on Flickr Lego Technic Аircraft-Fighter NZF-1 by Nikolay Zubov, on Flickr Lego Technic Аircraft-Fighter NZF-1 by Nikolay Zubov, on Flickr Lego Technic Аircraft-Fighter NZF-1 by Nikolay Zubov, on Flickr Lego Technic Аircraft-Fighter NZF-1 by Nikolay Zubov, on Flickr Lego Technic Аircraft-Fighter NZF-1 by Nikolay Zubov, on Flickr Lego Technic Аircraft-Fighter NZF-1 by Nikolay Zubov, on Flickr Lego Technic Аircraft-Fighter NZF-1 by Nikolay Zubov, on Flickr Lego Technic Аircraft-Fighter NZF-1 by Nikolay Zubov, on Flickr Lego Technic Аircraft-Fighter NZF-1 by Nikolay Zubov, on Flickr Lego Technic Аircraft-Fighter NZF-1 by Nikolay Zubov, on Flickr Lego Technic Аircraft-Fighter NZF-1 by Nikolay Zubov, on Flickr Lego Technic Аircraft-Fighter NZF-1 by Nikolay Zubov, on Flickr Lego Technic Аircraft-Fighter NZF-1 by Nikolay Zubov, on Flickr Lego Technic Аircraft-Fighter NZF-1 by Nikolay Zubov, on Flickr Lego Technic Аircraft-Fighter NZF-1 by Nikolay Zubov, on Flickr
-
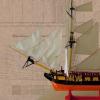
 My build for the contest uses sets #8068 and #42020, which have 408 and 145 pieces respectively, for a total of 553 pieces. I used 490 on the ship and 14 on the stand. Leaving 34 and 29 pieces unused. The Leftovers by CleverNiftyDude, on Flickr Major pin and axle shortage with these two sets. VTOL Heli-plane by CleverNiftyDude, on Flickr The stand,...barely stands, but I was able to get some cool banking shots,... as it slowly fell over. VTOL with Pilot by CleverNiftyDude, on Flickr Just happen to have a matching Technic Fig for scale,..Nice! Unfortunately my entry post will be pilot-less, as he is not part of either set. VTOL Cockpit by CleverNiftyDude, on Flickr A close-up of the pit, with assorted NF controls and interface. VTOL Top view by CleverNiftyDude, on Flickr Functions incude: Manual 90 deg. swivel of wings/props/landing wheels Manual tail fin rotation HOG prop spin. HOG Ratcheted rescue basket I think I'm going to try to get a few more photos before I enter it. Cheers.
 -
A great deal of experimental aircraft were developed by the ƧCǣ airfactors in attempts to break Trans-Atlantic and time airborn records. The Lightning Volt was on such jet. While it got to a certain point in deveolpment a more promising design prototype shelved the L-V project. Mothballed for a long time it was built to flight standard by an eccentric pilot. Sooo... I was building Adventurer planes but these sky-fi ones keep escaping instead. It is technically created for Adventurer's to use but it of course fits here better than Action and Adventure. I was trying for some bare-bones look in areas as if the jet is experimental and I love using the spinner crowns in planes and the cable/wires at the front are actually reigns from Friends and the Star Wars Bantha.
-
Harry Cane has a new plane to test and fly. The Goodbury group's newest offering: The Goshawk. The Goodbury Factors build all kinds of vehicles. I patterned this after the early fighter planes, both in style and colourscheme. It wasn't based on any specific old set this time, simply a new plane for my refreshed figure to pilot. The new Harry Cane has a cleaner cut than the old figure, mainly because I think he looks a lot smarter with a tidy beard than with a whole lot of stubble. My personal story for him was RAF officer, so he had to look a little neater! The Naboo Pilot torso has been a favourite of mine, both 'recent' designs look great. Though their source look was taken from the eras of history that had such style! There are only a few Adventurer of my refreshed characters who I have used a whole new face for. There are 'story' reasons, there are quality issues with the old heads or I didn't have the figure in the first place. Other times it is simply the fact I like the 'new' white pupils printed in. All of these factors meant Harry Cane got a new head!
-
Due to financial restrictions, I can't build real models as of yet, so LDD will have to do, I've made several things in the past but this is the first time I decided to showcase a model online Being an aviation fan, I decided to build an airliner using a combination of the big '<insert that tiresome argument>' parts for the cockpit and tail-cone and smaller parts for the wings and tailplane. It contains more details than you would get in a typical CITY set, it has obvious cockpit and passenger seating put it also contains separate first and economy (known as coach class in America), folding seat for a flight attendant, fully featured galley and a bathroom in the tail-cone (not pictured). Also not pictured is inverted roof pieces used to represent overhead compartments (although these make it difficult for minifigs to fit in comfortably) and clocks hanging from the ceiling in the aisle Constructive criticism is encouraged and accepted. 717.lxf
-
Hi all, this is a first aircraft, a Canadair CL-215 waterbomber in minifig scale (around 1:45). Its wingspan is 80 studs, the fuselage is 8 studs wide. The main points were getting the wings straight and getting a smooth fuselage, especially at the rear. Apart from that it was quite a fun build, although it took nearly two months. Being a complete newbie in building airplanes I was very glad to see that I had some predecessors. It helped me a lot to look at their versions of the Canadair. That's why there are quite a few credits: John Lamarck, Bombardier CL-415: measurements, proportions, wing profile vincez01, Canadair CL-215: fuselage, landing gear Zorko Huljic, Canadair CL-415: tail Last not least a big thank to my dear friend Steffen, a LEGO plane specialist, who gave me a lot of advice. Take a look at his fantastic aircraft: www.flickr.com/photos/29666619@N04 Some more pics: Side view: The plane fits two whole minifig pilots, as you can see here: Furthermore the aircraft has some functions: 2 engines (run by a PF M motor each) flaps (run by a PF M motor) movable rudder, coupled with the steerable nose wheel Video (sorry for the bad quality, it's just to get an impression): The plane was built to be moved by an LCS (see http://www.eurobrick...showtopic=91937). It was quite suspenseful to see if a plane with a weight of over 1 kilogramme could be pulled by it. In fact it's no problem, as you can see here: This is quite nice because like this an airport with taxiing planes is possible which widens the possibilities when planning a town layout. That's about it so far, some more pics on Flickr, if you're interested in this. C&C welcome as usual, thanks for looking.
-
Hi. I've been working on it for a year or bit more. I think I'm on the finish line now as most problems I could think of are more or less solved. It started in that way - one of a rainy weekend we played with my son with some Lego and it turned to be a half-done airplane of mixed color. A few days after my son came up with 'Dad, will it fly?'. I answered "No, of course. It's too heavy and too weak for flying", but this idea literally stuck in my mind so I started to think about it from time to time. I started to evaluate things from different points of view. It was obvious that I should give up using Lego powertrain, there were no match for 0.8 - 1.2 KW required power. Other two main problems were weight and strength. Problem of weight could be moved away with enough power and enough speed. To cope with strength issue I decided to move on with glue. There was also no chance of controlling such a thing with IR stuff, so controls also should be implemented using standard RC 2.4 GHz equipment. This left me with only the airframe made of Lego, but nevertheless I'm pretty happy with it (Purists may stop reading here :))). However, the model could stand on a shelf (and this shelf have to be rather big :) without any glue, operate landing gear and may be even control surfaces using only Lego parts. This means there are no cheats like 'just glue this piece to that'. All connections are at first usual Lego connections, glue just added for stiffness. But to flying. First, I had to implement airfoil using Lego pieces. I did not choose Carsten Swendsen's way of making only wireframe with Technic axles and using some kind of monokote to cover it and instead decided to use System parts to make the wings and fuse. I managed to implement Kline-Fogelman airfoil using 93606 and some plates with stud inversion. May be this is not the best airfoil, but I think it weighs less than, for instance, flat bottom airfoil with some curved slopes on the trailing edge. Wings implemented that way have many space inside and could accomodate LiPos and motor controller. My first version of wing have following layout: Speed controller on the root part of wing, then nacelle with landing gear, doors and retraction mechanism, then batteries in configuration of 2 cells one above another and one another cell next to them. My chosen configuration was 2700 KV 590W motor and 3x2200 mAh batteries in each wing. (With covering removed) (Speed controller inside wing root) Landing gear was implemented using single 9.5L shock absorber with double springs and spacer made from modified 4624 wheel hub. Single 9.5L shock with extra hard spring compresses fully at 1.2kg and I had no chances making the plane lighter then 4 - 4.5 kg and any design with some kind of levers would weigh more and take more space. (And a bit boring video:) My evaluations showed that take-off speed with flaps deployed will be about 40 kph, so landing gear must be able to sustain this speed for at least 30 seconds. There were some doubts how much load could be handled by Technic axle rotating in shock socket at speed of 7000 RPM. I did some experiments with it. Now I know that axle will be damaged if used without grease handling load of 1 kg at ~ 5000 RPM, but could live with this load for 30-35 seconds if greased. This made me move away from that simple landing gear design, it was also rather weak and any non-ideal (or may be even ideal?) landing could break the strut or move it away from extended position - the locking was not good. (I'll post pictures of damaged axle and video of experiment a bit later) At the same time I was thinking of other ways to reduce weight and came up with idea to reduce weight by cutting flight time. I was targeting for 10 minutes before, but now I think that even 3-4 minutes will be enough to prove the idea of flying Lego airframe :) I found another motor/prop/battery configuration and combined it with new landing gear with 4 wheels per strut and more reliable locking. New layout is using 4x950 mAh batteries, 1200 KV 530 W motor and smaller speed controller and potentially could fit in root part of the wing at whole. However, root part have to be lengthened. This is going to enlarge wing area (which is good) but also probably will load root spars more (which is not so good). On the other hand, heavy batteries are moved from outer wing section into root section (and their weight is reduced; with lighter ESC saving is 90 g per wing) First version of wing also featured front spar for almost all wing length. In second version I decided to end front spar soon after engine nacelle. After gluing wing v1 it was obvious, that front spar of that length is not needed - wing is rigid enough. Also, when making wing v1 I had some mess with covering root section - it was 10st length and there is no 10x8 tile to cover it. Wing v2 have root part of 18st and could be covered easier. (Unfinished nacelle v2) To make control surfaces I used micro-motor directly connected to axle, holding the surface (except of flaps - flaps are connected by worm gear. On ailerons other side of surface is attached to potentiometer, connected to PCB of standard RC servo. Micro-motor is connected to PCB via H-bridge. RC servo operates at 5 V and this is very low voltage for Lego motor. With help of H-bridge, micro-motor is being fed by full battery voltage (11.1V or 14.4V) and moves with reasonable speed. For rudder, elevator and flaps I will have to add some gears to connect potentiometer. I hope the play in gears could be compared to play in servo-to-surface linkage of traditional RC setup. I started some mock-ups of fuselage about the same time as wing v1. Seems like I can fit all the required equipment (air compressor, front landing gear, flap mechanism, pneumo-switches) under the floor (slightly raised in nose section) and some other things (RC receiver, air tank) in aft section. This makes realistic look for cabin, it can be fitted with seats, crew and passengers :) Fuselage, however, is a quite ugly being made from System pieces. With one wing attached: Some amusing details :) Now I'm waiting for new powertrain and some missing pieces for nacelles. After that, if this layout proves doable and reasonable, I'm going to glue both wings, finish fuselage and rear control surfaces and attach wings so CG is in the right place. I think I'll be almost done at that point. However, there are some minor unsolved problems. Design of front landing gear and bay doors make it impossible to close doors when landing gear is down like in main struts. On the other hand, doors must open before extending gear and close after. And there is no place for third pneumo-switch. My idea is to make some kind of throttle to create delay in pneumo-cylinder operation. Also, there is no place for mechanical sequencer, so I'm going to make some simple microcontroller stuff for sequencing door-gear operations. I don't see anything hard here. And yes, there is still a bigger problem - will the whole thing work as expected? :) Well, at least it will be fun to watch how it crash. Sure I should have started with some simpler design - no retractable landing gears, some simple fuselage, something like WWI era airplanes, but my current design is so much fun to build, so I probably revert to simpler construction only after I done with current one. Hope you enjoyed this crazy thing.
-
Steven: Lets hope that cargo we sabotaged the plane for is still intact. Ian: Don't you worry about that....
-
Hello everyone I would like to introduce my model for the Bombardier C-Series (both the CS100 and the CS300) which is the newest narrow body plane being made by the Canadian giant Bombardier to take on Airbus and Boeing's duopoly on the medium sized aircraft market. My model for the CS100, the smaller of the two members of the family comes in the colours of Swiss Global Airline, which is the launch customer for the type. The aircraft features retractable landing gears and opening doors. It can seat 6 passengers. The tail is this way until I can justify ordering two 3x3 cross plates (15397) which I still have to do. DSC04420 by Maxim Pieuchot, on Flickr DSC04442 by Maxim Pieuchot, on Flickr DSC04437 by Maxim Pieuchot, on Flickr DSC04427 by Maxim Pieuchot, on Flickr My CS300 is 4 studs longer and comes in the colours of my custom airline Nova Airlines. The aircraft features the same retractable landing gear and door system. DSC04460 by Maxim Pieuchot, on Flickr DSC04467 by Maxim Pieuchot, on Flickr I hope you enjoy these two airplanes. My goal is too bring more details into the lego aviation world. I hope you find these creations achieve this. All comments are welcome :) Happy Building -Max
-
Hi, here's my LDD model of Captain Baloo's famous plane. I hope you like it :) Best Vaionaut Edit: @Mod: Please correct the typo in the Title (Disney's). Thx!
-
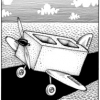
Hi, the NC-4 was a flying boat, manufactured by the Curtiss Aeroplane and Motor Company in Buffalo, NY. In May 1919 it became the first aircraft to fly across the Atlantic Ocean. I really like the design of this plane and so I built it in the LDD. Here are the pics: Best Vaionaut
-
Yes I know that the Topic title isn't correct. It's WWII planes. I would like to share some designs I made back in 2011 Supermarine spitfire LDD by Anders Thuesen, on Flickr Messerschmitt Bf109 LDD by Anders Thuesen, on Flickr Fighterplanes compared by Anders Thuesen, on Flickr Heinkel He111 LDD by Anders Thuesen, on Flickr Heinkel He 111 bottom by Anders Thuesen, on Flickr Heinkel He 111 front center by Anders Thuesen, on Flickr Heinkel He 111 Different colors by Anders Thuesen, on Flickr The last one has also been built Heinkel He111 back by Anders Thuesen, on Flickr Heinkel He111 top by Anders Thuesen, on Flickr Heinkel He111 front by Anders Thuesen, on Flickr Heinkel He111 Flightcrew by Anders Thuesen, on Flickr
-
Mission: Scout Lorstan II for water. Tags. Plane, Kawashita, Lorstan II, Pilot They sent me to Lorstan II to scout for a water source, pretty sure it won't be hard to find.. Mantis is on the offensive now, won't be long until we are competing with them on planets on a regular basis. Hopefully I'll have time to finish the big ship.
-
 Hello everyone. This is my first post and this is a projekt I've been working a lot on the paste yea or so. I have only posted on the danish lug Byggepladen.dk, and I wanted to show the building progress to every other AFOL around the world instead of just danish members of Byggepladen. All of these next posts are copied directly into google translate so bear with me if there are some mistakes some places. I don't have the energy to translate walls of text just for this purpose. You can find my image gallery here You can find my youtube account with my airplane process - I plan on adding another video very soon, the plane is nearly done :DSo here goes.... (I realised just now that I cannot create a reply to my self but only edit. Be patient please. There are lots of stuff to come.) (My englih skills are also awesome if I have to say so my self, bear in mind that I'm still using google translate and fixing the most inconsistent words for better understanding)
 -
There is a red and gold blur that disrupts the blue cloudless sky. As you squint you can make out some of the details. Then it is upon. And you don't have any time left. Behold! "Emuir's Breath" I was really inspired by Jon Hall's sky-fi planes on flickr. I used some of his techniques on this build. And now, as is my custom, a period picture. Here is a side-view. As usual, more images are on Brickshelf (when moderated).