
Ashi Valkoinen
-
Posts
537 -
Joined
-
Last visited
Content Type
Profiles
Forums
Gallery
Everything posted by Ashi Valkoinen
-
Reading back the topic now I see why I missed it. Haven't seen your MOC at BSBT, at least this one. :( And overall nice design with lot of details, as usual. But tell me, what do the LEGO string with 1×1 round plate parts doing at the bottom of the train bogies?
-
I really like this work, especially because of the appearence of 5 studs covered narrow gauge track piece. We are used to use normal LEGO gauge as normal gauge (1435 mm), LEGO and TrixBrix narrow gauge as 600/690/760 mm narrow gauge, but the track inbetween representing 1000 mm gauge real life tracks are really missed!
-
MOCs: Models of trains running in Hungary
Ashi Valkoinen replied to Ashi Valkoinen's topic in LEGO Train Tech
Thank you guys! The layout was made by Nándor Mészáros, András Pécsi and me, but actually my part was just a quick improvising putting my houses, trees around the small two-track station. I just joined narrow gauge at our LTC, but I plan to make Sátorkő station of the Sand Railway network based on old aerial photos to figure out the track plan and it will include more details and will be better built. I really love the coal waggons, too, they are the smalled train MOCs I have ever made, the good quality (SKF) ball bearings under each waggon cost more than all the LEGO pieces, including the old and quite rare container lid I used upside down. There is more to come as I will make my own narrow gauge layout. On the long term I plan to make a hill where trains can go up - with total height of 51 plates (17 bricks) to climb! But I estimate the full project approx. 2-3 years! -
MOCs: Models of trains running in Hungary
Ashi Valkoinen replied to Ashi Valkoinen's topic in LEGO Train Tech
No, not. But there is a small switch to turn the Cube ON (left), OFF (middle) or BLE (right). If you leave it ON, or BLE, you can charge it. When you connect the charger, the green light (turned ON) or the blue light (BLE) will turn off, red will turn on to indicate charging. After charging finished, red light turns to green, but still no output while the charger is attached. If you remove the charging cable, you get back your Cube charged and in the state you left (turned OFF, ON or BLE). So basically I don't need to reach the turn ON/OFF/BLE button during showtime, I turn the locs to BLE at the beginning of the day, I am charging if necessary and turning locs OFF at the end of the day. But I can confirm you can charge while BLE is on, I didn't try what happens when the Cube is turned ON (continuous outputs) and I start charging. -
MOCs: Models of trains running in Hungary
Ashi Valkoinen replied to Ashi Valkoinen's topic in LEGO Train Tech
I used their original application to control the cubes. Since they added the option to connect to two cubes at the same time via Bluetooth, for me it is quite viable to use it from this app, I never need to control more than two small locomotives at the same time. For the "Babycroc" locomotives, charging can be done just removing the roof with the pantograph, to turn on or off the cube must be lifted and rotated out. Basically, I don't turn it off while charging, so it needs no turning on after charging is finished. The small 9ton locomotive's 1×4×3 panels can be easily removed (they are not part of the structure), the charging port is behind one of the panels. The turning on/off bottom is underneath, and nothing covers it so really easy to access. And as I promised, here is the video of the running locomotives with their freight trains. A few notes, problems, I faced: TrixBrix switches are pain when it comes you go straight one them - the lack of second moving rail giving support for the wheels is really bad when you have a locomotive with such small weight and such small axle distance. TrixBrix track vary a lot in quality unfortunately - there were some tracks bended from the beginning, and wheels were is to start spinning at these sections. The smaller loco's weight distribution is really bad, having the battery in the cab, it required some small magnets put in the cavities of the front to balance it, but without careful driving it may leave the track when the small nose part is leading the train. The big "BabyCroc" locomotives worked well, but quite slow, I managed to put only one CC-motor inside, and due to the overall shape of the locomotive, there is not so much weight at the only driven axle. Both locomotives and freight trains were able to handle R36 - I wish no more. The minecart-train, with that small wheels, small axle distance, it is really pain when it comes to push such a train. -
MOCs: Models of trains running in Hungary
Ashi Valkoinen replied to Ashi Valkoinen's topic in LEGO Train Tech
That's a long river, and the biggest river in Hungary. Last weekend we had a show, narrow gauge only layout and the small mining locomotives did really great. Circuit Cube components are small, very flexible items, I am glad that it allowed me to make my 4 studs wide and 4 studs+1 plate wide locomotives motorised, without adding a constantly couple freight car for batteries. Some really nice photos coming soon! -
[MOC] September Addon Frenzy (ÖBB / ČSD / MÁV)
Ashi Valkoinen replied to Brickstone_City's topic in LEGO Train Tech
Wow, that's something. I am always feel good when I see people building some Hungarian or Hungary-related stuff, our country is so small and unknown, I am always wondering why people from a different country choose to build our locomotives. The steam is right on spot, and using two CADA-motors facing each other, giving enough traction power is really clever idea. Hiding them in such small locomotive, great work. I guees that orange and dark green train windows are clones, but what about other bricks in those models? Some years earlier I found a danish MOC passanger car with dark red windows - all the 1×4×3 train glasses where held by SNOT panels in place and the train itself gave the impression train window part was used there, but no, just SNOTting around, since no dark red train windows were produced. -
MOCs: Models of trains running in Hungary
Ashi Valkoinen replied to Ashi Valkoinen's topic in LEGO Train Tech
After finishing the work at my normal gauge main station's signalling I turned back for narrow gauge, especially the "Sand Railway" network. The mainline locomotives were shown above, but there were some small locomotives doing the shunting at the sand mining site. These had rod pantographs as the overhead wires were offset from the centerline of the tracks. This locomotive had a really nice path of service - all started in 1922 where two identical, 2-axle electric locomotives, as twins, sharing one full pantograph were built to serve on the first version of the "Sand Railway" network, built using 580 mm as gauge. The network got its name of the sand transported on it - sand was mined from the sediments of river Danube to fill up the nearby coal mines' unused tunnels. In 1935 gauge was switched to the more reliable 760 mm, and three new locomotives arrived (TC series, number 1, 2 and 3). As the twin locomotive wasn't needed anymore for the mainline service, twins got separated, regauged to 760 mm and each half got a rod pantograph - so they were able to do the shunting at the sand mining site, where the overhead wire was offset from the centerline of the track. The "Sand Railway" worked until 1988, the nearby coal mines got depleted or victims of underground water, without the need of sand the entire network and all vehicles were scrapped. My LEGO MOC locomotive is number 5, I found a couple of coloured photos of the real train from the last decade of the service. Number 5 had an orange paint, number 4 was yellow, with some diagonal black stripes. However there is no photo proof that number 5 ever had stripes, I added them to improve the look - I used original LEGO stickers to do it. I powered the locomotive with Circuit Cubes HUB and small motor - these are really tiny electronics but still very hard to fit to the locomotive. The HUB is quite heavy compared to the overall weight of the locomotive, fits only the cab, while the motor has odd dimensions, and the bottom is lower than the top of rails. I hid the HUB in the cab, old (no side support) 1×4×3 panels are around it. I added 2× original traction rings to each wheel, it increased the height of the loc so the bottom of the motor is not touching the level of the top of the rails. Honestly, to make this locomotive run was maybe the hardest task I ever did with bricks, due to the inbalanced weight distribution, only one axle driven, it was really challanging to make it work on R36 geoemtry (trixbrix points and curves) and also pulling, pushing some heavy cars! -
All the best, Ben!
-
For the signal Ties used the new track element introduced with the Arctic Train set, which triggers the rocks falling off from the top of the tunnel.
-
MOCs: Models of trains running in Hungary
Ashi Valkoinen replied to Ashi Valkoinen's topic in LEGO Train Tech
This is a video taken not by me, but since the AFOL used a camera on his head to record how he turned back with his train on my layout with full signalling and protection, I am happy to share it. His train arrives on the mainline, facing a red block signal, since the Railjet KISS is at the next block section. When Railjet KISS enters the station at platform 5, the block section gets free and the czech train progresses forward and then to platform 6. As he enters the station, a black locomotive from platform 3 is shunting back to the short loco storage track. While the czech train's locomotives shunt around on track 7, my girlfriend's own built M44 diesel engine shunts the orange freight train to track 3, while the Railjet KISS already left the station to the mainline (three paralel train movements). The czech locos complete the shunting, returning to the other end of their train, M44 deattached from freight on track 3 and leaving to the shunting yard, and the Westbahn KISS arriving and departing back on track 5. As the block section after Westbahn KISS is cleared, the czech train gets the free signal aspect, while the block locomotive is shunting back for its train. And lastly, I arrive on the mainline with my GySEV InterCity consisting of all my five GySEV coaches. I am really happy with the station by now, worked really nice during BSBT2025, with no major problems. Operating the station is a great teamwork, our TFOL member Donát Szüts operated the control system of the station, while my girlfriend operated the shunting locomotive for those trains which didn't arrive to track 6 or 7 and needed their waggons pulled of before reversing. -
Fx Bricks (Michael Gale) announces Fx Track system
Ashi Valkoinen replied to HoMa's topic in LEGO Train Tech
Yes, FX presented some of their prototype motors and speed regulators at the show. However I didn't have too much time talking to Michael and Max, I had a short 5 minutes brake from driving and played a little with their prototype 9V motor. The motors are geared differently, than the usual LEGO train motors we know (9V, RC, PF, PU), they are slower but having more torque. The speed regulator is easy to handle, the slidebar instead of the rotating switch of the old 9V speed regulators is a nice feature. The FX speed regulator also consumes less space, and multiple units can be attached next to each other, the neighbouring units feeding power to each other. So you plug one FX speed regulator with USB-C type connector, and it can power other speed regulators, too. I have driven an old 12V set with the FX 9V motor underneath, the maximum speed was okay, but as I mentioned, not the speed we got used to with LEGO train motors, on the other hand the FX version give a really, really nice low-speed operation - perfect for shunting and other train station movements, the train kept the really low speed I set for it on the curves, too. Wheels are full metal and they have a really nice, realistic look by colour. -
Fx Bricks (Michael Gale) announces Fx Track system
Ashi Valkoinen replied to HoMa's topic in LEGO Train Tech
It was made by Miles McFadden on request, using four original FX switches. The switches which didn't make to the market. :) -
MOCs: Models of trains running in Hungary
Ashi Valkoinen replied to Ashi Valkoinen's topic in LEGO Train Tech
Then the only thing to do is keep going and get that dragon called Phd final exams. :) I'll be here next year for sure, so if you need the LEGO train and layout inspiration one year later, you will get it. Also, if you have the time and the change to travel, this year I'll participate BSBT2025 in Schkeuditz again (from 8th to 10th August). ;) -
Fx Bricks (Michael Gale) announces Fx Track system
Ashi Valkoinen replied to HoMa's topic in LEGO Train Tech
The P40s which didn't make to the market: Yeah, sure. You simply missed it. The switches were never recalled, replacement tiebars were sent based on your orders, the replace process took less then 1 minute for each point, but basically they were working with the wrong tiebars, too. I own currently 30 P40 switches, so they are quite real and made it to the market. -
MOCs: Models of trains running in Hungary
Ashi Valkoinen replied to Ashi Valkoinen's topic in LEGO Train Tech
It is never too late to start or restart with a train layout. I don't how did you feel about your when you were playing around but for me it is quite satisfying to build up a system and let is work. Not only on the scale of my MOC trains, but the cooperation with other LUG members brings to ultimate pleasure of this hobby. Also, I am happy to show you my next train MOC, the passanger car with UIC number 51 43 20-33 100-2 of GySEV Austrian-Hungarian railwa operator. This passanger car has a quite unique and experimental design - it is supposed to to replace the old fashioned green-yellow design of GySEV passanger cars. The passanger car has lot of trapezoids with many colours - in this case the different shades of gray are a little too many (5 shades). The trapezoids also continue above the windows, including the lower part of the roof, it required the special slopes of the 45° family to keep the diagonal patterns on the sloping part. The sidewall is built SNOT completely, this allowed me to use the differently coloured wedge tile 1×2 part. Funny, because when I started this passanger car back in March, the wedge tile 1×2 didn't exist in the LBG colour, it appeared only at the end of May/start of June with the Balrog Book Nook LotR set. I wanted to keep the 6 wide interior with lights and full details inside, so keeping the sidewalls 1 wide was quite hard. The SNOT tiles have colourful line of SOT tiles below and above to get the right height of the colourful pattern - the bottom was easy as tile are placed on the dark green bottom, but the row of tiles under the windows was quite tricky. The SNOT part of the sidewall has the small roller skate element, which can hold the SNOT and the SOT tiles, too. The 5 shades of gray were simplified for obvious reasons to 3, and however using DBG, LBG and very light gray would have been the best, very light gray is and old and retired colour, no new parts like wedge tiles or special slopes were made in this colour. I found that colour "sand blue" with relative low saturation of blue is quite a good "gray" colour and sits nicely between DBG and LBG. The only problem was tile 1×4 in sand blue - the SOT tiles on the side needed to be 1×5 by the sand blue pattern, but the roller skate elements' halved studs can't hold a tile 1×2, because tile 1×2 has open bottom, so it would fall out easily. There is only two possible division of 1×5 in two parts - 1×2 + 1×3 and 1×1 + 1×4. 1×2 didn't work because of the part design of the bottom, so 1×1 + 1×4 remained, but 1×4 sand blue tiles are really pain to find. :) The passanger car has also interior lights - the usual solution with old 9V battery box + PF conversion cable + 2 pairs of PF ledlights was used. After I figured out the building techniques and overcome the problem of hard to access parts (thank you, Dennis!), now the passanger car is completed and ready for service. -
MOCs: Models of trains running in Hungary
Ashi Valkoinen replied to Ashi Valkoinen's topic in LEGO Train Tech
When I switched to the terminus design, as the 10th main variation of my train station, I motorised all the switches for smooth and easy control, but didn't connect the ledlights and distance sensors - with the 9th design I had a lot of connection issues with bluetooth devices - okay, maybe going up for 6 SBrick Lights, 4 SBrick Plus and 6 SBrick hubs was way too much to handle at once. I found also that SBrick Light hubs are harder to connect and lose easier the connection, so I tried to figure out how to reduce their number. The terminus doesn't require train detection and signals on both sides, only by the entry part, so I spared 4 hubs and only two remain. Less sensors resulted in less SBrick Plus hubs (from 4 to 3), but the switches still require 6 SBrick units. But this setup fits and works nicely - I would like to show you a video showing movements at the train station synchronised with the screen capture of the program I created in SBrick Pro to handle switches, lights, train detection - and building up a realistic instrument to control and keep trains safe. It is me sitting in front of the computer - and for departure it is not only enough to see a signal letting you go but proper signing from the traffic controller is also required to depart. It adds a lot to playing experience. -
MOCs: Models of trains running in Hungary
Ashi Valkoinen replied to Ashi Valkoinen's topic in LEGO Train Tech
Actually, this is my second MOC using the old nylon hinge coupling. The first one is under the front bogie of my GySEV Inlandswagen control car. This nylon hinge is thinner than half plate, extremely useful when it comes to connect everything in the train bogie design. The 2×2 parts holds firm, they fit between the lowest brick of the bogie and the top of rails, while the hinge part can still hold things above it without stud connection. Usage is limited because of the dimensions, but fits quite okay for any bogie which need support/reeinforcement from below. -
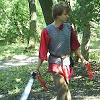
Does this qualify for the topic? :) Four wide mining train with Hungarian Ganz 9t electric locomotive and five mine carts - the locomotive is powered with Circuit Cubes.
-
MOCs: Models of trains running in Hungary
Ashi Valkoinen replied to Ashi Valkoinen's topic in LEGO Train Tech
Hello all! Seems I stopped building trains - honestly, I have slowed down with new creations since my storage and transport capacity is really on the edge. However it doesn't mean no more new trains - but I give at least two times to think before start building. Today's MOC is not new, a couple of months old, but haven't been presented here yet, so there she comes, an odd-looking, narrow gauge, crocodile-style electric locomotive from the Hungarian "Sand Railway" network. The purpose of the network was to carry the sand mined from river Danube's sediments to the coal mines, where unused and depleted tunnels were filled with the sand. Trains carried sand uphill, and sometimes coal waggons downhill. Only three of this locomotives were made by Ganz, all scrapped around the time when I was born. "Sand Railway" was the only electrified narrow gauge surface network in Hungary, powered with 550V DC. Railway gauge was 580 mm (1922-1935) and 760 mm (1935-1988). TC locomotives were built freshly for 760 mm gauge network. The brick-built model has been made using LEGO-bricks with various (and quite so called "illegal") building techniques, and it is powered with Circuit Cubes BLE battery hub and Circuit Cubes small motor. Although the locomotive herself is 29 studs long, there is not so much space to do the motorisation - the long, but flat noses and and the bogies with the odd 3,5 studs wheel axle spacing have no room for a tiny motor. CC small motor is placed SNOT in the bottom of the middle compartment, and the hub is sitting (SNOT again) on the top of it. Building in 5 wide and fitting everything inside was a real challange! Fortunately it runs nicely, working on R36 narrow gauge track geometry of TrixBrix, and also climbing a 2 plates/16 studs incline. I built the first version using Dark Bluish Gray colour, but later I found some coloured images of the locomotives which indicated some yellow-based colour - TLC's bright light orange colour fitted the best. The freight trains always ran the same configuration - a TC locomotive + three freight cars, two of them had braking so called cabins. They where thin and uncomfortable. -
MOCs: Models of trains running in Hungary
Ashi Valkoinen replied to Ashi Valkoinen's topic in LEGO Train Tech
Hello William, thank you for your kind words! And for your questions and thoughts, just in order: GySEV/ROeEE is quite small operator compared to MÁV-START (Hungarian State Railway) and ÖBB (Austrian State Railway). GySEV works mostly with motor units - diesel ones on branch lines and electric ones on mainlines. They own some Jenbacher single and double DMU's (bought from ÖBB), FLIRT, FLIRT3 and Desiro ML electric motor units, and these serve all the local passanger train needs in general. In the rush hours some additional trains are required - these are served with traditional locomotive + passanger cars setup. Since all time schedules are set up for motor units (quick reverse at end stations), the loco + cars formations need to be reversed quick - that's why they use these driver cars. The InterCity service between Sopron/Szombathely (western Hungary cities) and Budapest (capital of Hungary) are served by loco + passanger car trains, but these have enough time to reverse, so if they contain this driver car, this is only for bicycle transport, because former ÖBB cars don't have compartment for bikes. Basically in Hungary there were many driver cars, but since we were unfortunately part of the Soviet Union for a long while, no western european standards were used here when driver cars were produced. The wiring, the remote control setup is unique on these, old BDt cars could remote control diesel, electric, even steam engines, but if a car was able to remote control the electric loc, it wasn't able to do this with the diesel one, so each locomotive series had their own driver cars, without the interoperability. After russians went off, we never really reached "west", and while we bought these Inlandswagen driver cars for MÁV-START, too, they never used them as driver car. It took a decade to use the "Halberstadter" driver cars in pushed formations - we didn't have any locomotives compatible with the remote control system of those (later some old electric was upgraded to work with them, but they lost their ability to work with old BDt driver cars). GySEV was forced to make the "Inlandswagen" work due to the discussed operational needs above. Budapest owns yellow trams quite a long while, their look is quite coherent, and only Siemens Combinos got a really small green and blue pattern, but this had nothing to do with GySEV railway operator. -
MOCs: Models of trains running in Hungary
Ashi Valkoinen replied to Ashi Valkoinen's topic in LEGO Train Tech
This evening I'd like to share my first train MOC of year 2024 with you - seems building and rebuilding the big station took all the time and money I can spend on this wonderful hobby! Full consist by Donát Raáb, on Flickr The biggest change in the train station project was switching to terminus design - and as my Stadler FLIRT and KISS units can reverse quickly, with traditional locomotive + passanger cars consists it takes more time to reverse, especially with the lack of a second locomotive for short reverse. So I decided to build a GySEV/Raaberbahn car again (there are two big railway companies in Hungary, the State Railway operator, MÁV-START and the Austrian-Hungarian GySEV/Raaberbahn). There are only three of the 8076 series driver cars in the green/yellow livery of GySEV, these cars were former ÖBB units, but some of them were sold to both MÁV-START and GySEV. The green/yellow company uses this driver cars in pulled and pushed trains to serve some local trains, but they also appear strictly in pulled formations on the Sopron-Budapest InterCity line, in these trains they serve the need of bicycle transportation. GySEV 8076-102 "Inlandswagen" driver car by Donát Raáb, on Flickr Full consist with various GySEV cars by Donát Raáb, on Flickr However this car in the yellow/green livery is really rare (GySEV owns three of them), the LEGO-parts I used for this MOC are even more rare! The 1×4×3 train windows, the 1×2 hinges with 2/3 teeth, the 1×1 plates with clip (both horizontal and vertical) were officially never produced, they are not listed on Bricklink by colour green, but small amount of them were made for LEGOland builds. I was fortunate enough that a German builder, Thomas owned some of these windows (18 were used in total), and sold me his Q-elements at a decent price! Train windows 1×4×3 in green! by Donát Raáb, on Flickr Plate 1×1 with clip parts by Donát Raáb, on Flickr Beyond the rare parts the design itself was quite challanging, too. These type of cars (known as Schlieren, Inlandswagen) are lower than standard UIC-X and UIC-Z cars, which requires a lowered bogie profile, too. As I was doing the math for the window setup, I realised that it won't be enough to build a simple tower of 1×1 bricks between windows, but a quite unusual offset, 1 stud + 2 plates will be need (=1,8 studs). This was quite hard to carry over keeping structure. The doors are 3 studs wide with 0,5-0,5 plates wide black frame, lot of bracket were spent on them! I'm quite happy with the front, too, unfortunately GySEV has many cars and motor units with green sides but full yellow fronts - the corners are not LEGO-friendly at all! Front details by Donát Raáb, on Flickr I hope you like it, I guess this passanger car will be my only train build this year - and 15th anniversary of this topic getting closer. :) Full consist with interior lights by Donát Raáb, on Flickr A video of the full consist in pushed train, Bdfmpz 8076-102 + Bp 20-33 000 + Bmz 21-90 000 + ABmz 31-90 000 + Taurus 470-502: Full speed in pushed train formation by Donát Raáb, on Flickr -
MOCs: Models of trains running in Hungary
Ashi Valkoinen replied to Ashi Valkoinen's topic in LEGO Train Tech
Honestly, i think it will happen, sooner than later. Thank you for all of the nice comments - I completely forgot to include a video showing the station during train movements. But now, here it is: -
Hello, I am not sure I can do it for since the digital design is on my older computer. I'll try to look up for it, but will take some time 'til I get back to my homeplace where it is stored. You may find some photos at my Flick-gallery to get started - looking back at this tram it is quite easy design compared to my recent stuff. :) https://www.flickr.com/photos/150200265@N08/albums/72157700704620731/with/44498911334
-
MOCs: Models of trains running in Hungary
Ashi Valkoinen replied to Ashi Valkoinen's topic in LEGO Train Tech
The photos below shows my 10th iteration of a LEGO train station. The first version was made back in 2010, with only two short tracks and two switches, with a 6-wide platform beetwen the tracks. As the number of my trains increased the more tracks I'd built during the years - but all iterations were organic developement from the previous version. Two years passed only after 2010 and my station was the biggest in our LUG and was a great junction on our double track mainline and this type of through station was developed until the 9th iteration. I was really happy with the 9th version, with freshly installed FX Bricks P40 (R104-ish) 9V switches, but the setup time before each show went up crazy - took 14 hours to put it up and 5 hours to dismantle. There were a lot of frustrating, time consuming and boring setup progresses due to the irregular track geometry and the cables I ran through almost all baseplates. I also started to find a through station boring, no shuntings were performed during shows, and as being part of a through line with two tracks, our LUG always put up a double track oval, which resulted in trains going around circles and there were no point-to-point traffic. So, for this time, the 10th main version, for the first time, I completely erased the full previous station and started fresh. It took 4 months to do, and half of this time was digital planning - I wanted to have a terminus, where all train should reverse, but with good reversing capacity, a geometry, which support arriving and departing trains, shunting, and also easier to install compared to the previous one. The ballast under tracks were increased to 4 plates (I started with 3 plates back in 2010), so now I have a comfortable space under the tracks for electronics and could plan better the cable connections. All switches of the station are motorised and controlled via Bluetooth on my computer. I started to enjoy managing the traffic done by others, who like driving their trains, but I also really like to run my modern EMUs on it. Fortunately my girlfriend, Tünde, take turn being the traffic controller, so I can drive, do the shunting, going around with locs, pull out some cars, etc. Switching to a terminus design instead of supporting the double track oval also had good influence on our LUG, more trains were running during the last show and everyone enjoyed the traffic we made - trains started somewhere and then went somewhere else, not just going around again and again. This gallery features some photos of the full layout we set up for a show at the end of September. The station has seven tracks for arriving and departing trains, can handle a single track branchline and a double track mainline, has four very long storage tracks and three shorter dead ends for storing the shunting/waiting locomotives. Train station and me. by Donát Raáb, on Flickr Morning hour. by Donát Raáb, on Flickr Station and computer for switch control. by Donát Raáb, on Flickr The full layout. by Donát Raáb, on Flickr Storage yard with wooden sleepers by Donát Raáb, on Flickr