
Ashi Valkoinen
-
Posts
537 -
Joined
-
Last visited
4 Followers
.thumb.jpg.9192516dafb46956946ec33aff8b5798.jpg)

About Ashi Valkoinen

- Birthday 05/08/1988
Recent Profile Visitors
5,231 profile views


-
It is a Siemens Taurus (1116 series in Austria), not a Vectron.
-
Holes in 9V train motor - What are they for?
Ashi Valkoinen replied to FGMatt's topic in LEGO Train Tech
I got so upset of the useless technic hole on the side of PF/PU motors I figured out how any decoration can be built on it safely. Get a minifigure hand, put the hand clip into the hole (just like it can be done with antistuds), and put the perpendicular middle part of a pneumatic T-piece into the figure hand. The hand stressed against the wall of the technic hole with the bar inside will result in a sturdy grip. -
I am the man of honest opinions, everyone knowing me in person could tell you. :-) I am not great fan of 6W since it looks odd on LEGO tracks (train just slightly wider than the tracks underneath), but I can accept that people make different choices when it comes for building so I try to add opinion judging the build itself and not the choices behind. For a 6W build, it looks proportional, the train is clean, no unnecessary fluff, gives back the vibe of the real thing well. I don't know if anything could be done about the front (the FLIRTs' noses are narrowing, too, and the side windows of the cab is visible when you are standing exactly in front of the train), but making a narrowing front starting from 6W would destroy the well-built proportions and maybe the cleanness of the design. So, as 6W, it is a great build, no mistakes made that can be seen at many 6w trains. Personally I felt the same cleanness with the 2009 red PF passanger train (similar to german Siemens Desiro DMUs), except for the doors which LEGO forgot to put into the model. When parents asks me about building traisn at different shows, I always show them that set, teaches more to the kids compared to the trains with front cones of one mold. Safe the train glasses for later, those are getting rare, they will be great for an another build, like a traditional coach.
-
It is really nice as 6-wide, and also give me some nice memories about starting my topic back in 2009 with my old Stadler FLIRT design. As 6 wide train it has the advantages of a regular LEGO train set needing less space compared to an 8W MOC, but also has nice details which we miss from official trainsets. I'd recommend is remove the LEGO train window glasses from the frames and replace them with single non-train window 1×4×3 glass as the real train have only very limited number of openable windows.
-
I made some photos of the light solution as well, so you can see, how the cable is wired in the front:
-
Thank you! It everything goes well, there will be a railroad modelling event in Zagreb, second weekend of May at Family Mall, and our LEGO train groups MLVK (Hungarian L-Gauge Club) is also invited, this event is a good reason to build a train not related to my Hungarian fleet. I'll bring also my Končar TMK2200 narrow gauge tram, too! I was stuck with the roof for weeks, I went around all Youtube videos I could have found about the battery-electric train, but of course, everyone is filming next to the train tracks so no roof details could have been seen from those videos. I found a drone footage at the site of HŽPP accidentally, the resolution was low but at least I got the idea of the position and estimated size of the dark gray, light gray boxes, the copper-coloured cables, cylinders on the top. Could be much more accurate if I can go there and take a couple of photos and videos of the roof. Unfortunately, the electric only trains are not good references, as they feature much less equipment on the top because of the lack of the batteries. Thank you! Light transmitting cable is an old "hose" type LEGO part. It is a long, semi-transparent cable, which is used to carry a single ledlight somewhere else. Here you can find them on bricklink: https://www.bricklink.com/v2/catalog/catalogitem.page?P=x400c12#T=S&C=12&O={"color":12,"iconly":0} It has a diameter of 3 mm, so you can put them through open studs, it is flexible, you can bend it as you want. The LEGO Power Function ledlights have quite bulky heads, and they simply don't fit next to the sidewall of the train. So ledlights are deep in the model, and the light is delivered to the bright green round plates using the cable linked above. BuWizz 3.0 units have 2 PF and 4 PU ports. Each PU train motor is linked to one PU port, the PU port are linked to the same throttle I use to drive. BuWizz settings enable to customize "Power Curves" (it is a function you connect "Throttle output - motor output". For one of the motors I reversed the power curve. Like: Motor "A": Throttle (-1) -> Motor (-1); Throttle (0) - Motor (0); Throttle (+1) - Motor (+1) this is a linear function f(x) = x Motor "B": Throttle (-1) -> Motor (+1); Throttle (0) - Motor (0); Throttle (+1) - Motor (-1) this is a linear function f(x) = -x So the PU motors facing opposite direction will go to the same thanks to the setting of the Power Curve.
-
Thank you, zephyr! Was a long journey with this MOC, and honestly it is good to see the same nicknames here, at the forum. :) Thank you! The cables are running through 4× 1×2 round plates, 3× 1×1×2/3 bricks with open stud, behind an 1×2×1 panel, curving inside for a headlight brick. The are approx. 16-16,5 plates = 6,4 - 6,6 studs long. The whole windscreen module can be taken off easily. The hose is held at two points by 1×1 tiles with clips - in the middle, at the bottom and on the side of the windscreen. I gently pushed the hose agains my index finger, the curvature created like this exactly matches the curvature I needed. After shaping the bottom curve evenly, I overcurved it a little bit - rigid hoses tend to get less curved over time. When this was done, I locked it with the 1×1 tiles with clips so they stay really solid at their position. I bought 10× 10L rigid hoses because I knew it may be tricky - now I have 6 leftovers since all the four hoses used on the two fronts came to shape at the first attempt, no hoses were wasted. It requires patience, tho, and even more patience when you build them digitally. :D
-
Reading back the topic now I see why I missed it. Haven't seen your MOC at BSBT, at least this one. :( And overall nice design with lot of details, as usual. But tell me, what do the LEGO string with 1×1 round plate parts doing at the bottom of the train bogies?
-
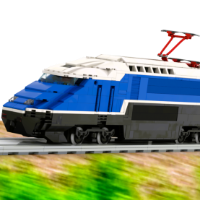
Hello all! Since this LEGO train MOC of mine has nothing related to Hungary, I guess it deserves its own topic here, on Eurobricks. To be honest, it is a decade long story ended today when I installed the final bricks to this MOC. All the thing begun when I had a girlfriend in Croatia (yes, such a clever life choice for a Hungarian guy), and since I spent a lot of time in Zagreb, of course I had the chance to see and travel Croatian rolling stock. At those time Končar already made the two prototypes (suburban with 8 doors on each side, regional with 4 doors on each side), and the prototypes were followed by the 6112.2 and 6112.3 sub-series as well. I was really amazed that Croatia made it and they kept their vehicle-production and succeeded to develope their own electric motor units. So I made those train in LDD: Looking back at those trains, I developed a lot and also started to make measurements and calculations in scale before building any two bricks together. Maybe you noticed it has some green colours and only three modules. As a decade passed, Končar didn't stop developement and they displayed they new trains at the end of 2024. A two-section battery only motor unit was taken to Innotrans show (6012-001), but they made a battery-electric hybrid as well, consisting of three modules. This is 6211-001, and I chose this sub-series from the motor unit family since it can run unelectrified tracks, but has pantograph as well (all, really, ALL my train MOC representing a powered train do have pantographs). It is an important reason for me, because we in our LUG do this hobby as railroad modelling, and the rural lines with no overhead wires and poles are not allowed to be driven by electric locomotives, only steam, diesel or battery trains are allowed to run on them. So at all our shows some tracks at our layout was out of my reach, but now I have a train to explore the world on our rural lines, too! It also meant that I'd buy tons of green and bright green neck brackets - not a cheap part! This URL showcases the real train - unfortunately, I had no chance to see it in real: https://www.hzpp.hr/en/first-battery-electric-train-in-operation The refurbished front cone - this looks so much better compared to the old one: And how it looks with real bricks: The front lights use LEGO Power Function ledlights, and the usual light transmitting cable were used for light piping to the edge of the train, while the ledlights themselves are far inside the front cone. The relatively new piece bricks 1×1×2/3 with open stud help a lot with hiding the light cable! The green thing around the front window is hose, rigid 3 mm in 10 studs length - the 20 studs long version would have been better to have all the pattern from one piece but it was extremely hard to make them the right curvature, so it was easier to start with two halves. The front modules being built - note the old type of hinge plate (with two or three fingers) in the colour of green! I really like to collect rare of officially never existed, but LEGO parts - I bought these years ago just to have them in my collection and by building this MOC I actually found a good use of them! And as we move smoothly from the front to the side of the train I can tell you that the front cone was an easy thing compared to the sidewalls of the train. As travelling to Zagreb this May I measured some patterns on the real trains, not the battery one, but the blue and red ones, and it quickly turned out, that the bi-coloured pattern (green-red in my MOC, red-darkred in regional, blue-darkblue in suburben sub-series) has the height of 43 cm. I build in 1:45 scale, so one plate in LEGO represents 14,4 cm of the real thing (3,2 mm × 45 = 144 mm), so 43 cm is very close to three plates (43,2 cm). And both colours have the same height, so one colour must be 1,5 plates - this made this build horrifying. Brackets can be used, but I also wanted to have interior with seats inside - and not only the green-red pattern under the windows, but the white-red pattern above the windows have the same dimensions. So, lot of brackets (one row of smaller neck bracket, one row of larger regular 1×2 - 2×2 or 1×2 - 2×4 brackets to save space), and no connection between the different sections of the sidewall. I came up with a solution in LDD, but I am really suprised that things built up digitally hold in reality, too: The photo above shows the construction of the middle car and the layers of bracket - standard LEGO seat were placed on the top of the red brackets. The train has one BuWizz 3.0 control unit inside, located at the toilet part, two Powered Up train motors work for driving, 6 pairs of PF ledlights for front/tail lights and 3 pair of PF ledlight for interior lights. I hope you liked the walkthrough and if you do so, please leave a comment here to let me know. Critics, as always, very welcome.
-
Holes in 9V train motor - What are they for?
Ashi Valkoinen replied to FGMatt's topic in LEGO Train Tech
This technic hole is also placed at the PF and PU motors. However, compared to a normal technic hole, it is quite loose and have no grip when you put a stud into it. Very unfortunate! -
I really like this work, especially because of the appearence of 5 studs covered narrow gauge track piece. We are used to use normal LEGO gauge as normal gauge (1435 mm), LEGO and TrixBrix narrow gauge as 600/690/760 mm narrow gauge, but the track inbetween representing 1000 mm gauge real life tracks are really missed!
-
MOCs: Models of trains running in Hungary
Ashi Valkoinen replied to Ashi Valkoinen's topic in LEGO Train Tech
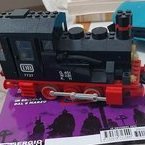
Thank you guys! The layout was made by Nándor Mészáros, András Pécsi and me, but actually my part was just a quick improvising putting my houses, trees around the small two-track station. I just joined narrow gauge at our LTC, but I plan to make Sátorkő station of the Sand Railway network based on old aerial photos to figure out the track plan and it will include more details and will be better built. I really love the coal waggons, too, they are the smalled train MOCs I have ever made, the good quality (SKF) ball bearings under each waggon cost more than all the LEGO pieces, including the old and quite rare container lid I used upside down. There is more to come as I will make my own narrow gauge layout. On the long term I plan to make a hill where trains can go up - with total height of 51 plates (17 bricks) to climb! But I estimate the full project approx. 2-3 years! -
MOCs: Models of trains running in Hungary
Ashi Valkoinen replied to Ashi Valkoinen's topic in LEGO Train Tech
No, not. But there is a small switch to turn the Cube ON (left), OFF (middle) or BLE (right). If you leave it ON, or BLE, you can charge it. When you connect the charger, the green light (turned ON) or the blue light (BLE) will turn off, red will turn on to indicate charging. After charging finished, red light turns to green, but still no output while the charger is attached. If you remove the charging cable, you get back your Cube charged and in the state you left (turned OFF, ON or BLE). So basically I don't need to reach the turn ON/OFF/BLE button during showtime, I turn the locs to BLE at the beginning of the day, I am charging if necessary and turning locs OFF at the end of the day. But I can confirm you can charge while BLE is on, I didn't try what happens when the Cube is turned ON (continuous outputs) and I start charging. -
MOCs: Models of trains running in Hungary
Ashi Valkoinen replied to Ashi Valkoinen's topic in LEGO Train Tech
I used their original application to control the cubes. Since they added the option to connect to two cubes at the same time via Bluetooth, for me it is quite viable to use it from this app, I never need to control more than two small locomotives at the same time. For the "Babycroc" locomotives, charging can be done just removing the roof with the pantograph, to turn on or off the cube must be lifted and rotated out. Basically, I don't turn it off while charging, so it needs no turning on after charging is finished. The small 9ton locomotive's 1×4×3 panels can be easily removed (they are not part of the structure), the charging port is behind one of the panels. The turning on/off bottom is underneath, and nothing covers it so really easy to access. And as I promised, here is the video of the running locomotives with their freight trains. A few notes, problems, I faced: TrixBrix switches are pain when it comes you go straight one them - the lack of second moving rail giving support for the wheels is really bad when you have a locomotive with such small weight and such small axle distance. TrixBrix track vary a lot in quality unfortunately - there were some tracks bended from the beginning, and wheels were is to start spinning at these sections. The smaller loco's weight distribution is really bad, having the battery in the cab, it required some small magnets put in the cavities of the front to balance it, but without careful driving it may leave the track when the small nose part is leading the train. The big "BabyCroc" locomotives worked well, but quite slow, I managed to put only one CC-motor inside, and due to the overall shape of the locomotive, there is not so much weight at the only driven axle. Both locomotives and freight trains were able to handle R36 - I wish no more. The minecart-train, with that small wheels, small axle distance, it is really pain when it comes to push such a train. -
MOCs: Models of trains running in Hungary
Ashi Valkoinen replied to Ashi Valkoinen's topic in LEGO Train Tech
That's a long river, and the biggest river in Hungary. Last weekend we had a show, narrow gauge only layout and the small mining locomotives did really great. Circuit Cube components are small, very flexible items, I am glad that it allowed me to make my 4 studs wide and 4 studs+1 plate wide locomotives motorised, without adding a constantly couple freight car for batteries. Some really nice photos coming soon!