
Ashi Valkoinen
-
Posts
537 -
Joined
-
Last visited
4 Followers
.thumb.jpg.9192516dafb46956946ec33aff8b5798.jpg)

About Ashi Valkoinen

- Birthday 05/08/1988
Recent Profile Visitors


-
Reading back the topic now I see why I missed it. Haven't seen your MOC at BSBT, at least this one. :( And overall nice design with lot of details, as usual. But tell me, what do the LEGO string with 1×1 round plate parts doing at the bottom of the train bogies?
-
I really like this work, especially because of the appearence of 5 studs covered narrow gauge track piece. We are used to use normal LEGO gauge as normal gauge (1435 mm), LEGO and TrixBrix narrow gauge as 600/690/760 mm narrow gauge, but the track inbetween representing 1000 mm gauge real life tracks are really missed!
-
MOCs: Models of trains running in Hungary
Ashi Valkoinen replied to Ashi Valkoinen's topic in LEGO Train Tech
Thank you guys! The layout was made by Nándor Mészáros, András Pécsi and me, but actually my part was just a quick improvising putting my houses, trees around the small two-track station. I just joined narrow gauge at our LTC, but I plan to make Sátorkő station of the Sand Railway network based on old aerial photos to figure out the track plan and it will include more details and will be better built. I really love the coal waggons, too, they are the smalled train MOCs I have ever made, the good quality (SKF) ball bearings under each waggon cost more than all the LEGO pieces, including the old and quite rare container lid I used upside down. There is more to come as I will make my own narrow gauge layout. On the long term I plan to make a hill where trains can go up - with total height of 51 plates (17 bricks) to climb! But I estimate the full project approx. 2-3 years! -
MOCs: Models of trains running in Hungary
Ashi Valkoinen replied to Ashi Valkoinen's topic in LEGO Train Tech
No, not. But there is a small switch to turn the Cube ON (left), OFF (middle) or BLE (right). If you leave it ON, or BLE, you can charge it. When you connect the charger, the green light (turned ON) or the blue light (BLE) will turn off, red will turn on to indicate charging. After charging finished, red light turns to green, but still no output while the charger is attached. If you remove the charging cable, you get back your Cube charged and in the state you left (turned OFF, ON or BLE). So basically I don't need to reach the turn ON/OFF/BLE button during showtime, I turn the locs to BLE at the beginning of the day, I am charging if necessary and turning locs OFF at the end of the day. But I can confirm you can charge while BLE is on, I didn't try what happens when the Cube is turned ON (continuous outputs) and I start charging. -
MOCs: Models of trains running in Hungary
Ashi Valkoinen replied to Ashi Valkoinen's topic in LEGO Train Tech
I used their original application to control the cubes. Since they added the option to connect to two cubes at the same time via Bluetooth, for me it is quite viable to use it from this app, I never need to control more than two small locomotives at the same time. For the "Babycroc" locomotives, charging can be done just removing the roof with the pantograph, to turn on or off the cube must be lifted and rotated out. Basically, I don't turn it off while charging, so it needs no turning on after charging is finished. The small 9ton locomotive's 1×4×3 panels can be easily removed (they are not part of the structure), the charging port is behind one of the panels. The turning on/off bottom is underneath, and nothing covers it so really easy to access. And as I promised, here is the video of the running locomotives with their freight trains. A few notes, problems, I faced: TrixBrix switches are pain when it comes you go straight one them - the lack of second moving rail giving support for the wheels is really bad when you have a locomotive with such small weight and such small axle distance. TrixBrix track vary a lot in quality unfortunately - there were some tracks bended from the beginning, and wheels were is to start spinning at these sections. The smaller loco's weight distribution is really bad, having the battery in the cab, it required some small magnets put in the cavities of the front to balance it, but without careful driving it may leave the track when the small nose part is leading the train. The big "BabyCroc" locomotives worked well, but quite slow, I managed to put only one CC-motor inside, and due to the overall shape of the locomotive, there is not so much weight at the only driven axle. Both locomotives and freight trains were able to handle R36 - I wish no more. The minecart-train, with that small wheels, small axle distance, it is really pain when it comes to push such a train. -
MOCs: Models of trains running in Hungary
Ashi Valkoinen replied to Ashi Valkoinen's topic in LEGO Train Tech
That's a long river, and the biggest river in Hungary. Last weekend we had a show, narrow gauge only layout and the small mining locomotives did really great. Circuit Cube components are small, very flexible items, I am glad that it allowed me to make my 4 studs wide and 4 studs+1 plate wide locomotives motorised, without adding a constantly couple freight car for batteries. Some really nice photos coming soon! -
[MOC] September Addon Frenzy (ÖBB / ČSD / MÁV)
Ashi Valkoinen replied to Brickstone_City's topic in LEGO Train Tech
Wow, that's something. I am always feel good when I see people building some Hungarian or Hungary-related stuff, our country is so small and unknown, I am always wondering why people from a different country choose to build our locomotives. The steam is right on spot, and using two CADA-motors facing each other, giving enough traction power is really clever idea. Hiding them in such small locomotive, great work. I guees that orange and dark green train windows are clones, but what about other bricks in those models? Some years earlier I found a danish MOC passanger car with dark red windows - all the 1×4×3 train glasses where held by SNOT panels in place and the train itself gave the impression train window part was used there, but no, just SNOTting around, since no dark red train windows were produced. -
MOCs: Models of trains running in Hungary
Ashi Valkoinen replied to Ashi Valkoinen's topic in LEGO Train Tech
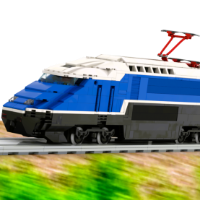
After finishing the work at my normal gauge main station's signalling I turned back for narrow gauge, especially the "Sand Railway" network. The mainline locomotives were shown above, but there were some small locomotives doing the shunting at the sand mining site. These had rod pantographs as the overhead wires were offset from the centerline of the tracks. This locomotive had a really nice path of service - all started in 1922 where two identical, 2-axle electric locomotives, as twins, sharing one full pantograph were built to serve on the first version of the "Sand Railway" network, built using 580 mm as gauge. The network got its name of the sand transported on it - sand was mined from the sediments of river Danube to fill up the nearby coal mines' unused tunnels. In 1935 gauge was switched to the more reliable 760 mm, and three new locomotives arrived (TC series, number 1, 2 and 3). As the twin locomotive wasn't needed anymore for the mainline service, twins got separated, regauged to 760 mm and each half got a rod pantograph - so they were able to do the shunting at the sand mining site, where the overhead wire was offset from the centerline of the track. The "Sand Railway" worked until 1988, the nearby coal mines got depleted or victims of underground water, without the need of sand the entire network and all vehicles were scrapped. My LEGO MOC locomotive is number 5, I found a couple of coloured photos of the real train from the last decade of the service. Number 5 had an orange paint, number 4 was yellow, with some diagonal black stripes. However there is no photo proof that number 5 ever had stripes, I added them to improve the look - I used original LEGO stickers to do it. I powered the locomotive with Circuit Cubes HUB and small motor - these are really tiny electronics but still very hard to fit to the locomotive. The HUB is quite heavy compared to the overall weight of the locomotive, fits only the cab, while the motor has odd dimensions, and the bottom is lower than the top of rails. I hid the HUB in the cab, old (no side support) 1×4×3 panels are around it. I added 2× original traction rings to each wheel, it increased the height of the loc so the bottom of the motor is not touching the level of the top of the rails. Honestly, to make this locomotive run was maybe the hardest task I ever did with bricks, due to the inbalanced weight distribution, only one axle driven, it was really challanging to make it work on R36 geoemtry (trixbrix points and curves) and also pulling, pushing some heavy cars! -
All the best, Ben!
-
For the signal Ties used the new track element introduced with the Arctic Train set, which triggers the rocks falling off from the top of the tunnel.
-
MOCs: Models of trains running in Hungary
Ashi Valkoinen replied to Ashi Valkoinen's topic in LEGO Train Tech
This is a video taken not by me, but since the AFOL used a camera on his head to record how he turned back with his train on my layout with full signalling and protection, I am happy to share it. His train arrives on the mainline, facing a red block signal, since the Railjet KISS is at the next block section. When Railjet KISS enters the station at platform 5, the block section gets free and the czech train progresses forward and then to platform 6. As he enters the station, a black locomotive from platform 3 is shunting back to the short loco storage track. While the czech train's locomotives shunt around on track 7, my girlfriend's own built M44 diesel engine shunts the orange freight train to track 3, while the Railjet KISS already left the station to the mainline (three paralel train movements). The czech locos complete the shunting, returning to the other end of their train, M44 deattached from freight on track 3 and leaving to the shunting yard, and the Westbahn KISS arriving and departing back on track 5. As the block section after Westbahn KISS is cleared, the czech train gets the free signal aspect, while the block locomotive is shunting back for its train. And lastly, I arrive on the mainline with my GySEV InterCity consisting of all my five GySEV coaches. I am really happy with the station by now, worked really nice during BSBT2025, with no major problems. Operating the station is a great teamwork, our TFOL member Donát Szüts operated the control system of the station, while my girlfriend operated the shunting locomotive for those trains which didn't arrive to track 6 or 7 and needed their waggons pulled of before reversing. -
Fx Bricks (Michael Gale) announces Fx Track system
Ashi Valkoinen replied to HoMa's topic in LEGO Train Tech
Yes, FX presented some of their prototype motors and speed regulators at the show. However I didn't have too much time talking to Michael and Max, I had a short 5 minutes brake from driving and played a little with their prototype 9V motor. The motors are geared differently, than the usual LEGO train motors we know (9V, RC, PF, PU), they are slower but having more torque. The speed regulator is easy to handle, the slidebar instead of the rotating switch of the old 9V speed regulators is a nice feature. The FX speed regulator also consumes less space, and multiple units can be attached next to each other, the neighbouring units feeding power to each other. So you plug one FX speed regulator with USB-C type connector, and it can power other speed regulators, too. I have driven an old 12V set with the FX 9V motor underneath, the maximum speed was okay, but as I mentioned, not the speed we got used to with LEGO train motors, on the other hand the FX version give a really, really nice low-speed operation - perfect for shunting and other train station movements, the train kept the really low speed I set for it on the curves, too. Wheels are full metal and they have a really nice, realistic look by colour. -
Fx Bricks (Michael Gale) announces Fx Track system
Ashi Valkoinen replied to HoMa's topic in LEGO Train Tech
It was made by Miles McFadden on request, using four original FX switches. The switches which didn't make to the market. :) -
MOCs: Models of trains running in Hungary
Ashi Valkoinen replied to Ashi Valkoinen's topic in LEGO Train Tech
Then the only thing to do is keep going and get that dragon called Phd final exams. :) I'll be here next year for sure, so if you need the LEGO train and layout inspiration one year later, you will get it. Also, if you have the time and the change to travel, this year I'll participate BSBT2025 in Schkeuditz again (from 8th to 10th August). ;) -
Fx Bricks (Michael Gale) announces Fx Track system
Ashi Valkoinen replied to HoMa's topic in LEGO Train Tech
The P40s which didn't make to the market: Yeah, sure. You simply missed it. The switches were never recalled, replacement tiebars were sent based on your orders, the replace process took less then 1 minute for each point, but basically they were working with the wrong tiebars, too. I own currently 30 P40 switches, so they are quite real and made it to the market.