
Hopey
-
Posts
209 -
Joined
-
Last visited
Content Type
Profiles
Forums
Gallery
Everything posted by Hopey
-
 I have! Just finished it tonight. I need to get some better batteries before I can really say whether it worked or not.
 -
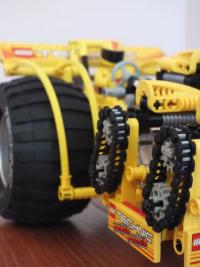
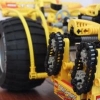
Hiya. I like the look of the 9398, but I don't have one. I do, however have an 8110 Unimog, an 8043 excavator and an 8109 flatbed. So I decided to see how close I could get. Obviously there's quite a few significant parts that I was missing. For the tyres, obviously I used the Unimog tyres. And of course the colours are completely different. No L motors, so I used two M motors on each axle. This meant widening the top of the structure a bit, but the shocks could still attach pretty much the same way. I also only had 2 of the 6L link, rather than the 4 required to prevent the axles moving sideways. I experimented with various solutions to this, including using universal joints or some bionicle parts I had lying around, but ended up just using panhard rods as in the unimog. Not great, but it does the job. I also changed the gearing a bit, simply because I didn't think I had enough 12t and 20t double bevel gears (although maybe I did after all). I replaced the last 12:20 - 12:20 before the wheels with 16:16 and 8:24 (the latter in the portal hubs), changing this part of the gearing from 0.36:1 to 0.33:1. After watching Sariel's videos, I also decided to replace the diffs with knob wheels. No servo motor for the steering, so I used a single M motor. I experimented with a return-to-centre steering system using rubber bands attached to a 3L crossblock on the steering axle(hence the extra space on the end of the axle in the above photo) but this really didn't work out. I also only had a 7L space in which to fit the motor and a gear on the end, which demostrates the problem with the placing of the pin holes on the M motor. It's held in place primarily by the two 2x2 plate-with-axle-hole underneath it, which are braced on the side by two 6L half-width beams. The axle joiners on either side are to prevent it moving sideways; note the bend in the axles on the one that is rotated so that grey pin-with-stud holds it in place. From above, the battery pack kind of holds it down. The second picture shows how the 2x2 plates are braced sideways (this was an earlier attempt with 7L half-beams, which I changed to 6L when I swapped the gears around) The ubiquitous underside shot. The end that's cropped off is pretty much the same, as in the real one. To be honest, I was more interesting in replicating the chassis than the body. My first attempt was to match the various panels and fairings as closely as I could, and I aimed for a colour scheme where it was yellow at the front, orange in the middle, and red at the back, but it looked hideous. I really didn't want it to be yellow, but didn't really have any other option. I got a bit creative with the doors and the sides of the bonnet, as I didn't have anything that remotely matched the fairings. I also got around the need for the new right-angled connector piece with some crossblocks. I also put some extra lights on to make it look pretty, although one of them got knocked over when I was testing it out just before I took the photos. It's still pretty ugly, but better than I expected it to look. As for performance, well, It's pretty bad, although I'm fairly sure this is because of the crappy batteries that I'm using (prompting this thread). The steering seems very heavy, and the driving slows noticeably when the steering is applied. Trying to climb onto a 10cm or so tall cushion, which shouldn't be too difficult, it can get the front wheels up no problem, but stalls trying to get the back wheels up. Then it falls over, usually. There's no gears clicking though, so I think I've built it tough enough, and hopefully the lack of torque is because of the dud batteries, and not the crappiness of the M motors. I'm also not sure if you're supposed to try and drive 5 M motors from a single battery pack and IR receiver, especially with 4 of them on one channel. The next step is to try and gear it down a bit and see if it goes any better. If anyone's interested, I can take some photos when I dismantle it to show how it's put together.
-
Hiya. I'm thinking of doing a mod to make a rechargeable version of the standard battery pack. I've got 3 of these already and several of the next few sets I'm planning on getting include one as well, so no huge loss if I muck it up. The plan is to get a 9.6V battery pack something like this and put them inside it. By eyeball measuring it, I think there's enough room to fit 8 AA batteries in at right angles to the standard way. I'd solder these up in series and attach them to whatever terminals the standard 6 battery connectors use. This would give 8x1.2V = 9.6V, which should be safe to use with the 9V kit. Once inside, it'd be permanent, so I wouldn't have to make it so that they can be changed; I can just ram them in and hot-glue the lot in place. I might need to do a bit of hacking bits out with a dremel so that the outside looks nice. I've seen instructions for a mod to use a 9.6V battery pack as it, but it requires cutting an extension cable and adding an extra switch, and leaves you with a big ugly battery pack. Since I'd be using the original circuitry, I wouln't need to wire in any extra switches or anything, and the entire thing would externally still look like the standard battery pack, and could be incorporated into models in the same way. A couple of questions though: Has anyone pulled on of these apart? I had a quick go at removing the two screws, and it seems that the part that holds the batteries should slide out, but it didn't seem to want to come apart and I didn't want to destroy it just yet. Is it possible to get it apart without destroying the circuit board? How would I go about charging it? I'd incorporate a nice discrete socket to plug something into for charging. Do I need a special charging device, or can I just use any old spare DC transformer I've got lying around? What kind of voltage/amperage would I need? Performance wise, how would this compare to 6 good alkaline or 6 rechargeable batteries? What kind of batteries do I want? NiMH? LiPo? Something else? Cheers!
-
Sorry to jump in late to the thread. These tyres look pretty cool, although they seem rather expensive. I'm curious though, are they specifically designed to be alternative tyres for lego wheels? Or are they tyres designed for non-lego RC cars, which just happen to have the right dimensions to fit onto lego wheels?
-
Combining two PF-M motors
Hopey replied to Hopey's topic in LEGO Technic, Mindstorms, Model Team and Scale Modeling
I don't know the exact mechanics of it, but my intuition is that issues with slight differences in speed would only occur if it's running unloaded. As soon as there's a load applied, it would sort of force them to work at the same speed. Kind of like how having multiple engines on a single train works. If A goes a little bit faster, it takes the load off of B, which is then unloaded and goes faster, catching up with A. Negative feedback ftw. As to why, I've reached my budget for the forseeable future, and plan to build what I can with what I've got before I go buying anything extra, including XL motors. Currently I've got: 8110 Unimog 8109 flatbed (+ 6 extra wheels) 8043 excavator (on it's way) My kids' moderately sized collection of System lego, including a 7685 dozer This gives over 4000 technic parts to play around with, including 2 IR remotes, 6x PF M motors, pneumatics, 4 linear actuators, 3 diffs, many uni joints, a bunch of tank track, 4 big wheels and 12 small ones, etc, and I've already got quite a few ideas: A pair of simple RC cars A pair of simple RC tanks A big RC tank with suspension of some sort and controllable turret A big 4wd RC car, of similar design to the 9398 crawler in terms of motor placement and suspension, using the unimog wheels and possibly paired motors for drive (4xM total for drive!) Some kind of halftrack maybe. When I get through all of that, I might think about buying some new parts :) -
Hiya. So I've gone and ordered myself an 8043 for all the awesomeness it contains, and while I wait for it to be delivered, I've been thinking about what I can do with the parts it contains. I'll end up having 6 PF-M motors, and 4 IR output channels, however if I piggyback two motors together on two of the outputs, I can use all 6. For example, I might make a pair of small RC cars, each with one motor for steering and two for drive, the two drive ones wired together and geared something like this: Does this work? Are there any drawbacks? How does the power compare to a single XL motor? Cheers.
-
Yep, I discovered this through a little trial and error. Here's the new drivetrain for my dozer: (Please excuse the quality. Do I get a bigger image quota when I've been here for a while?) Obviously it still needs some work to add some supporting structure around it, but I think this'll be compact enough to fit inside the original structure of the dozer, with some modification. Hope to get it done this weekend...
-
That's awesome. As a little project, I'm trying to motorise a 7685 dozer with a single motor, such that when switched on in one direction, it goes forwards, and when reversed it turns on the spot (by driving the tracks in opposite directions). I've figured out a drivetrain that seems to work, but (as I now realise) it's overly complicated. I've physically made a prototype, but needed to work out the right way to build the supporting structure around it, so made a model of it in MLCad. (Apparently I can't attach .ldr files? The rear output shaft isn't really visible in the screencap, no biggie) The drive from the motor goes in the "side" of a differential gear. Out the other side is a shaft with a worm gear. The body of the diff drives the main drivetrain, which includes a gear shifter thingy which selects one of two output shafts, front and rear. There's a 8 tooth gear on a blue friction pin attached to the drivetrain before this. The worm gear drives a clutched 24 tooth gear which rotates a gear lever. The end result is that when the motor switches direction, the friction pin provides enough resistance that the worm gear turns instead, moving the gearbox collar to select either the front or rear output shaft. When it reaches its limit, the worm gear stops and the diff drives the drivetrain. I've yet to do the actual drive, which will take 2 more diff. One will drive the back track sprockets in the regular way. The other will have gears between the diff and the front track sprockets, one with two gears, one with 3, so that they will rotate in opposite directions. This means that whenever it's going (one way or the other), the other diff's shafts should rotate at equal and opposite rates (driven by the track), so the other output shaft should be stationary. I can still use the diffs concept, but with a sliding worm gear instead, and it'll be a helluva lot more compact. Might have to think about how to do it such that the two 16t gears aren't meshed; maybe put one above the worm gear and one below, or space them apart and use two worm gears. Will see...
-
Hiya. I've just recently emerged from the "Dark Ages" as it's apparently called, and I think I've become an AFOL. This has largely been prompted by the fact that my sons (6 and 5) have been getting into lego somewhat over the last year or so, and now have a moderately sized collection of various sets (ciry/police, star wars, etc). Helping them out with these piqued my interest, which along with a realisation that I now have a disposable income piqued my interest to the point that I got a unimog for my birthday, got some job lots of technic from ebay, discovered bricklink, and am now pretty much hooked. Rather than the "one big bucket" method of storing it that I'd used as a young fella, I've invested in some compartmentalised boxes and am keeping my own collection sorted, and having seen the benefits of this, I'm already kicking myself for not doing something similar when I was little. It's worked so well that I've invested in some similar boxes for the kids lego and started teaching them how to sort it. Helped by labels with pictures which I printed out, this has gone surprisingly well. I was expecting them to stop and ask me "Where does this go" for every other piece, but they've both picked it up rather well. Anyway, on to my question, for those of you with kids: How do you manage your kids lego and your own lego? Do you keep them completely separate? Or mostly separate, with occasional borrowing? Or do you keep it all together, sorted appropriately, with some kind of ground rules laid down? The fact that mine is all Technic and theirs is all System, there's not actually a huge amount of overlap, but there is some, and they'll have their own Technic one day, I assume. How do kids generally deal with the fact that their Dad has better toys than they do? Cheers.