SteveB
-
Posts
50 -
Joined
-
Last visited
Content Type
Profiles
Forums
Gallery
Everything posted by SteveB
-
Here's a few... Steve
-
The Dino neck piece can work too. It's tough to get it all to hang together. In the old days I used castle corner walls similar to this tanker MOC.
-
They look to be around $2.50 these days! A nice price if you need 20-30 of them around the layout. Man if you could get these working it'd be very cool for qussi-automated layouts. I can easily imagine points (switch track) controller. If each pt controller is addressable then a smart phone app can be used to switch points at a distance! Steve
-
Purist or not make sure you don't order 3mm hose, I believe it's 1/8" (3.17500 mm). Also note the polyurethane tubing I bought is a bit rubbery to the touch which makes it a bit too sticky when sliding elements along it. And it is not as stiff as LEGO tubing. I think Nylon is the right material. Has any one else had better material matching luck? Steve
-
"Just Go For It" is the most irresponsible thing in the world to say. Taking tens of thousands of dollars from people on the internet is very serious business, certainly ethically if not legally. Your KS supporters expect to get what they support. And a mold is VERY expensive to get wrong... there is no "reset" / "do over" button. A mold is typically $12,000.00 to $20,000.00 USD and that's a very expensive paper-weight. Fett the best advice is to listen to "coaster". All his advice is exactly correct. You cannot scan and copy, you must have a 3D CAD drawing made. You cannot make a side stud without a slide-out mold, consider creating a slight modification to the design. This is possible because you can make the assumption that a 1x4 is the only element attached, imagine a vertically slotted stud. SteveB
-
Really great design. I love the super clean lines! I hope you don't mind if i copy it. I'd love to add it to my elongated version. I built 6 shared bogie coaches bookended by the engine units. Thanks SteveB
-

I'm having too much fun with Blue Render.... [LDD]
SteveB replied to Electricsteam's topic in LEGO Train Tech
Dumb Question... is there a DAT/MPD to LDD converter out there? Steve -
Hi All, I'm thinking about a doing a Kickstarter project for this. If I can get 250 motors pre-sold via KS I'll do it. In the mean time I'm getting bids on wheels and wipers and I'm not getting very affordable results. If anyone has a favorite machine-shop that they work with I'd like to get bids from them. Please LMK the name and contact info. Thanks, Steve
-
Steve, which size of magnets does one need for the magnet holder and coupler you sell? Yikes, I don't actually know! :-) I assumed you'd use the existing LEGO ones which slide out with a little coaxing. I guess I'll measure them and post that info. SteveB
-
I get a lot of stuff from www.banggood.com and had no issues. Typically it is free shipping too. http://www.banggood.com/search/rare-earth-magnets.html SteveB
-
It seems that super capacitors have a decreasing linear charge v. voltage slope, where batteries, esp LiPo's, have a nice flat voltage until the tail end of the charge. Also the super capacitors have about 1/10th the charge density. But of course you can charge a super capacitors very quickly... interesting trade offs. Steve
-
I'm getting bids on wheels and wipers... Some homework before a doing a KickStarter for altBricks. If I can get 250 replacement motors pre-sold via KS, I'll do it. I think I'll tackle the 9v motor replacement first by removing the Pf wire and internally hard wiring it. All the same new components as the Hybrid but a bit less labor intensive. Udo (a German LEGO Rail fan) showed me a Pf train motor as a 9v replacement motor using external wipers. Great work, I love the idea of a simple 9v replacement train motor as a second SKU to the Hybrid. Unfortunately for Udo I had to reload my Flickr video and lost his comments. :-( Udo... Please comment and link your videos! On LiPo's: I fly quad copters (my other hobby) and I know that 7.4v 2000mAh batteries are ~$10 ea. vs. LEGO $50ea. They need to be ran through a PCB (protection circuit board ~$1.50) but "should" run fine. I'll be testing that in a week or two. :-) I already have the batteries... waiting for the PCB's to arrive. This solution would require charging out side the MOC. It would be nice to get a recharging solution in a small package and charge from the rails using the Batts as a UPS (Uninterrupted Power Supply), mentioned above by Bricks & Bolts. This would be so cool... power and recharge from the rail and still run on plastic rail if needed. Unfortunately the 2S (two cell) 7.4 LiPo recharging circuit is harder to implement then the 1S. Any pointers to a low cost single chip solution would be awesome. I'm sure the Arduino community is working on this so its only a matter of time. :-) LEGO tackled this in their LiPo pack... but this design is several years old (kudos to LEGO to release a "new" technology), but lot's of components in there! Steve
-
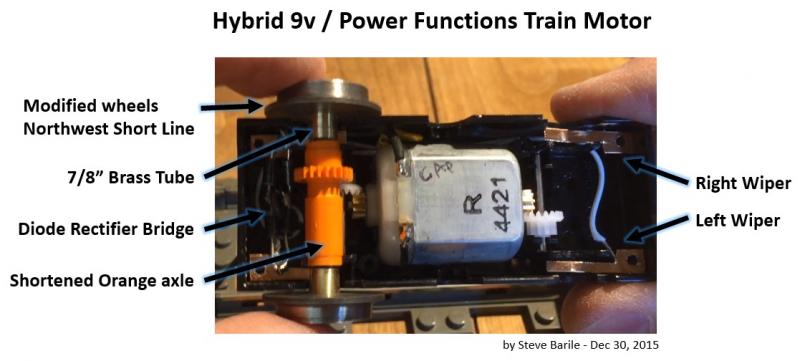
What does it do.... great question. :-) Since there are no more 9v motors being made it helps solve that issue. It modifies a Power Functions (Pf) train motor to pick up power from 9v track. It routes that power up the Pf cable to supply power to the Pf receiver so no battery is required. So you might say its the best of both worlds, remote control track powered train motors. BTY once there is a constant 9v's is on the rails any track side accessory can pull power from the rails. Steve
-
Hi All I posted three videos on Flickr showing a DIY hybrid 9v / Power Functions train motor modification I made this weekend. Thanks, SteveB
-
Thanks guys... I assumed that if I was logged in and made two searches it wouldn't do that! :-) I'll try that Google search idea! SteveB
-
Hi All, What good is a forum if you can't search it.... is there a way to by pass this? I'm trying to find info on various switch track / points modifications... but I got to wait and wait and wait and wait and wait.... oh, was I just being frustrated... YYEESS Thanks SteveB Flood control is enabled. Please wait at least 23 seconds before attempting to search again
-
I found that buying Atlas HO code 100 flex track and de-railing them isn't a bad way to go in small volumes. Steve
-
Awesome! You win the prize as the first to try it!!! :-D I'd love to see the setup too. I tried a Dremel tool in the "Dremel Drill Press rig" and couldn't keep it form melting the rails. I think I got one good cut form every two I tried. I'll take a snap shot of the Harbor Freight drill press setup I ended up using. The rotation speed is around 320 RPM, so the plastic melting is kept to a minimum. I bet with the collaboration on this forum... a best know method can be developed and this will be an affordable and easy modification, until we get someone to manufacture them! :-) Steve
-
How did the experiment work out? - SteveB
-
The metal rail is upside down. The base of the code 100 is about the same width of the plastic rail. you can see the train running over it in the video (black first frame) on www.flickr.com/photos/66978286@N00/. Recall the motor wheel geometry is such that it rides on the inside corner of the track. SteveB
-
How to make these rails at home... (BTW I AM NOT RESPONSIBLE IF YOU CUT YOUR FINGER OFF!!!!) The prototype making was a long journey! Rotary tools like Dermal and table routers go too fast and melt the plastic even with a 1mm tip! I really learned about "speeds and feeds" in this endeavor! I finally ended up with a low cost Drill Press (60238) from Harbor fright $60 with a table fence (96395) $35, use coupons! I used a 1.5" dia 1mm kerf blade (67224) $9 and set the saw at the slowest speed. I set up the fence so that I could slide straight LEGO plastic track through with the top rail aligned with the blade. You have to make 2 passes, one for each rail. I destroyed about 1 of 4 tracks. Also the table fence had to be slightly modified, its kinda crappy, like all HF stuff is. To make curves is a PITA (pain in the megablocks). I was happy when I came up with the idea of forcing the ME rails straight in a gig made of LEGO. I aligned the gig with the cutting blade and ran the gig through holding the plastic rail straight. What's nice is it works for all radii. I have 1/4 loop of R88 cut... it was a PITA and I destroyed several rails. I cut the code 100 metal rail with a micro table saw (from Harbor Freight) with a cutting wheel. I hand file the ends usually with the metal rail in the plastic track so it's steadied. If I had a desktop milling machine (not even CNC) with really slow rotation speeds I might not have destroyed as many. But this is really all a prototype for molded version. Good luck! Steve Thanks Steve Great idea! In fact I did glue one set of metal rails into a straight plastic LEGO track segment prototype and it worked. I was thinking that a clean way to quickly glue would be from the bottom via the "wire holes" I mentioned in #1. I'm just thinking about how to reduce the assembly steps and required materials (glue). Steve
-
Hi Benn/All, Thanks for the analysis! To get this right we should all pitch in. EVERYONE please comment with constructive and harsh critiques. Better to air the issues now so they can be addressed! Some design constraints (to get started): 1. Requires to be made via a simple "clam shell" (2 piece) mold to hold costs down 2. No electrical "clips" or rail joiners required 3. No special "tooling" required to assemble 4. Low resistance, low oxidation rail material 5. Do not have a higher segment to segment electrical resistance than the LEGO Track Let me address your questions and suggest some more topics to explore. 1) Power Lead Connectors: I think a high percentage of folks could use existing connectors, but to grow past the original 9v owners a power connection method is needed. Along each plastic rail at 1/3 in from both ends a hole at the bottom of the slot will be open all the way through the plastic rail about 1/4" long. This would allow special track segments to be assembled with a wire lead that is soldered to the bottom of the metal rail and pass through the bottom of the plastic rail. There are some productization options for the other end of the wire leads, but that can be worked out later. I assume that non-LEGO controllers will be in the mix. 2) Electrical Connection Between Rail Segments: The plastic rail will bend inward at the point of connection between rails thus providing the spring action. To avoid the rail climbing issue only ½ the rail material can be used on each end. Note: “rail climbing” is lessened with the increase in radius, so we have that going for us! J I have several sections of modified plastic LEGO track using this technique. I will measure the resistance across several joints. Good idea! 3) ME Rail Clutch Power: Agreed, it’s not good. I understand that ME is selling rail segments pre-glued. My assumption is that this new metal version rail would be sold this way. The bend at the end of the plastic rail (see #2) will create torque on the joint with the ties and will weaken that connection hence weakening the electrical connection. Plus the outer rails are also subject to the torque of the train pasting over. It’s obvious why LEGO chose to add rail clips to the 12.5v “sleepers”. 4) The height of the new slotted plastic rail needs to be reduced by the inserted metal rail “Base Height” so the tops align. 5) NEED HELP HERE: The slot width in the plastic rail somehow needs to capture (a. perpendicular to the slot and b. the same direction as the slot so it doesn’t slide) the metal “Rail Head” without requiring a complex mold. IDEAS: A very small wrap-around tip at the ends of the plastic rail can capture the metal rail solving the "b." sliding issue, but would require a more precise, yet do-able, metal rail length cut. To address "a." a couple “tight” spots inside the slot, perhaps co-located where the holes that go all the way through bottom of the slot (see #1). In fact that might address "b." also. But what is "tight"? I don't have the ABS flex index as hand. Is there some ABS engineers out there that can suggest what a tight fit is? Steve
-
Hi All, An update. I decided to make a video of how to make this style track. In this video shows the modified ME-Rail R88... Here's the video link. BTW Mike, Eric and I are working thru the technical details and its looking positive. This method works for any radius or length track and there is only one fixed tooling cost so it is a really flexible manufacturing process. When I looked into making track the same method as LEGO I found that in addition to the track mold (~$24k), each rail (cause they are different radii) required a stamping "tool" and a crimping "tool", each about $35k. So for each radius track segment the startup cost is about $100k... that's why no one has done it. The design work is the relative easy step. Keeping startup and manufacturing cost low is the trick. For really low numbers 3D printing + Tin plated copper tape *might* be a good alternative. Especially for switches. When I think about the volume of sales it's like 30:1 track segments to switches. :-( Thanks, SteveB
-
Hi All, I am thinking about going to Australia and wanted to know the best LEGO fan events for train heads down there? Can someone post a list of events and locations and dates? Any info would be appreciated. Steve
-
Hey Holger! Great to hear from you!!! Agreed that the track is only one piece of the "bring-back-9v" puzzle. I think the most efficient way to bring back 9v is a hybrid solution. When I say efficient I mean cost effective to manufacture and price for the customers. Here's what I envision and this is built on several great works done by several fans that have posted on this forum in the past. 1) Create an insulated metal wheel-set that snaps into the existing LEGO wheel holder. 2) Create electrical wipers that work with the metal wheel-set in the existing LEGO wheel holder with no LEGO modification required. 3) Create a battery box with a internal LiPo or 9v pigtail for an external 9v NiMH battery, that the electrical wipers charge and simultaneously supply clean pass-thru power. This provides continuous power even with noisy wipers / dirty metal track and on plastic track. Include a Power Function connector pigtail to connect to the Pf receiver. 4) Optionally create a very small form factor Bluetootk LE Pf receiver. Include two Power Function connector pigtails to connect to the Pf train or other motors and lights. I think $60 ea for a SBrick is too expensive when you want 5 to 10 of them. There are plenty of good LEGO motor solutions including the Pf train motor. I believe the efficiency of this motor rated much higher than the original 9v motor <Philo's Page>. Both the battery box and BtLE box should be at most 2 studs wide. I would also not use Power Function connectors like SBrick. It makes the containers much bigger than they need to be and the pigtail offers greater flexibility. Thanks for the pointer... Michael and I have met several times at BrickFete in Toronto and have talked about this topic. But a great reminder to swing back around and pick up on that conversation! SteveB