

steph77
-
Posts
926 -
Joined
-
Last visited
4 Followers

About steph77

Recent Profile Visitors


-
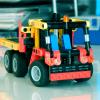
Steph77's Moc corner - EW160E
steph77 replied to steph77's topic in LEGO Technic, Mindstorms, Model Team and Scale Modeling
I folks, These are two first pictures awaiting the full review. When i saw the official 42215, my first impression was 'never for that prize'. That's the easy way, but next i asked myself what i would had agree to pay for. This project was born... -
Steph77's Moc corner - EW160E
steph77 replied to steph77's topic in LEGO Technic, Mindstorms, Model Team and Scale Modeling
Coming soon... -
Maybe this one should interess you.
-
Grum's Shed
steph77 replied to grum64's topic in LEGO Technic, Mindstorms, Model Team and Scale Modeling
Merci christmas Clive! Don't abuse of all good things life could bring to you by these hours.. and by the way no legi building tonight...but wait...who knows?.@++++ -
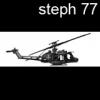
[TC15] AH-77S - HUNTER
steph77 replied to steph77's topic in LEGO Technic, Mindstorms, Model Team and Scale Modeling
I am still here @cortex31 send me a pm with a valid email and I'll try to send you the file. It is hopefully still stocked on my old computer. I'll have to revive it. -
I really love the tractor. Using the piston par as changeover catch is genius!
-
[MOC] Isuzu NPR
steph77 replied to Thirdwigg's topic in LEGO Technic, Mindstorms, Model Team and Scale Modeling
Ohhhh...love it. I will try to build this one! Possible to get the parts list by pm? -
Congratulations RacingBrick
steph77 replied to Ngoc Nguyen's topic in LEGO Technic, Mindstorms, Model Team and Scale Modeling
...250.000x S. -
I guess mine is somewhere between 5M and 6M series...
-
Even if I am not a great fan of bus and coach model I just have to give my hat off regarding the time and effort put in the realization of this model. Well done!
-
Thanks! For the yellow links they work well and I didn't have any issue with them. I'll test to stress them a bit and see what happen. As I mentioned it I do not try to replicate any existing model. Inspiration brand comes more relatively to the color scheme. Considering the wheelbase and the utilization of power up motors...it's just a choice I have made. I even length up the wheel base for some design balance considerations. Thanks for your comments :)
-
Presentation of My Tractor Model Here we are at last. It’s been a few weeks since the model was completed, and I’ve been tweaking small details here and there without adding any major new developments. So, it’s finally time to give it a full presentation, along with some nice photographs. It all started with the purchase of BUWIZZ bricks. Initially, these were meant for building a remote-controlled excavator, which I did—but quickly moved on. The main advantage of the BUWIZZ is its very compact size and the proportional control of each function. In my building history, the model that caused me the most constraints from this perspective was a remote-controlled tractor whose design was significantly—and somewhat negatively—impacted. So I decided to go back to the drawing board and create a new tractor. In terms of functionality, I had the choice between four or six motorized functions, depending on whether I used a Buwizz 2 or a Buwizz 3. I chose the latter. Then came the definition of the specifications, mainly concerning the two additional functions on top of the four standard ones: propulsion, steering, three-point rear lift, and power take-off (PTO). As I often do, I put myself in the shoes of a designer and asked: how do I create the best playset? The options I considered were: A front PTO and a complementary front lift A second rear PTO and model lighting Dual independent lighting A loader with lifting and tilting bucket A tractor is essentially a tool carrier—it doesn’t really exist by itself. It’s the tools that give the model its full dimension. In terms of tools, my thinking revolved around what the tractor itself made possible. To make the most of it, I opted for two distinct implements: a simple tilting trailer, and a hay tedder. The trailer allows for fun maneuvers and makes use of the PTO, while the tedder takes advantage of both the lift and the PTO. With this setup, it felt natural to include a front loader with bucket. This way, you can run a complete cycle: load with the bucket, dump into the trailer, and then empty it. As for the tractor itself, I didn’t aim to reproduce any specific existing model. That’s a tricky exercise, and not my strong suit. I prefer to let the mechanics guide the design choices, which results in a more generic look but fully meets my mechanical goals. That’s how the model was born. I began by defining the overall placement of the main electrical components: batteries and motors. In a tractor, once you set aside space for the wheels—especially the steering ones—you quickly realize the remaining space is very limited. LEGO’s way of solving this (making bigger and bigger models) wasn’t an option for me, since the wheel size dictates the model’s scale. After about fifteen prototypes—testing 4x4 transmissions, lockable differentials, etc.—I settled on a simple rear-wheel drive. The main tractor motors (for the standard functions) were aligned low and in series, while the loader motors were placed laterally, as close as possible to the functions they control. The battery sits under the hood, which eliminates the presence of a fake engine. This is a weakness of the model, but it allows very easy access to the battery for recharging (USB-C). Once I finalized the design of the rear lift, the rest of the build followed naturally. For the color scheme, without repeating what I wrote elsewhere, I went for a John Deere look. Since I already had the forwarder and enough green parts, I chose that combo. The tractor has a medium-long wheelbase, suitable for motor placement. The different wheel diameters required an offset of one and a half studs for a perfectly level chassis. After testing a one-stud rise and a one-stud drop, I chose the latter. The cab is simple, angular, and embedded in the tractor’s body for a compact, robust look. The fenders follow the same angular style for overall consistency. I did try rounded designs using flex axles with 3L beams inserted, but although nice, they didn’t fit the model’s overall look. For the hood, I aimed for the cleanest build possible. It’s equipped with headlights, flares out slightly toward the front, and rounds off smoothly into the grille. It gives full access to the Buwizz, which can be removed and used in another model. Considering the cost of the battery, it’s worth reusing it! The hood also features a pre-tensioned mechanism that holds it open at any angle. This required quite a bit of experimenting due to the tight space in the hinge area. I tested several springs—new, used, harder ones, etc.—and the winning combination was an old soft shock absorber spring. Now for the functions. The Buwizz 3 has six ports: 4 connected to LEGO Powered Up Large motors 2 connected to LEGO Power Functions Medium motors Function allocation: Large motor #1: propulsion Large motor #2: steering servo Large motor #3: loader lift Large motor #4: bucket tilt Medium motor #1: PTO Medium motor #2: rear lift Propulsion The PUP motor drives a 8T/24T gear into the differential, which then sends torque to the wheels via portal axles with 12T/20T gears. This setup, combined with Buwizz control, allows precise low-speed control and a good top speed for playability. Torque is preserved, but the model should preferably stay on flat surfaces—no off-roading, especially since no clutch gears are in the drivetrain. Steering Initially designed with Ackermann geometry, the final version uses a simple parallel linkage. The reason is that the Ackermann setup limited the motor’s rotation to ~160° instead of 180°. Also, oddly enough, the drive motor seemed to strain less in reverse than forward—this disappeared when I changed the steering. The system is straightforward: the motor drives a 12T gear directly on a rack. A mechanical stop ensures proper motor calibration in the Buwizz app. The steering angle is excellent, and the wasp-waist front design allows full wheel movement. The front axle also pivots, serving as suspension. Overall structure The model actually uses relatively few parts. I didn’t count, but it’s fairly restrained. That’s partly because the motors themselves serve as structural elements, resulting in a rock-solid and very stable build. Rear lift Driven by a PF medium motor connected directly to a small linear actuator, linked via 3L beams and ball joints. Smooth, well-calibrated, with generous travel. The arms nearly touch the ground and lift quite high. Power is limited by the actuator’s clutch, but this never caused problems during many hours of testing. PTO Driven directly by the second PF medium motor, mounted at the rear hitch. Direct connection means no friction losses, but the motor size limits torque. Compactness made it the best choice. Loader and bucket The last two large motors power the loader arm and bucket tilt. These functions involve more friction, so I used the stronger motors. Directly mounting the actuators on the motor shafts created friction from the loader’s weight, but after many iterations of geometry and angles, I achieved satisfying results. It relies on motor strength rather than zero-friction design—a deliberate trade-off for space and design constraints. The arm’s range is excellent, with the actuator disengaging exactly when the bucket touches the ground—no stress on the mechanics. The bucket’s geometry amplifies tilt range, dumping much more effectively than many LEGO models I’ve seen. Implements I’ve built two so far, with potential for more later. Trailer: A simple single-axle tipper. Not too big, for coherence and display practicality. The PTO drives a standard linear actuator for tipping. It has two opening side panels with locking, plus a manual stand. Hay tedder: Inspired by a mechanism I discovered in set 8094 as a child, where a motor powered two different functions depending on rotation direction via friction. I recreated this principle: in one direction, a 12T gear with a friction clutch engages a worm gear driving linkages to raise/lower the tines. In the other direction, it drives the rotary rakes. The tedder has four support legs for easy attachment, plus details like lights, indicators, and a width bar. I hope you’ll enjoy this model as much as I enjoyed creating it. Feel free to share your comments!
-
Grum's Shed
steph77 replied to grum64's topic in LEGO Technic, Mindstorms, Model Team and Scale Modeling
Hi Grum! Always great to see that this project is still ongoing. Your patience and dedication are impressive. You're making good progress! As for those 15100 pieces, I can confirm that it's just as difficult for me. As a Moc builder, I often have to take apart and reassemble sections of models. Just to annoy me, these parts are always located in hard-to-reach places, and I sometimes have to use a scalpel myself to help insert them (I press lightly on the pin to compress it and allow it to enter the other part). So I wish you all the best for the completion of this build! Translated with DeepL.com (free version) -
Here you go: Nothing special here.8t/8t/24t connected to the differential (classic one). BTW. I am working on a special attachment that will need a third function on the front loader. At this stage I equipped the tractor with two lines of pneumatic hose and the idea is to hide an autovalve in some counterweight at the back. It will be run by the pto and actionate the claw S. ps anyone has an idea on how should work the hay tender?
-
Hi folks. Some news. At first I am sorry for the bad quality of the pictures. Low light ...I will fix this later in the final presentation. So. It seems it finally turned to deere tractor. As you may know I am a daltonien guy and I must say that despite your opinion, wife and children opinion, this deere colors heme suit better to my eyes. The other point was that the cab design doesn't match fendt at all. I worked on several things these days. The main mods comes to the front end and on the main wheel base. It has been lengthen by one stud. I also worked on two attachments. A simple dump trailer and a hay tender. This was thought to fully exploit the potential of motorized functions. The hay tender has two separate motorized functions based on an unique pto shaft. Who will guess how it work?. Awaiting best picture here is a second one of the front end: hope you'll like it despite picture quality. s.