
Nelson
-
Posts
70 -
Joined
-
Last visited
Content Type
Profiles
Forums
Gallery
Everything posted by Nelson
-
 @BrickBear I'm going to try and replicate your image to see what you've got going on. While it may not be a design conducive to my concept, I've found inspiration from your ideas in the past. It looks like you may have had some bushings on the ends of the orange pieces in the first photo, but they're just tipped with raw pins in the second photo. Any reason? Or am I not seeing it right?
 -
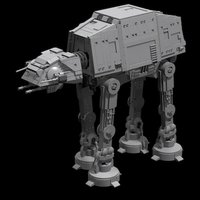
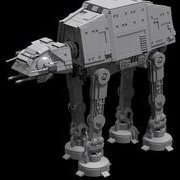
Okay. It may be time for a break. (Yeah, right.) Another update on the Abridged-Terrain-Awkward-Transport. It's getting heavy on the awkward ("heavy" also being an operative word.) I'm struggling to get this MOC to the finish line. Much of this project has involved overcoming the limits of the materials, and this phase is no different. To get the aesthetics I desire, the weight just keeps piling on, and the plastic bends, flexes, and occasionally gives up the ghost. The "pinning" technique I worked out for the legs did a LOT to sturdy those up, but it's not enough to wrangle so much weight. I'll try to get an ounce or two off the body panels and chassis, but I feel like something needs to happen with the legs themselves to get things working better. It may mean giving up on the faux leg bend and adding another solid liftarm inside the leg structure. That would suck, but it may be the best option considering I'm also struggling to figure out a way to articulate those upper leg portions. On the plus side, I'm really happy with the way it's looking. I just received a parts order and altered the upper legs to get the width proportions more accurate. It's tricky to pull off widths like 5 studs when dealing with curving areas. Many of the panels are not yet completed in this video. Anything sitting on top of the head and body is literally sitting due to gravity alone. I may take a little breather and do some diffuse thinking rather than focused thinking on it. Unless I have an epiphany of course! Update: I made some adjustments to the ankles to limit their rotation a bit more and that helped somewhat. I think the rods that drive the mechanics need to be bulked up or doubled or something. They flex too much when struggling to move so much weight. I'm sure pondering a solution will invade my sleep for days to come., Before I put the MOC on the shelf, I did a quick comparison to some online photos of a film model to see how my proportions and details were stacking up. If you ignore the missing head and rear sections, I think it's pretty close for a motorized model of this scale. (The head is a bit droopy because it's barely held together at the moment.) There are definitely a few tweaks that could be made.
-
It took several attempts, but I finally figured out a way to run a gear for the head articulation off the main drivetrain. There is so little space to work with up there, it is a miracle I found a way to rig it up. This will provide complete control over the timing of the head movement, which is awesome. I'm working on ways to make the mechanism smoother. There is also the question of aesthetics. The place where the neck joins the body might be a bit uglier than I'd like, but of course, I'll keep refining it. The motion in the video is a bit wonky as I haven't balanced things out weight-wise yet.
-
@BrickBear Steal away! Now you've got me thinking of ways to connect to the drivetrain. That really would provide ultimate control over the timing. Another fine evening of ripping the whole thing apart!
-
@BrickBear Yes. I built that kit with my girlfriend's son back when it came out. I don't have a way to feed off the drivetrain to make that kind of mechanism work. At least I haven't found a way yet.
-
This head articulation is a tough nut to crack. I've tried about a half dozen ideas this weekend. This is the most promising, but still needs a lot of refinement. Or perhaps some other epiphany will hit me.
-
@BrickBear I may indeed do something along those lines. I have a few ideas. We'll see which one actually works and can fit in that tight space. Even if I reach Echo Base, I won't have room for any troops in there!
-
A quick update. I tried several different "wheelbases", (the length between the front and rear legs), along with subtle leg angle changes, (pitching them slightly more forward or back), but nothing improved upon what I had in the most recent videos. Those changes invariably made the balance and movement worse. It's all just so touchy. I'm going to try figuring out a way to get the head moving. I hinged it up in testing and manually moved it to counter the shifting weight and it seemed promising. It would be great if the head movement was in phase with the movement of the liftarms, so I could link them, but alas, they are not. There's no way to access the big gear that drives the crank either. Time to put the old thinking cap on. I'd like to use some kind of linkage rather than things like string or rubber bands, but those may be the best solution.
-
If I could create more organically-shaped cams, that type of balance shifting might be possible. Unfortunately, I've yet to find a way to pull that off. I'm going to try stretching the length of the chassis out a bit to see if getting the legs closer to the front and rear will help. I'm also going to experiment with reducing the camber on the feet, making them more perpendicular to the legs rather than pitched slightly. I may let it all sit for a week while I catch up on some other projects. I have to portion out my obsession in metered doses!
-
I completed my goals for the weekend: test the model on various substrates and see how it deals with weight. Mixed results in both departments. I really love how the side panels look, but man... they need to lose some weight. The chassis and legs alone are 1.25kg. The side panels bring it up to 1.38kg. That's over 3 pounds. I can't imagine how heavy this thing's going to be once I add the top and end panels along with the head! I just hacked together a method for attaching the sides, so you see them gracefully falling apart in the video. Aside from the idea I mention about angling the legs out a bit toward the front and rear, I wonder if reducing the camber on the ankles/feet might help it not pitch around so much. Here lies the next challenge! Honestly, it performed better than I expected. I didn't think the feet would even get off the ground.
-
@BrickBear Crank Ankle. "Crankle"
-
Some tests on various substrates. I didn't notice the upper leg on the right rear had separated while I was setting up. It may have altered the motion slightly, but is probably not responsible for the mechanical failure at 1:00, even though it's on that leg. The loose terry cloth really bound things up. I think if it had been pulled tight, it wouldn't have been a problem. Still. This baby won't be tackling any loose dirt or gravel any time soon. Watch the rod on the right rear flex like crazy before finally breaking the crank ankle.
-
I will study this image a bit. As for reaching goals, I try not to think of this as a competition (although that can be motivating). My idea of success is different than yours. A model with true bending legs is integral to your vision, while I'm bypassing that feature. I would not be where I'm at in this process without your contributions in this forum. The current concept #2 design is a direct offshoot of this conversation. I only hope my contributions are helping you reach your goal. I had a sizable head start on this project, two years at least if not three.
-
Thanks for the lighting tip @BrickBear! I will investigate. And I think I'm following you a bit better now. I'll have to look at some video to see about your observations with the gate. If you feel it would be useful, draw up a image like the one I recently posted with naming conventions for the mechanics of your model. Perhaps we can even agree on some names for portions of our models that are similar or serve the same purpose.
-
@BrickBear I'm not quite following your post, but it seems like you feel your current leg motion isn't as close to the ideal line as you'd like. I'll look forward to seeing updates when you get back on the project! I love how differently we think about the same challenge and how we utilize different tools to assist us in our quest. I imagine Lord Vader and General Veers hanging out in a conference room hashing out the AT-AT's design. Vader is pushing the intimidation features of the vehicle while Veers is concerned about its fuel economy. I'm "satisfied" with the gate of the version in the video below. This concept design will always have a bit of shuffle from the feet on the ground. It's just the way the geometry works. I've minified it as much as possible. I could go back to concept #1 (and may someday), but I think #2 is more stable, robust, predictable, and will be more conducive to creating instructions for laypeople to build. I've got clearance between the toes now! (Barely!) No hang ups. That may change as weight is added. I've attached the aesthetic "shoulder" pieces and love how the look is coming together. (I'll worry about articulating the upper legs later.) I'm going to try to get the side cladding on this weekend and see how it handles that weight. @BrickBear One issue I've noticed in this thread is that we don't have adequate language to describe our model's mechanical features. I created this image and will use the terms shown in it moving forward. And here's the latest video:
-
I did do a bit of "cheating" early on in development, using non-lego springs, rubber bands, etc. But at this point, I'm down to two general model concepts (currently working with concept #2), so I typically start with a test mechanism that's all Lego. It's just one leg or quadrant stuck on a 19x11-stud technique panel (https://www.bricklink.com/v2/catalog/catalogitem.page?P=39369#T=C). It's kind of a pegboard where I can try out different geometries and timing. Unfortunately at this point, there's no replacement for actually putting it all together and firing it up. The concept is fairly proven, but it's really touchy in the overall build. IE: Last night I found out that kicking the timing of the rear legs forward one gear tooth caused total failure of the entire system! I admit that I still don't fully understand what makes one model work while another almost identical one fails even though I've been at this over four years now! Heck, NASA sent men to the moon only eight years after Kennedy's speech!
-
I'm trying my best to keep the model pure, using only genuine Lego parts that are "currently" available. I'd like to eventually sell the instructions on various platforms and that usually means not using non-Lego or out of production parts.
-
So much for taking time off. I woke up with a few ideas to try out. I was perusing BrickLink yesterday and ran across part #28974. (https://www.bricklink.com/v2/catalog/catalogitem.page?P=28974#T=C) A quick test with a minifig backpack confirmed this is a great part to shim various areas where you need just the tiniest bit of spacing. For my model, it will help get a touch more lift height in the legs. Obviously, I won't use the brown minifig backpack shown in the photo once I get the more appropriate parts, but you get the idea. There was just a touch of un-utilized gap at the peak of the leg lift cycle, but it was too small to add even a thin bushing. Now the crank can get that little extra lift it was missing before. That tiny shim gains me about 2/3 stud in height once the distance is amplified at the end of the liftarm raising the leg.
-
Here's the latest. It's been torturously frustrating trying out several time-consuming concepts only to discover the model runs worse than before. Each iteration takes most of a day to redesign, tear down, rebuild, and test. I'd say this version is about as good as the last video I posted. It's really tricky getting the legs to not interfere with each other as they flex from their own weight. I'm going to take a few weeks off and see if diffuse thinking offers any revelations. Abridged-Terrain Awkward-Transport
-
I'm still ironing out some issues with the mechanics, but thought I'd share this building technique using bars and round plates. It doesn't look as nice (or as screen-accurate) as the inverted tile pieces I had cladding the legs previously, but it's seriously tough. If you use this technique, get it right the first time because it's quite difficult to deconstruct!
-
Lots of progress over the weekend! I made some planned adjustments and encountered some happy accidents. I hope to have video up shortly. The timing has been corrected. The pronounced shuffle of the non-lifting legs has been tempered, and I have a building technique for the legs that is almost indestructible.
-
As I feared, the single motor and higher gearing didn't provide sufficient power. The mechanism would struggle through the high-torque portions of the cycle, then whip the leg down once it got over the hump. over the weekend, I put together a model using the newer mechanism geometry, but keeping the old duel-motor, low-gearing setup. While it's showing promise, I'm starting to run into a new issue...the legs. After years of tinkering with the chassis, the legs have remained the same, and the wear on the parts is starting to show. The studs are popping apart where they used to stay solid, causing the model to become unstable. I'm at a loss as to what to do aside from replacing the failing parts with new ones. I'm not satisfied with that solution. I've gone to the drawing board several times in hopes of designing something more durable, but I can't replicate the rigidity of the current legs. It's so frustrating to feel so close to success, but then experience all these snags. As they say, the devil is in the details.
-
I was back at it last week. My goals were to increase the speed of my model's cadence, correct the timing so the front legs aren't running slightly earlier than the rear, and also switch to one motor instead of two if possible. I think I have a solid design to correct the cadence timing. Getting the geometry correct was challenging. However, I'm not sure I'm going to be able to get away with one motor or get the higher speed. The extra gearing required to distribute power to both front and rear areas from one motor really adds a lot of lag and decreases power. If the final model was lighter, I could probably get away with it, but I know the weight of the body panels is going to test the torque of the drivetrain significantly. I'm going to draw up a design with the new mechanism geometry, but going back to the low-geared, two-motor setup. In the meantime, here is some inspiration. AT-ATs on Hoth - 4K Ambience
-
That limited ankle range can be beneficial. I found it critical to control that range of motion in my design. Too much ankle flex, and the model can end up on its bum.,
-
I like the action of that mechanism. Sort of a dual cam.