BananaBrick01
-
Posts
27 -
Joined
-
Last visited
Content Type
Profiles
Forums
Gallery
Everything posted by BananaBrick01
-

Motorising 0-6-0s - LEGO Caledonian 812
BananaBrick01 replied to BananaBrick01's topic in LEGO Train Tech
Thanks a lot garmsey - I appreciate it! -
Motorising 0-6-0s - LEGO Caledonian 812
BananaBrick01 replied to BananaBrick01's topic in LEGO Train Tech
Thanks for those, tips, ColletArrow! I will definitely try them out. You are right about the brightness - the light in the firebox photo is only on the second notch, and already very bright - and the gaps between the coloured translucent studs / wedges allow some white light through, depending on the angle - so an extra plate should hopefully fix that! -
Motorising 0-6-0s - LEGO Caledonian 812
BananaBrick01 replied to BananaBrick01's topic in LEGO Train Tech
Thanks zephyr1934! -
Motorising 0-6-0s - LEGO Caledonian 812
BananaBrick01 replied to BananaBrick01's topic in LEGO Train Tech
As promised to ColletArrow, here are a couple of low light photos showing the front light and the firebox light in action - it is quite fun to turn up and down the intensity, particularly for the firebox! LEGO Caledonian 812 - Front light by BananaBrick01, on Flickr LEGO Caledonian 812 - Firebox by BananaBrick01, on Flickr Though I have to say CollettArrow, the firebox in your Collett Goods is amazing, and hard to top! -
Motorising 0-6-0s - LEGO Caledonian 812
BananaBrick01 replied to BananaBrick01's topic in LEGO Train Tech
Thanks a lot - I really appreciate it! Some of the stickers are on quite small bricks, so they took a while to apply! -
Motorising 0-6-0s - LEGO Caledonian 812
BananaBrick01 replied to BananaBrick01's topic in LEGO Train Tech
Thanks for the replies - lots of great ideas and feedback here! idlemarvel - I love your tank engine. It’s always a challenge squeezing in all the tech even when you have a tender to play with, so kudos for getting everything so neatly in a tank! It looks great, and very true to the original. ColletArrow - these are really great builds. I will send some low light photos to show the firebox light in action on the 812. Having said that, the firebox build and lighting from your Collett Goods looks amazing, so I don’t know if mine is a patch on that! But always nice to share ideas :) I am going to experiment with the O-rings in line with your suggestions about leaving off one side, and see what impact that has on starting / running. Feuer Zug - always appreciate your support and feeback. On the colour choice - I’m not an expert on the history, but I believe the 812 series started out painted dark blue, but were changed to black later, possibly in the 1930s or 1940. I love the blue personally, but of course when Donald and Douglas - based on the 812 series - were introduced in Thomas the Tank Engine, they first appeared in black paintwork). Those with keen eyes will spot that there are a couple of bricks on the model that I couldn’t get in dark blue, so are black instead - that’s the challenge of building MOCs for real I suppose, rather than using programs! ;). The Ideas vote is really appreciated. I think you’re the first one to spot the Billund Tea Easter Egg :D -
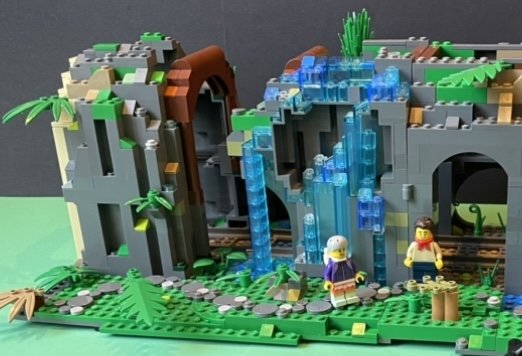
Hi all - I wanted to share my latest project of creating a LEGO Caledonian 812 with tender, and see if anyone else had experiences to share (good or bad) of motorising a 0-6-0? LEGO Caledonian 812 ‘Jumbo’ steam train by BananaBrick01, on Flickr https://ideas.lego.com/projects/19a8da31-bbb5-4119-9fab-dcb1d287cc12 In my model the main chassis of the train is built directly onto the Powered Up train motor (88011), with power going to the middle and rear pairs of wheels, as well as being transferred to the front pairs of wheels via the pistons. To ensure the train can corner, the middle pair of wheels are blind drivers without flanges. The tender uses three pairs of small wheels in 38339 holders, but the rear wheel can turn (using a similar connection to the front wheels of Emerald Night), again to enable cornering. The drive wheels have O-rings. The Powered Up box is its usual place in the tender, beneath a panel with 'coal' studs and wedges on top: LEGO Caledonian ‘Jumbo’ (showing powered-up box) by BananaBrick01, on Flickr I found that once the O-rings are attached to the drivers, the train will both start and run well on both straights and corners, though with a heavier load (2+ carriages / trucks), it would need a nudge to start if placed on a corner. The train has lights fitted; one of the lights is in the usual place on the front of the train, and the second lights up the fire in the firebox (as shown on the Lego Ideas page). Hope this is of interest. Really interested to know if anyone else has experimented with 0-6-0s, and what they found to be optimal to get everything working well! Happy building all.
-
I’m in line with garmsey - that’s a lovely little loco, and shows what you can do with clever integration of the powered up battery box. supported! (though I would agree no harm in switching to the plastic rails to avoid confusion….)
-
LEGO Train Tunnel Idea - Suggestions and support
BananaBrick01 replied to BananaBrick01's topic in LEGO Train Tech
In response to JaBaCaDaBra's feedback on making the tunnel 'rockier', here is a 'sneak preview' of the February update to Old Hill Train Tunnel which should hopefully go live in just over a week... Old Hill Train Tunnel (LEGO Ideas) by BananaBrick01, on Flickr Really appreciate all the support and feedback on this... please consider voting if you would like to have an official LEGO train tunnel on LEGO Ideas! -
thanks miccio 😉
-
Hi all - like others, really appreciate this stream being revived. Have introduced myself on the general “Hello, my name is…” topic, but it is great to have something in Train Tech as well. My name is Antony and I’m now 42 . My son is 7 and really getting into trains so a lot of what I build is to play with him in the first instance, often trying to fill the gaps in the sets officially launched by LEGO. I posted separately about my current LEGO Ideas project for an official train tunnel; my other main project at the moment is a powered-up 0-6-0 based on the Caledonian 812 class, which is something of a companion piece to the tunnel, but designed to work on its own as well. A few pieces still waiting to come in the post before it is ready for it’s maiden run, but seems to be running well even with a few holes in the side 😁 My deep, dark secret is that I was really into Space LEGO as a kid, and had a space city under a table tennis table based around the space monorail (6990)… but always had an envious eye on the city and train ranges. Now I’m “all grown up”, I enjoy the City and other real-life infrastructure more than anything else… and my son has his own little town (circled by 60052, 7725 and Emerald Night) on the living room table. Great to get to know everyone, and really appreciate all the mutual support and encouragement in the forum.
-
Thanks, Niku - I appreciate it! :)
-
LEGO Train Tunnel Idea - Suggestions and support
BananaBrick01 replied to BananaBrick01's topic in LEGO Train Tech
Hi Garmsey - you’re right, pulling the tab launches the rockslide. Here is a video I made showing it in action: It is a really interesting idea to have a passing train launch the rockslide - or other features I guess. Might have to put my thinking cap on… -
LEGO Train Tunnel Idea - Suggestions and support
BananaBrick01 replied to BananaBrick01's topic in LEGO Train Tech
By way of update on the project, the boulders have now arrived after a couple of months waiting , so I've finally been able to get the rockslide finished and working.... Testing the rockslide…. by BananaBrick01, on Flickr I tend to like the trains to run smoothly, though my son loves it when there are accidents... I fear we now might have a few derailments mid-tunnel...! Testing the rockslide…. by BananaBrick01, on Flickr -
LEGO Train Tunnel Idea - Suggestions and support
BananaBrick01 replied to BananaBrick01's topic in LEGO Train Tech
Just having my first go at adding a better resolution photo of the project using Flickr... hopefully this will be easier for people to see :) Any other thoughts or feedback really welcome. Tunnel roofs removed by BananaBrick01, on Flickr -
LEGO Train Tunnel Idea - Suggestions and support
BananaBrick01 replied to BananaBrick01's topic in LEGO Train Tech
One other possible addition I am playing with is to add a removable ‘bricked-up’ panel that can be placed in one or other of the tunnel entrances - it might add to the abandoned ‘look’, and may even be useful when only one half of the tunnel is connected to a track…. The wall is just balancing at the moment - I will need to rustle up some tan jumper plates to actually anchor it to the floor ;)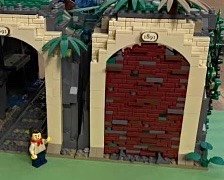
-
Loving the grey ingots for the lower brickwork - looks fantastic.
-
LEGO Train Tunnel Idea - Suggestions and support
BananaBrick01 replied to BananaBrick01's topic in LEGO Train Tech
thanks so much garmsey - really appreciate it ;) -
LEGO Train Tunnel Idea - Suggestions and support
BananaBrick01 replied to BananaBrick01's topic in LEGO Train Tech
Just to say I am testing out some aesthetic changes to the entranceways, including adding a layer of masonry bricks behind the main arch and adding a date sign using custom stickers above a pair of 24246 extended circle tiles - see photo below. (The date chosen is significant in LEGO history, in case anyone can figure it out….) Any feedback really welcome - I’m trying to make this into a tunnel people would want to use in their own layouts ;)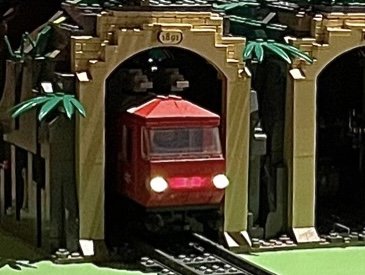
-
LEGO Train Tunnel Idea - Suggestions and support
BananaBrick01 replied to BananaBrick01's topic in LEGO Train Tech
Thanks - that’s really helpful as a comparison! :) Yes, re: overall size, I was thinking that any increase in height might need to be offset with some widening of the entrance, if only so things don’t get out of proportion. And you’re right I don’t want the size to get so big it looks wrong for other LEGO trains. -
LEGO Train Tunnel Idea - Suggestions and support
BananaBrick01 replied to BananaBrick01's topic in LEGO Train Tech
Thanks Feuer Zug! :) The more I look into it, I think the clearance for the croc will depend on the height of the pantograph settings - I think it will clear (to be tested!) if the pantos are set lower, but I would need to build in additional clearance for mid to high settings. (By way of comparison, my 7725 can’t enter the train engine shed 10027 without the pantographs being removed - I built Old Hill taller to have additional clearance, but clearly the croc is a level or two higher still than 7725!) -
LEGO Train Tunnel Idea - Suggestions and support
BananaBrick01 replied to BananaBrick01's topic in LEGO Train Tech
Thanks so much :) I am going to do a test with 10277, and look at doing an expanded build with extra height clearance for higher pantograph settings + making it rockier for more of a mountain setting. I should be able to add this to Ideas as an ‘update’ to the concept to test it, alongside the core edit, and then build it into the main edit if it works :) -
LEGO Train Tunnel Idea - Suggestions and support
BananaBrick01 replied to BananaBrick01's topic in LEGO Train Tech
Great - thanks for supporting Sunil766! :) -
LEGO Train Tunnel Idea - Suggestions and support
BananaBrick01 replied to BananaBrick01's topic in LEGO Train Tech
Hi JaBaCaDaBra - that’s a really good question! :) Unlike EN and 7725 I don’t have a 10277 on hand to test, but by my measurements the width clearance should be fine (the side rails on the middle section should clear with ease) and the Croc should clear height wise as well, so long as the pantographs are set to a medium-to-low setting - at its highest point the tunnel entrance is currently 14 bricks above the plate beneath the rails, though this goes down to 13 bricks high immediately above the rails and 11 bricks high at the lowest point on the sides (which might become relevant where a setup has a corner immediately before the tunnel). Does that help? I’m definitely interested in getting hold of a croc now to test this, particularly as you say it is designed to run through mountain tunnels :) -
Hi all - this is my first time posting in the Train Tech forum, so hopefully I get things right :) I am really interested in any suggestions and support on my train tunnel project on LEGO Ideas (Old Hill Train Tunnel) - I would really like there to be an official LEGO train tunnel, and I am trying to get the overall parameters and design right - so I am coming to the experts :) https://ideas.lego.com/projects/b86fc97f-c793-4d15-81f3-8ebef34139b3 Old Hill Train Tunnel by BananaBrick01, on Flickr My objectives so far have been: - make sure the tunnel is wide enough for Emerald Night to enter and tall enough for 7725 to enter without removing its pantographs; - have removeable roof panels so trains can be seen through the roof, and the inside of the tunnel accessed; - have open areas on some sides (caves, waterfalls, etc.) so there is also some visibility of the trains passing through the tunnel on the side view; - have a hinge functionality so the tunnel can work either as two tunnels side by side or one long tunnel (similar to the functionality of Train Shed model 10027); - have enough play-focused features so it is an interesting set for all ages, whether or not attached to a wider track; and - not to panel the sleepers with flat brown tiles, which pushes up the piece count, and noting this isn’t something that LEGO tends to do on official sets (even if it can look nice in the right setting). Am I missing anything here (or does anyone disagree with these parameters)? Any suggestions or support very welcome. Thanks everyone for your time :)