
Wurger49
-
Posts
378 -
Joined
-
Last visited
Content Type
Profiles
Forums
Gallery
Everything posted by Wurger49
-
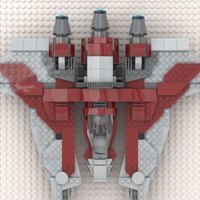
 The Fairchild Republic A-10 Thunderbolt II is one of the most distinctive and purpose built aircraft ever created. Designed for close air support, the A-10 is famous for its durability, unmistakable silhouette, and the massive GAU-8 Avenger cannon it was built around, responsible for the aircraft’s legendary BRRRRT and its nickname Warthog. Transformers fans may also recognize the A-10 as the alt mode of the Autobot Powerglide. After designing sleek stealth fighters using parts from the LEGO Star Wars 75440 AT-AT, I wanted to push the parts palette in a completely different direction. Many of the AT-AT elements turned out to work surprisingly well for recreating the A-10’s straight fuselage, broad wings, and high mounted twin engines. The nose is based on a modification of my F-22 design, with a bar element added to represent the GAU-8 cannon. The 4x4 round bricks form the turbofan engines. While slightly oversized for the model’s scale, they capture the distinctive engine pods mounted above the rear fuselage. The A-10’s straight, high aspect ratio wings are another defining feature. Unlike swept wings on most jet fighters, these wings improve low speed handling, stability, and manoeuvrability during low altitude operations. The broad rectangular planform also allows the aircraft to carry multiple external weapons. These features are particularly effective for anti-drone roles, which could help extend its operational lifespan. At the rear, the twin vertical stabilizers are connected by a wide horizontal stabilizer positioned behind the engines. This configuration improves directional stability and control, especially at lower speeds or when carrying heavy loads. The engine placement and tail design also reduce vulnerability to heat seeking missiles, further contributing to the aircraft’s reputation for survivability. The A-10 is famous for its ability to survive heavy battle damage and remain controllable, reportedly capable of flying with one engine, half of the tail, one elevator, and even half of a wing missing. Like its real counterpart, this model is designed to be sturdy and swooshable. The central structure is strong, while the extremities are slightly more delicate due to the limited connection points. The display stand follows the same philosophy as my previous builds: simple, sturdy, and purposeful. The AT-AT plaque remains as a nod to the donor set, and the model pairs nicely with the F-22 and F-35 I have also designed from the same set. Instructions are on Rebrickable: https://reb.li/m/254616
 -
Everyone is very excited about the new The Lord of the Rings 11373 Sauron’s Helmet, especially since it includes the Sauron minifigure that was previously exclusive to the massive and expensive Barad-dur set. With such a strong helmet design for the Dark Lord, I began imagining a brick built helmet of his deadliest servant, the Witch-King of Angmar, whose presence in The Return of the King was truly fearsome. The helmet rises in a stark vertical silhouette, constructed in dark bluish gray pieces to echo blackened steel. Its surface is defined by wedges, slopes and curved plates that create a rugged, battle worn look. The narrow elongated cone is the dominant feature, capped with an angular extension plate layered with various slopes to sharpen the profile. The helmet is fused with spikes. Due to the limited number of brackets available for attaching them, I focused the four spikes at the front of the helmet to maximise display impact. There is no visible face beneath the helmet. It opens below the eye holes into two long downward curving prongs that function almost like iron fangs, giving the impression of a twisted metal skull. Wedge plates and curved slopes create a recessed void, an empty gaze that suggests no physical features beneath, only darkness. I had to raise the display stand slightly to accommodate the length of the downward prongs. Instead of the Sauron name plate, I placed the Ring on a jumper plate at the base of the stand, symbolising how the Nazgul are enslaved to Sauron through the Ring. I am very pleased with how this rendition turned out using only the pieces from Sauron’s helmet. Its brutal dark presence is something you can feel from across the room. Instructions are on Rebrickable and OpenStuds. https://reb.li/m/252304
-
The Lockheed Martin F-22 Raptor is widely regarded as the world’s premier air superiority fifth-generation fighter. Even though it is around 10 years old than the F-35, it still has unmatched air combat performance, combining super cruise, extreme manoeuvrability and advanced stealth into a single airframe. For this build, the nose benefited greatly from my F-35 design. The Raptor’s gold tinted bubble canopy is achieved using trans-clear tiles and yellow slopes. The rest of the jet is a complete redesign from my F-35. Angled air intakes Clipped diamond wings Blended body shaping by positioning the wings a plate closer to the spine Outward canted twin vertical tails the horizontal stabilisers’ s shape is a compromise due to the wedge plates available Triangular exhaust nozzles for thrust vectoring As the benchmark air dominance fighter, it absolutely had to be swooshable. The blended wing root and broad fuselage create perfect grip points for high G turns across the living room, preferably with an appropriately epic soundtrack in the background. The display stand follows the same philosophy as the previous build, sturdy and purposeful. The AT-AT plaque remains on display as a nod to the donor set. A fitting tribute to a fighter designed not for compromise, but for control of the skies. Instructions are on Rebrickable: https://reb.li/m/253460
-
The Lockheed Martin F-35 Lightning II is a fifth-generation multirole stealth fighter. While the F-22 Raptor remains the premier air superiority platform, the F-35 is designed as a versatile, sensor fused strike fighter with advanced networking and data sharing. It emerged from the Joint Strike Fighter program to replace the F-16 Fighting Falcon, F/A-18 Hornet, and AV-8B Harrier II. Australia has received 72 F-35A aircraft, with one squadron based at RAAF Base Williamtown, just north of Sydney. I found the nose of this stealth fighter particularly challenging to design. I spent far too much time refining that section to achieve an acceptable shape. As soon as I felt satisfied, the next problem appeared, the cockpit windscreen. I experimented with yellow cheese slopes paired with trans clear tiles, but in the end I chose the only dark bluish gray slope from set 75440. It gave a cleaner and more aggressive profile that better matched the F-35’s faceted look. To overcome the restricted choice of only 1x1 cheese slopes, I used hinge bricks to create angled plates as a substitute for curved slopes. That adjustment helped capture the sharp stealth geometry without breaking the part limitations. With those challenges resolved, I focused on refining the aircraft’s distinctive features: Forward pointing air intakes Portside cannon Trapezoidal wings Outward canted tail fins Larger horizontal stabilisers The tucked in exhaust nozzle As the most advanced fighter in the world, it had to be swooshable, and it absolutely is. The fuselage and wings provide solid grip points for barrel rolls while blasting Danger Zone in the background. I also built a substantial display stand, making use of the black bricks that were not needed for the jet. The AT-AT plaque remains on display as a nod to the donor set. A fitting presentation for a fifth generation fighter born from a galaxy far away and reimagined in modern airpower form. Instructions are on Rebrickable: https://reb.li/m/250781
-
There has been a lot of interest in my Imperial Gunship, which naturally led to my next design. This time I wanted to explore another Republic era starship that was later pressed into Imperial service, the Nu-Class Attack Shuttle, as seen in The Bad Batch and the upcoming Maul - Shadow Lord. Like the gunship, I scaled the model based on the cockpit windscreen. Using a two stud wide windscreen allowed me to incorporate 4x4 round bricks as the folding wing roots, giving the shuttle a much stronger visual presence when displayed. The Nu-Class was designed by Cygnus Spaceworks as a faster, long range supplement to the LAAT gunship. It featured heavier armour and shielding, and included a hyperdrive for extended travel. In its role as an armoured transport, it could carry up to 30 clone troopers, though it lacked the missile launchers found on the LAAT. The cockpit module features angled side walls and a sloped top panel, with the white boarding hatch positioned on the front right beneath the nose. Armament includes two cheek mounted laser cannons beneath the cockpit, along with an additional pair of laser cannons built into the wing roots. The Nu-Class has its iconic folding wings, similar in concept to the V-19 and Lambda Shuttle. The wings are mounted using clip elements and fold up and down to the correct angles seen on screen. The angled side hulls are achieved using hinge plates underneath, while the dorsal fin is constructed by stacking plates, including the black Star Wars display plate. I was especially pleased to reuse the 2x2 angled plate to achieve the correct looking engine exhausts, only the second time I have used that part since incorporating it into the Millennium Falcon cockpit. Most of the longer bricks are used internally, resulting in a very solid core structure. The folding wings are strong enough for general swooshing, although I would not recommend overly aggressive movement. Even though most of the black elements were consumed by the shuttle itself, I still managed to build a simple display stand. The Nu-Class looks right at home next to the gunship, as if both were sitting inside an Imperial hangar. Instructions are on Rebrickable: https://reb.li/m/251531
-
Thank you so much! Working at this scale with a limited part palette was definitely a fun challenge!
-
After Order 66, there were still tens of thousands of Republic Gunships in service, many of which continued operating under the Imperial Navy. A large number were repainted in Imperial grey, and we can see these grey gunships appear in The Bad Batch and the upcoming Maul-Shadow Lord. As I continue my journey of creating alternate builds from the 75440 AT-AT, I realised the four 1x1 yellow cheese slopes could work perfectly as cockpit windscreens that stand out against the grey hull. This discovery paved the way for my Imperial Gunship design. I experimented with both a single-stud and a two-stud wide spine as a starting point, and ultimately decided the single stud wide option worked best for the cheese slope windscreens, sandwiched between wedge plates on both sides. While this gave the best proportions for the cockpit, it proved challenging to create a strong internal support structure alongside the side fuselage panels. I had to rearrange several elements to fit a 1x6 tile mounted on jumper plates, which is essential for the overall rigidity of the gunship. Achieving sloped sides at this scale is tricky, and clip plates were used on the side-door panels to make it work. Those elements combined to create a solid model to swoosh around in. The sloped wings are mounted using hinge bricks, and the result is surprisingly close to how the wings are installed on the real gunships. The missile launchers are built using improvised parts such as 1x1 bricks, partially buried into the wings so they do not appear out of proportion with the rest of the ship. Three levers are used to represent the armament, with two nose laser cannons and one tail laser cannon. The troop bay measures 3 by 4 studs. Two white round plates are used to represent each stormtrooper, with four in total. A small V-Wing was also designed to escort the gunship, serving as a cool nod to the transition of starships during the early days of the Empire. Both ships are displayed on stands, as they both deserve to be. This Imperial Gunship and V-Wing are strong representations of early Imperial starships transitioning from the Republic and would make a great addition to any Star Wars collection. Instructions are on Rebrickable: https://reb.li/m/250813
-
The YT-2000 freighter Otana is another saucer shaped transport from the Corellian Engineering Corporation, first appeared on Star Wars: X-Wing Alliance. This time, it features a centrally positioned cockpit sandwiched between two large mandibles. The cockpit extends beyond the mandibles, giving the pilot a clear and unobstructed forward view, a far more practical layout similar to the Rebel’s Ghost. The ship has a fully symmetrical layout, with crew and cargo space at the front and the engines positioned at the rear. I initially planned to piggyback on the design language of my Millennium Falcon due to the nature of alternate builds, but the mandibles and side airlocks required so many changes that this ultimately became an entirely new build. The 4x4 round bricks are used to form the aircrew quarters, while a wheel element is used for the cockpit instead of the 2x2 round bricks used on the Falcon. The flattened saucer hull is expressed through layered plates behind the mandibles, while the sloped rear hull behind the airlock corridors is achieved using two hinged sections. Reddish orange and yellow elements were added to the fuselage to echo the red and tan weathering commonly seen on Rebel ships. Medium azure elements represent the iconic blue glow of the sublight propulsion system. The upper laser cannons are built using clip bars, allowing the barrels to elevate up and down, although the cannons themselves do not rotate. All six 1x6 black bricks are used as the internal core beneath the hull, making the Otana a very solid model. The only parts to watch are the 2x2 macaroni tiles mounted on brackets, which can be pushed in from the sides but are easy to place back if dislodged. A new display stand was designed to present the Otana at an angle, making it ideal for displaying alongside other midi scale Star Wars starships. Instructions are on Rebrickable: https://reb.li/m/250273
-
You might be surprised by how many different freighters exist in the Star Wars universe. Here is another one. The Outrider shares the same basic saucer shaped hull as most YT series freighters, but is set apart by its tubular cockpit, which is connected to the hull by two starboard bracing arms. It was heavily modified by the smuggler Dash Rendar in Shadows of the Empire. Various wedge plates form the front bracing arm and extend around the bow of the Outrider. The AT AT 4×4 round foot bricks are repurposed to great effect as the cockpit module. I used slopes to recreate the convex hull shape where possible, and I was especially happy with how I achieved the shape of the dark bluish grey maintenance access panels above the cargo hold. Reddish orange and yellow elements were added to the fuselage to reflect the red and tan weathering seen in the source material. Printed 2×2 round tiles are used for the engine vents and the escape pod hatch. Medium azure elements represent the iconic blue glow of the sublight propulsion system. The dorsal laser cannons are built using clip bars, allowing the barrels to elevate up and down, although the cannons themselves do not rotate. The construction method is plate stacking, so the finished model is very solid and great for swooshing around. The bracing arms are not as strong as the port side saucer hull, but they should be more than adequate for play. A new stand was designed to display the Outrider with the AT AT plaque showing the donor set. This Outrider model would be perfect for display next to a midi scale Millennium Falcon. Instructions are on Rebrickable: https://reb.li/m/249057
-
After completing my saucer starships, it felt like the right time to return to Star Wars. It has been a while since I designed my first Razor Crest, and the few hints of yellow and tan bricks hidden inside the otherwise grey dominant palette of 75440 started the idea. The model also pairs nicely with the upcoming The Mandalorian and Grogu, which is certainly an inspiring movie title. The Razor Crest is an ST-70 assault ship manufactured by the Corellian Engineering Corporation, the same company behind the iconic Tantive IV. Jon Favreau’s original design brief to Lucasfilm referenced the A-10 Thunderbolt “Warthog”, most notably through the use of two large turbofan engines. Their unusual placement reduces ingestion risk and allows the engines to run while the craft is serviced and rearmed, shortening turnaround time. The Razor Crest features top mounted wings with massive engines positioned at the wingtips. This configuration gives the ship impressive speed and manoeuvrability, allowing it to operate alongside much smaller starfighters. Recreating those engines took many design iterations. The biggest limitation was part availability, as the set only includes seventeen cheese slopes including one spare, which is not enough to fully shape both engines symmetrically. On the plus side, I finally found a satisfying use for the two 1x4 Technic gear racks in the engine assemblies, pieces I could not integrate into my other three alternate builds from 75440. Small levers were a perfect fit for the twin blaster cannons, while brackets form the shape of the nose section. Two differently coloured tiles help disguise the gap between the brackets. The entire AT-AT contains only a single curved slope, and fortunately that one piece was enough to serve as the Razor Crest canopy windscreen. I love simple solutions to design challenges. To capture the angular, industrial wedge profile of the Razor Crest, I built the fuselage using six angled panel sections across the hull. Most of these panels rely on three or four stud connections for clutch power. Structural strength is a major focus in all my designs, especially since my family loves to swoosh models around. That said, the angled side panels can be pushed inward at their joints. If this happens, I recommend removing the central panel, reattaching the loose panel, then reconnecting the three panel section as a whole to the trans-clear side studded brick. When handling the model, pick it up by the two engines and hold the ship around the central fuselage panels while swooshing. The structure is very solid in these areas. If the angled panels are accidentally pushed in, simply reattach them using the method described above. To complete the display, I also designed Mando’s N-1 Starfighter to accompany the Razor Crest. I am proud to say the N-1 is highly accurate and includes its own display stand. Naturally, the Razor Crest received a larger stand to balance its increased size. Overall, this Razor Crest was a satisfying return to Star Wars and a great way to push the limits of what 75440 can offer as a donor set. Working within the strict part constraints forced more deliberate design choices, especially around the engines and angled fuselage panels, and ultimately helped define the character of the model. The result is a relatively sturdy, swooshable build that stays true to the Razor Crest’s rugged, industrial identity while remaining practical to handle and display. Paired with the N-1 Starfighter, the two models make a cohesive and character driven display that feels right at home on the shelf. Instructions are on Rebrickable: https://reb.li/m/246421
-
[MOC] Enterprise NX-01 Midi Scale - Alternate Build of 75440 AT-AT
Wurger49 replied to Wurger49's topic in LEGO Star Wars
Totally agree with the more rounded saucer! Thank you! The shuttle pod is built with a mix of snowspeeder parts and some AT-AT. -
Hot on the heels of the Enterprise NCC-1701, I started looking for other Star Trek ships to rebuild from 75440 AT-AT. I considered the LEGO Icons Enterprise D, but the limited selection of curved slopes in the donor set quickly became a constraint. That pushed me to look elsewhere. The NX-01 is humanity’s first true deep space exploration vessel and, importantly, it does not feature the tubular secondary hull attached to a dorsal neck seen on later Enterprises. That alone solved one of my biggest design challenges and made the NX 01 the perfect candidate for this alternate build. Features The saucer shaped primary hull is constructed from layered plates and tiles, with the centre subtly bulging outward on both the top and bottom surfaces. The recess for the navigational deflector has been modelled directly into the hull shaping. A combination of slopes and tiles is used to create the hull bulges that flow into the impulse engines and nacelle pylons. A surprising amount of detailing went into this small transition area, and it ended up being one of my favourite sections of the build. The warp field governor, located just behind the saucer, is represented as a structural element and also serves as a natural attachment point for the nacelle pylons, helping to tie the ship together visually and structurally. The twin warp nacelles are built using 2x2 round bricks and tiles at the front to emphasize their tubular form. Each nacelle core is constructed from two 1x8 black bricks, with light bluish grey elements covering the top and bottom surfaces for contrast. The sweeping angle of the pylons is achieved using 2x4 wedge plates. These are clip connected, with the wedge plates acting as backstops to lock the angle in place. The blue engine glow of the impulse engines is recreated using medium azure elements, adding a subtle splash of colour without overpowering the overall palette. A full size display stand is included, allowing the model to be tilted and displayed at two different angles. Where possible, I prefer to keep the nameplate to clearly showcase the donor set. Small changes were also made to the shuttle pod to better suit the NX-01 design language. Aside from the saucer edge, the model is very solid. It can be comfortably picked up by the impulse engine arms or the warp field governor and swooshed around without issue. The warp nacelle pylons are short and sturdy, so they don’t normally flop during handling. This makes the NX-01 a great companion ship to the NCC-1701, ready to be swooshed through space or proudly displayed as part of a growing Starfleet lineup. Instructions are on Rebrickable: https://reb.li/m/247699
-
The model is 13.5 cm wide, 28.0 cm long, 13.0 cm tall (including stand) Or 5.3 inches wide, 11.0 inches long, 5.1 inches tall (including stand) After completing my first ever Millennium Falcon alternate build, I wanted to take what I learned and apply it to another iconic saucer shaped starship, the USS Enterprise from Star Trek. The Constitution Class USS Enterprise NCC 1701 is one of the most iconic starships in science fiction and a lasting symbol of exploration, optimism, and discovery. First introduced in Star Trek The Original Series, it features a distinctive saucer shaped primary hull, an elongated secondary hull, and twin warp nacelles. This design became instantly recognisable and set the visual language for Starfleet ships. Features • The saucer shaped primary hull is built using various plates and tiles stacked together, with the centre bulging outward on both the top and bottom. Black pieces are used to represent the ship’s name. • The secondary hull is formed using a combination of 4x4 round bricks at the front with the sensor probe. Six 1x6 black bricks combined with plates form the core structure, with various slopes used to smooth out the hull. • The dorsal neck connecting the primary and secondary hulls required quite a bit of trial and error. In the end, I achieved a solid and accurate representation using two large brackets with multiple bricks acting as support. • The twin warp nacelles are constructed using 2x2 round bricks and tiles at the front to showcase the tubular shape. The core of each nacelle is built from two 1x16 black bricks, with light bluish grey elements covering the top and bottom surfaces. • The pylons connecting the warp nacelles also went through several iterations. A simple and effective solution was ultimately used, combining clip connections with a 2x6 plate acting as a backstop to maintain the outward angle. • In addition to the main model, I was able to build a display stand using spare pieces, as well as a small shuttle pod for fun, inspired by LEGO’s GWP designs. The secondary hull is very solid, there are weakness around the saucer dish. Since the engine pylons are mounted on clips, they may move inward during handling. I recommend holding the model with your index and middle fingers supporting the top of the secondary hull, while your ring finger and thumb support the bottom. This prevents the pylons from shifting inward. I am extremely pleased with my first USS Enterprise alternate build, and it is ready to be swooshed around or proudly displayed. Instructions are on Rebrickable: https://reb.li/m/247351
-
[MOC] Millennium Falcon Midi Scale – Alternate Build of 75440 AT-AT
Wurger49 replied to Wurger49's topic in LEGO Star Wars
Thank you, I really appreciate that. The AT-AT parts were quite helpful actually, the fun of alternate builds. Finding unexpected ways to reuse those shapes is what makes it so rewarding. -
The Millennium Falcon is the most recognisable ship in the Star Wars universe—and the fastest hunk of junk in the galaxy. Originally a Corellian YT-1300 light freighter, it was heavily modified by Han Solo and Chewbacca and went on to defy all expectations, famously completing the Kessel Run in less than twelve parsecs. The Millennium Falcon has been recreated in LEGO countless times—but this is my first. With the 2026 release of set 75440 AT-AT, this alternate build is a new year, new me approach, pushing a walker part palette into an unexpected silhouette while still paying respect to the most iconic ship in Star Wars. The Falcon’s unmistakable flattened, asymmetrical saucer shape is defined by its offset starboard cockpit and twin forward mandibles. In this build, 4×2 wedge plates form the mandible outlines—while 3×2 wedges would create a more circular profile, working within such limitations is part of the fun and challenge of alternate builds. The AT-AT’s 4×4 round foot bricks are repurposed to great effect as the side airlocks, and the single 2×2 angled plate from the bending AT-AT leg provides the angle for the protruding cockpit—one small piece that made a big difference during the design process. The flattened saucer hull is expressed through layered plates behind the mandibles, with the radar dish mounted on clip plates. Various different pieces are used throughout to fill gaps created by the offset, angular cockpit connection. The rear hull, behind the airlock corridors, is split into three hinged, interlocking sections to achieve the saucer profile. Medium azure elements are used to represent the iconic blue glow of the Falcon’s sublight propulsion system. The set includes eight printed 2×2 round tiles, which presented a design choice: rear heat vents or mandible maintenance access bays. After experimenting with multiple layouts, the 2×2 round plates were used for the vents, while the printed tiles were reserved for the access bays and the airlock doors. The upper laser cannons are built using clip bars, allowing the barrels to elevate up and down, though the cannons themselves do not rotate. Two 1×16 black bricks form the ship’s main structure, making the model very solid from the mandibles through to the airlock section. The three hinged rear sections, connected by two studs each to create the sloped hull shape, are slightly less rigid, but the model remains fully swooshable when handled from the core structure. The first version of the model was built entirely in grey, which felt too flat, so reddish orange and yellow elements were added to the fuselage to reflect the red and tan weathering seen on the source material. The included Snowspeeder was changed to the grey version piloted by Luke Skywalker during the Battle of Hoth. The stand was also redesigned to display the Millennium Falcon at multiple angles, with a clear brick supporting the Snowspeeder so both models can be displayed together. I believe the two builds are also in scale with each other. I hope you enjoy my first-ever Millennium Falcon alternate build as much as I enjoyed designing it—may this iconic ship find its place among the rest of your Star Wars fleet. Instructions are on Rebrickable: https://reb.li/m/246765
-
After the successful launch of my A-Wing Prototype, I wanted to further explore a bulky, armoured vehicle aesthetic, leading to the design of this Assault Gunship. Compared to my previous gunships, this variant features significantly thicker armour and a smaller troop bay, purpose-built for close-quarters combat and breaching fortified positions. Two 6x8 trap door frames were used as the base of the assault gunship with 1x8 red plates as highlights. Sloped wedges were used to great effect as the armour survival kit for the cockpit, creating a striking polygonal armour profile that gives the ship a realistic, militarised look. They are attached by brackets on the two brick-built columns holding up the spine of the ship. The curved bricks and curved slopes were used on the spine of the gunship in a similar fashion as they were on the Slave I. Sloped bricks and curved bricks were used to build the missile launchers, so they look quite different to the cylinder designs we are used to, fun deviation from the standard gunship. The nose-mounted weapons are my standard-issue square blasters, providing a consistent design language across my builds. The relatively small number of large and long plates made it hard to build large wings, so my assault gunship wings are made up of various overlapping smaller wedge plates. The troop bay measures 4×6 studs, comfortably fitting two standing clone troopers, while the spacious cockpit accommodates a single pilot. As with all my designs, structural integrity was a key focus—this model can be grabbed anywhere along the main hull and swooshed confidently without flex or instability. This Assault Gunship continues the evolution of my alternate-build gunship series, delivering a sturdy, playable, and display-worthy addition to any LEGO Star Wars collection. Instructions are on Rebrickable: https://reb.li/m/243219
-
The model is 21.6 cm wide, 19.4 cm long, 9.6 cm tall. Or 8.5 inches wide, 7.6 inches long, 3.8 inches tall. One of the reasons I put off design an alt. for 75401 Ahsoka's Jedi Interceptor is the lack of it's windscreen on Studio, since I have overcome that mental hurdle as I released my Hot Rod Gunship without any rendering. By utilizing the cockpit of the Eta-2 Jedi Interceptor, I thought to design Jedi Gunship with a single pilot that can carry a small team of Jedis across the battlefield. The design follows the standard gunship appearance of troop bay behind the cockpit and topside mounted wings. The columns around the troop bay serve as the main structure for the gunship, where the large windscreen is clipped onto the 2 brackets and the 1x2 half circle tile. The slanted wings are connected via technic axles onto technic bricks sitting on the spine of the gunship. The Eta-2 Jedi Gunship packs a punch with 2 nose laser cannons and 2 wing-mounted missiles launchers. The cockpit sits Ahsoka with Anakin and R7 standing in the back, the height of the troop bay is tall enough for the clone trooper too. The model is strong enough to swoosh around and playing with minifigures, the dark red color schemed patterns make it a striking looking ship. It's in scale with my other small gunships from play scale Star Wars sets, making it a great addition to your LEGO collection. Instructions are on Rebrickable: https://reb.li/m/242317
-
Thank you!
-
Can it Gunship? Yes it can! The LEGO 75414 The Force Burner Snowspeeder has been a fantastic addition to my Star Wars collection thanks to its new two-seater windscreen. While it currently comes in a funky trans-yellow, I’m sure LEGO will be keen to reuse this mould in future ESB-themed sets. As with most of my alternate builds, I started with the windscreen and designed outward from there. Its angular shape instantly reminded me of modern attack helicopters—so naturally, another gunship was the only logical outcome. The main structure is built around the inverted sloped wedge at the front and the large 6×8 trap door frame. A mix of plates, brackets, and support elements lock everything together, while multiple sub-models keep the construction smooth and intuitive. The 6×12 wedge plates work beautifully for the gunship wings. The Hot Rod Gunship brings plenty of firepower: Two nose-mounted laser cannons Two wing-tip heavy laser cannons One tail gun Twin missile launchers on top of the wings The cockpit seats two pilots, and the cargo bay can stand two clone troopers comfortably. Surprisingly, this is the strongest of my three small gunships. You can pick it up by the main fuselage and swoosh it around with no issues—it’s sturdy, compact, and great for both play and display. This model is the next evolution in my series of gunship alternate builds across various sets, and it would make a fantastic addition to any LEGO Star Wars collection. Instructions are on Rebrickable: https://reb.li/m/243202
-
Thank you, better late than never for the Wooden Wonder!
-
Back in March I tried to build a de Havilland Mosquito from two sets of 31160 but couldn’t quite get there, and that attempt eventually evolved into the P-38 Lightning. With a bit of spare time between LEGO releases, I thought: why not try again? So I disassembled the P-38 and returned to the Mossie as a small tribute to the RAAF Mosquitoes built at the de Havilland Australia factory in Bankstown. After plenty of fiddling with the twin engine mounts, since the available parts aren’t ideal, I finally managed to capture the overall silhouette of the Wooden Wonder. The Mosquito is a twin-engine, multi-role, two-seat fighter bomber from WWII. Its two Merlin engines sit on the wing’s leading edge, housed in long smooth nacelles that extend ahead of the wing to include the main landing gear bays underneath. The fuselage is cigar shaped and tapers cleanly toward the tail. The cockpit sits close to the nose to give the crew better visibility and to free up uninterrupted space in the central fuselage for bombs, fuel, and mission equipment. The wings are mid-mounted, elliptical wings with gentle taper to rounded tips. I included the characteristic step in the inner leading edge, representing where the Mosquito’s radiators sat just outboard of the fuselage. The vertical tail is tall and rounded, and I used a combination of slopes to get as close as possible to that distinctive triangular curve. The tailplane reuses the original 31160 design, and ideally it would be wider but the parts simply aren’t there. The 1×1 stud with an underside bar works surprisingly well as a tailwheel, accurately giving the Mossie its nose up stance on the ground. The set’s white, dark azure, and dark blue 45 degree cut tiles opened up many possibilities for disruptive camouflage. After experimenting with several patterns I settled on opposite white accents on the wings and dark azure patterns across the airframe. Structurally, the Mosquito is extremely solid through the central fuselage, much sturdier than the twin boom layout of my P-38, which makes it great to handle and swooshing around, especially with the spinning propellers. I kept the black display stand unchanged so you can build an extra one for other MOCs if you like. The Mosquito looks fantastic displayed in flight, and the landing gear pieces can be removed easily if you prefer a clean airborne configuration. Instructions are on Rebrickable: https://reb.li/m/242069
-
Haha, I do admit it's out there!
-
After designing my Horse Lord Castle from two sets of 31168 Medieval Horse Knight Castle, I received many requests to combine the Creator 3-in-1 31168 with the retired 31120 Medieval Castle, as not everyone can easily obtain multiple copies of the same LEGO set. At the time, I was working on the Book Nook series as a refresher on 31120’s building style before moving on to this next castle. I decided to call this model the “Alliance Castle”, as it’s a stronghold jointly defended by the Black Falcon Knights and the Horse Knights. I explored several design options, but given the constraints of the two sets, I focused on blending the best architectural elements from both castles to create a unified design. After some feedback on the open-back “dollhouse” layout of my previous castle, I made this one fully enclosed. Naturally, the enclosed design ended up smaller due to piece limitations. Inside, I incorporated two key features from 31168 — the tan wattle-and-daub house and the stone manor house. The tan house is hidden from exterior view so it doesn’t clash with the other yellow timber structures. I also raised all battlement crenels by one brick and flipped the slopes on the merlons outward, as they should be tall enough to shield soldiers from incoming projectiles. The Alliance Castle is divided into three main sections: The Gatehouse – featuring dragon gargoyles, a portcullis, and outward-sloped battlements for better deflection. I also added a kitchen to serve the banquet hall. The Riverside Wall Section – positioned along a river bend, where the watermill and dark azure plates form the waterline. Yellow wattle-and-daub structures overlook the water, while the mill powers a blacksmith’s workshop. The Manor house sits the banquet hall, with the throne room on the top floor. The colorful watchtower with its pointed spire stands guard over the landscape. The Land Wall Section – this area faces the main approach, so I doubled the wall height for defense. The great stone tower was built using corner panels from 31168. Inside, a stone staircase leads up to the tan wattle-and-daub house, which sits above a well and market stalls for fresh produce. With leftover parts, I also created a jousting barrier and arms stand, perfect for staging knightly duels — though my son always insists on being the good guy, leaving me stuck as the black knight! And yes, the green dragon can still be built. Overall, The Alliance Castle combines the best elements of LEGO’s two Creator 3-in-1 castles, offering both a display-worthy exterior and detailed, playable interior. Instructions are on Rebrickable: https://reb.li/m/237810
-
I had a blast designing and playing around with the Medieval Town Book Nook, and I’ve enjoyed it so much that it’s earned a permanent spot on my work desk. I wanted to expand on the idea and managed to get two copies of 31120 Medieval Castle from some mates who had them spare in their collections. From a design point of view, 31120 offers more wattle-and-daub buildings compared to 31168, making it perfect for creating a full streetscape along one side of the book nook. On top of that, my son and I both loved the set’s watermill, so I knew it had to be worked into the design. That led me to create a river town scene. Structural Design · Gate and Walls – Built completely solid for strength and easy handling. · Three-Storey Tower – Brick built on 3 sides for both play and stability. · Base – A sturdy foundation patterned in dark and light gray for visual texture. Scene Details · Left Side – Entering through the gate you’ll find a food stall, well, and blacksmith tucked beneath two wattle-and-daub houses, with a treasure and throne room hidden within. · Center – The three-storey tower with its watermill sits proudly on an island, the waterways powering its wheel. A barred door at the base is partly concealed by foliage. · Right Side – A wooden staircase leads down to ground level where chickens scratch and a mouse scurries about, while a small chapel is nestled just behind the main gate. The Atmosphere This build captures a slice-of-life medieval scene: a river town bustling with homes, a market, a watermill, and townsfolk, all contained within fortified walls and gates. It’s meant to feel like just one part of a larger medieval town or castle complex, packed with little details to discover. And of course, the green dragon fits right in with this setting—almost like Smaug swooping down on Lake-town from The Hobbit. Whether displayed on its own or slotted neatly between your books, I hope you enjoy building and displaying this medieval book nook as much as I do! Instructions are on Rebrickable: https://reb.li/m/235387
-
thank you! the closed mode is pretty cool with nooks