
HRU_Bricks
-
Posts
159 -
Joined
-
Last visited
Content Type
Profiles
Forums
Gallery
Everything posted by HRU_Bricks
-
 It is finally complete! 100% mechanical. It is being displayed at Perth Bricktober this weekend (11 & 12 Oct 2019). A long journey and glade it is done. Now onto the Studio file.... Video --> https://www.bricksafe.com/files/HRU_Bricks/gbc-ball-cleaning-machine-project/VID20191011184813.mp4 Note there was a drone flying around taking footage
 -
I was actually looking to build the Akiyuki axle sorter but not any more this one is sooooo much simpler and cheaper to build. I would modify this one to have the catching trays lower for the longer axles so the axles can bend around the arch as they fall instead of dropping on the trays. Sticking to the original is good to start with but there is always improvements. Not even the Lego sets stay standard around my house!
-
@Dan Kressin I just cam up with the same answer as @letsbuild after looking at your Studio file on Brick set before I scrolled down. 2 out of 2 that has to be the right answer Thanks for posting your work on the Studio file, when I saw your post on FB I knew I had to build it! Good luck with the gears, they maybe a challenge. My recomentations is to work from the motor out to the outside of the models drive system and SAVE often to save the heart ache ( I have done a lot of models now and found this to be the best way)
-
To get back onto why we all here... The build so far is really good. It has the "Technic" feel which is a little surprising because it is a programmable set with position controlled motors that often negates the need for gearing and more complicate construction methods. There are a few pin choices that are interesting with axle pins being used as locator pins when standard black friction pins would give better stability in the frame. The set is worth every cent so far and I am only just beginning. It would not be too difficult to modify it for PF and remove the Control Plus parts for other builds (my intention).
-
Any way I am just happy I have one and can build it this weekend, I can run it with Buzz Wiz app for the next few days. get over it
-
Lastly, just don't buy the set until the 1st of October
-
1. Sets delivered to retailers that DO have an embargo have a big sticker indicating not to sell before and got retailers follow that becuase they do not want trouble with Lego 2. The 42100 had no embargo on the sale as detailed by the retailers I saw today to find a set that arrived. 3. Lego has a massive logistical challenge to have stock on shelves in shops at the same time on line releases. 4. Retailers have discussed with Lego to bring online release dates and stock on shelf closer. 5. The on line Lego released on the 1st that's when they want to release the app
-
There is no embargo on the set. Stores are receiving them this week and can sell them when they are delivered. I picked mine up today and asked and they said there was NO embargo. Don't get upset with Lego they have said the release date is Oct. Use the Buzz Wiz app and get on with life, you are one of the lucky ones that got to build it early! Lego is also about the build remember
-
Remember he probably had a Lego specific release for the app. Have you tried the buzz wiz app
-
Sariel's exclusive first review of the Technic Liehberr 42100! I liked the set and now want it even more. The build itself have the haul marks of a good Technic build (complexity, function, new build techniques) with the added bonus of Control Plus. https://www.youtube.com/watch?v=4cvr20Q39gw&fbclid=IwAR1ZFBcHn8j-06yWb9soy6RTR9D4EEBELG4G5gphisuGTVubybklUsqBVW0
-
And it will 600 on sale in no time... Big-W it'll be even cheaper. The 4x4 was on sale a few weeks after it came out
-
Major building is complete! Well hopefully The cleaning press module is done and came out very different in comparison to Akyiuki's original. It kind of feels like it is missing something but cannot put my finger on it..... The machine is running really well with very few balls coming and no major issues for the 1 hr I did run it. The consumption of air was not as high as I first though but still very high if you considered to use Lego pumps. Currently with an operating pressure of 1.55-1.6 bar the consumption is about 45 Ltr/hr. If it was not for the Powered up section it would be complete. Video -->https://www.bricksafe.com/files/HRU_Bricks/gbc-ball-cleaning-machine-project/VID20190909213420.mp4
-
The cleaning machine does not actually need the Boost controller to operate and if can be removed all together. Thus it is the first 100% mechanical version (that I know of). There is actually not much that of the machine that was from the original, other than the overall concept and bones (flow, section positions and look). Without the original and the tips you all shared along the way it would still be a far off idea. What the intention with the boost controller is for it to sense when there are balls in the 4 ball lift section using the color sensor and that will switch on the PF motor that drives the valve block at the front. The valve block at the front then controls all of the functions on the machine using a combination of cylinder rams, PF switches and Servos. I am also using the Boost motor as a position sensor for the main pick and place arm so the controller knows when to reset the start point (full left with picking hands int eh up position. The Ball feeding lift is also turned on and off by the boost controller. This will run for a cycle then off for a cycle and then run for an extra cycle for each time the main machine runs. The main reason for the boost controller is for Lego shows so that the machine does not run when there are no balls in it as that is extra wear on parts that are not needed (that and I like to program machines too )
-
Getting very close now. The Mechanical timing is all good to go and working as it should, piping is done, lift and hopper is working well, out feed done. Al that remains is the last module for the cleaning cloth press and then onto the the control program that will turn the machine on and off if there is no balls being fed for a GBC display. Thanks @Juroen not to sure if I will be using the Lego cleaning cloth, there is non available in AU and the shipping is too high for a few cloths! Video --> https://bricksafe.com/files/HRU_Bricks/gbc-ball-cleaning-machine-project/VID20190905224528.mp4
-
Thanks Doug, yes the original desgin was not as reliable as one hopes for and was a bit of a pain at last years Bricktober Show. The other major change was having a 24T gear on each side of the unloader to help with torque transfer and to stop it jumping gears. The 2 striker arms was something I was experimenting with to get a more consistent strike to guarantee that it will switch over. When I tried the double rubber bands it tended to wear out the batteries faster. Your spot on with the droop and I did think that the flex in the the 15L beam was a contributing factor for the module not switching completely. I haven't tried the 13L (far simpler solution lol) so I will give it a go.
-
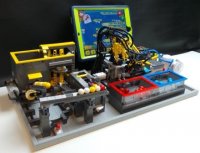
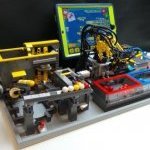
Functional Technic has made a video if this application. I have also used the Boost hub and motors to do this as will. If you are going to do it and have more space I would gear it down to 2:1 to give you more torque as the valves do get sticky. This is my boost controlled GBC valve manifold with 3 valves running 8:24 gear ratio. it has position control to move a picking and placing robot arm. Rebrickable link --> https://rebrickable.com/mocs/MOC-22401/HRU Bricks/lego-boost-gbc-pneumatic-ball-factory/#comments
-
Nice work on the full train system. It is defiantly a big build! The Studio file for my MODs for the unloading unit are complete --> https://bricksafe.com/pages/HRU_Bricks/gbc-train-modules-including-akiyuki-train-modules https://bricksafe.com/files/HRU_Bricks/gbc-train-modules-including-akiyuki-train-modules/Modified Train Unloader.mp4 There is far less friction for the cart in and out of the unloader and it dose not get court or break any bricks off too. I ran it for an hour with the loading unit and did not have any issues or stoppages. The tyres act as the initial buffer to ensure the cut is centered and the bushes take over along the edge.
-
Is there really a Lego cloth?? I thought he used a polishing cloth. Is there a part number?
-
Spot on! I don't know who would buy this for the children. That said I did buy a second hand BWE form a family who bought it for there 9 year old... When they asked if it was more my son I did feel a little embarrassed when I said it was for me and I have 4 more ?
-
From the Power UP media days Lego indicated there was going to be a "dumb" battery box much like the PF battery box the works with the new motors. The motors in the PU range are price comparable to the PF range so it shouldn't (hopefully) affect the price too much. From the info released it was hard to tell if the dumb battery box had multiple outputs. There for a set like the BWE, in theory shouldnt be more expensive than it was.... Hopefully Already working g on the model B
-
@Doug72 Thanks Doug. I did change the switches out for the older one. Because the of the reduction of friction the batteries are lasting longer which is good. Using the black suspension with the double yellow spacers helps with the lift and with on the return the motor tone is neutral. Here is a short video of the cart entering and leaving https://bricksafe.com/files/HRU_Bricks/gbc-train-modules-including-akiyuki-train-modules/Modified Train Unloader.mp4 There is also dual 24T gears to drive the unit which reduces the gear skipping.
-
Just finished the unloader unit with some minor modifications. The main modification is the unloader rails. The friction is reduced as there is only 4 small points of contact that reduce the power required to enter and leave the unit. The wheel and rollers help guide the train cart in straight and doesn't catch. I did try 2 rollers on the top but it did not work as well.
-
Thanks @Juroen Interesting to see you using the bevel gears to drive the barrels. Was there a reason why you went that way? I was thinking of making the drive gear a bevel so it would mesh better
-
@Juroen Correct I changed it to vertical instead of horizontal to slow it down some more and increase the lifting power, which it did nicely. I also managed to reduce the weight of the liter by using wall pieces on the back end which also made the difference. There is indeed a valve. It is on the far left of the valve block and the pipe work runs up from the underneath the valve block in the center. The pipes are labeled 9 & 10. It was the most challenging part of the valves and timing because (as I interpreted the sequence) it has to be activated (lifting the motor and pressing down on the balls) for 3/4 of the time and then release for long enough for the turntable to rotate. The valve bank only has one central shaft it was an interesting build to say the least! Can you share some photos and close ups of the cup rotator area and the cleaning clamp? I have some ideas on a different way and to make it modular but it is a good place to start. The all important valve:
-
The main functions for the cleaning machine are complete! Some fine tuning to do but it is working really well. The machine is running 100% mechanical at this stage. The next step is to build the lift for the ball cup rotator and the cleaning clamp. Video --> https://www.bricksafe.com/files/HRU_Bricks/gbc-ball-cleaning-machine-project/VID20190802211107.mp4