
mihao
-
Posts
143 -
Joined
-
Last visited
3 Followers


About mihao

Recent Profile Visitors


-
[MOC] 1:8 Koenigsegg Agera RS
mihao replied to mihao's topic in LEGO Technic, Mindstorms, Model Team and Scale Modeling
yes -
[MOC] 1:8 Koenigsegg Agera RS
mihao replied to mihao's topic in LEGO Technic, Mindstorms, Model Team and Scale Modeling
Hi Sokolov, thank you for testing it thoroughly, I will address the instructions issues soon. The two finger panning is a good suggestion for more viewing freedom. The second suggestion is an interesting one, I have also thought about that clicking a part in the view can lead to the step where that part is added in the first place. But it does require each part in the view is clickable, but right now, some part exists in a sub module, and it means that user can only click into the sub model first then to the individual part. I think it is tolerable. For Google store release, I haven't collected enough testers there, and there is some new issue reported from Google store which I have to fix. It seems a lot more restricted requirements to publish in Google store than Apple store. I am using Unity, so it should be straight forward to generate Windows store app, but using Windows is not part of my original intention, given that windows PC is not as agile as mobile device. Anyway, will let you know when I need some testing there. Thanks in advance! -
[MOC] 1:8 Koenigsegg Agera RS
mihao replied to mihao's topic in LEGO Technic, Mindstorms, Model Team and Scale Modeling
Yes, flexible parts can be used for that, but I don't think they'll as neat as the current way. For the Android app, seems that OBB has some issue with certain regions so right now I am trying to change them into Addressable asset bundle being loaded from CDN. I will send you a message when it is ready to test. Thanks. -
[MOC] 1:8 Koenigsegg Agera RS
mihao replied to mihao's topic in LEGO Technic, Mindstorms, Model Team and Scale Modeling
A bit small, but possible to use with additional structure. Also need to revise the related areas like the windshield side bars. -
[MOC] 1:8 Koenigsegg Agera RS
mihao replied to mihao's topic in LEGO Technic, Mindstorms, Model Team and Scale Modeling
Yes, I thought about that, but that part is a bit too big here. -
[MOC] 1:8 Koenigsegg Agera RS
mihao replied to mihao's topic in LEGO Technic, Mindstorms, Model Team and Scale Modeling
Yes, when I decided to use these Znap parts, I realized that they have already been discontinued, but given that they are relatively cheap on bricklink, so I chose to still use them. I just can't find any good replacement with other parts. This car is convertible, which becomes a signature feature of it, so I don't want to miss it in the design. When the roof is detached, it is basically a half circle left there. I have thought about using soft axle or similar, but none of them can achieve the clean result like the current one. -
[MOC] 1:8 Koenigsegg Agera RS
mihao replied to mihao's topic in LEGO Technic, Mindstorms, Model Team and Scale Modeling
I’m trying to bring the instruction App to Google Play (Android). But Google requires that my app is tested by at least 12 people before I can make it public, so I need some help from you here. If you’d like to support me: 1. Share your Google (Gmail) email address with me via IM. 2. I’ll send you an invite link. 3. You just install the app through the Google Play internal testing link. Thanks so much for your support. -
[MOC] 1:8 Koenigsegg Agera RS
mihao replied to mihao's topic in LEGO Technic, Mindstorms, Model Team and Scale Modeling
Yes, I am thinking about that too. -
[MOC] 1:8 Koenigsegg Agera RS
mihao replied to mihao's topic in LEGO Technic, Mindstorms, Model Team and Scale Modeling
It's a good idea to use beacon parts to differentiate the current step from existing model, and I need to leverage this in my next design. Showing assembled model in one color has its privilege in PDF, because user can only rely on the current angle to decide the location, this also applies to the additional insert. But with the ability to rotate the model on screen, I believe that any uncleared position can be clarified by looking at the model from different angles. I didn't make the close-up feature at the beginning, back then, user always see the whole model at each step initially. But I soon realized that on a small screen, it is so hard to tell the position of new step parts when the model gets big. I have to manually zoom in to see the new step clearly again and again. (This also happened when I followed the official LEGO builder app to build the Mclaren P1.) So I decided to automatically zoom-in to the step in a closer distance. My assumption is that, if the user follows the instruction step by step, a close-up view should not be too confusing, after all the user knows what the current model looks like. In case that the location gets lost, a manual zoom-out (plus rotation) can solve it. Anyway, it is a trade off for small screen, maybe I should introduce a setting to control auto close-up or not. Good comment. -
[MOC] 1:8 Koenigsegg Agera RS
mihao replied to mihao's topic in LEGO Technic, Mindstorms, Model Team and Scale Modeling
I tried to post on Rebrickable, but they disabled it because the instruction app doesn't follow their guideline. Yes, that is a good idea to highlight the current part. I will consider to use it. For now, I added glowing outline to parts of the current step to make them stand out. Thanks! -
[MOC] 1:8 Koenigsegg Agera RS
mihao replied to mihao's topic in LEGO Technic, Mindstorms, Model Team and Scale Modeling
Here is what I learned from ChatGPT, if it is not accurate, someone here can help to correct: LEGO setup: Connect the pistons to the PF motor (before the gearbox) Crankshaft spins whenever the motor runs. Pistons move at “engine speed.” Gearbox then reduces or increases torque to the wheels independently. ✅ This is realistic, like a real engine. Connect the pistons after the gearbox (to the wheels) Pistons speed now depends on wheel speed. Upshifting would suddenly slow down piston movement, which looks weird. Wheel load or stop also affects piston movement — not realistic. Conclusion: Always connect the dummy pistons to the PF motor shaft BEFORE the gearbox. Gearbox changes wheel speed independently. Pistons move consistently with motor (engine) speed. If your PF motor is just on/off, pistons will move at one speed whenever the motor runs — which is fine for LEGO visual purposes. -
[MOC] 1:8 Koenigsegg Agera RS
mihao replied to mihao's topic in LEGO Technic, Mindstorms, Model Team and Scale Modeling
Thanks! Actually, the engine is always running as the same speed regardless the stick position and the gear selection of the paddle shifter. The video maybe not clear enough to indicate that. Thanks a lot for the comments! I expected mixed reactions when I started working on this app, since it’s quite different from traditional PDF instructions. I completely understand that many builders prefer the “classic” style of flat 2D steps. There’s a certain rhythm to flipping through pages, scanning the layout, and working things out yourself—that’s part of the building habit, and even part of the fun. My main goal, though, was to make instructions more practical on mobile devices. When I build official LEGO sets from my own parts using the LEGO Builder app on my phone, I’ve noticed that for larger models—especially supercars—PDF scans can be a hassle. I constantly have to zoom in just to see exactly where pieces go. With this animated approach, the app can automatically focus on the building area, which takes away much of that effort. In fact, the official LEGO Builder app already uses a similar method for many of their sets. -
[MOC] 1:8 Koenigsegg Agera RS
mihao replied to mihao's topic in LEGO Technic, Mindstorms, Model Team and Scale Modeling
When driving with RC, I use the reverse gear, because there are way less gears engaged on the drivetrain. Just flip the direction on the controller. Sure I can still drive using low gear shift for forward, but it is very slow. Plan to do it on google store. -
I’m excited to share my latest project: a 1:8 scale LEGO Technic Koenigsegg Agera RS MOC. Functions include: Independent suspension on all wheels for authentic movement Fully functional dihedral synchro-helix doors, trunk, and hood Removable convertible roof Adjustable body height 8-speed gearbox with Drive / Idle / Reverse stick Paddle shifters and working steering wheel (HOG control) Here is the full demo video on Youtube: Power Functions compatibility: PF motors can be added to achieve driving, steering, lights, and body height adjustment. In theory, the components can be installed directly; in practice, it’s easier to remove a few pieces first to save your fingers. Gearbox development: The gearbox was by far the most challenging component. I wanted it to withstand high torque — tested with two L-motors. Early designs failed due to axle locking during part shifting. After multiple iterations, I refined the mechanism and reinforced the gearstick so it no longer pops back to idle under load. The final result is solid, and you can see it in action in the video. Dihedral synchro-helix doors: The doors are a signature feature of the real car, moving outward, forward, and upward at the same time. I achieved this by combining a Technic 28-tooth turntable with a hanging arm — a lifesaver solution that enabled smooth motion across all three directions. Bodywork: Designing the large-radius curves of the hood and roof was another headache. After much trial, I turned to Znap elements, which LEGO no longer produces. Despite being unconventional, they achieved a far better curvature than standard Technic or System parts. Height adjustment: The adjustable suspension relies on a complex gear train, including mechanisms to prevent over-rotation. Clutch gears are included in both the front and rear systems, so when torque is too high the clutch will slip, protecting the fragile bevel gears (especially the 8-tooth ones). Instructions: If you have an iPhone or iPad, the full instructions are available for free via the app: https://apps.apple.com/us/app/agera-rs/id6751605748 (or search “Agera RS” in the App Store). For convenience, the app includes a missing parts tracker and can generate an XML file for BrickLink orders. ⚠️ Note: Two panels (4446 and 4443 – Technic Panel Curved #54 Left/Right) are not available in red from LEGO. Options include painting them or sourcing from third parties. I’d love to hear your thoughts on both the design and the instruction app, so I know where improvements can be made. Thanks for checking it out!
-
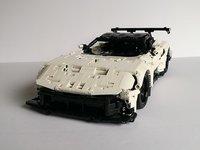
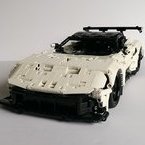
[MOC] 1:8 Corvette C7
mihao replied to mihao's topic in LEGO Technic, Mindstorms, Model Team and Scale Modeling
Nice! that's the game changer for me too!