

jfb9301
-
Posts
31 -
Joined
-
Last visited
Content Type
Profiles
Forums
Gallery
Everything posted by jfb9301
-
42172 - McLaren P1
jfb9301 replied to Ngoc Nguyen's topic in LEGO Technic, Mindstorms, Model Team and Scale Modeling
NM, I answered my own question -
42159 Yamaha MT-10 SP
jfb9301 replied to Ngoc Nguyen's topic in LEGO Technic, Mindstorms, Model Team and Scale Modeling
This is an actual first for me. TLG finally built a transmission that is based on reality. having built bags 2 and 3, I am reasonably sure that it shifts 1-N-2-3 (unlike the BMW which shifted 1-2-N-3). I do not have to re-engineer the gears to get the correct sequence. Also, even if I did, with the new parts, all on two axels (in this 3 speed), swapping the gearing around to get the sequence proper would be dead easy. I know there was much discussion of first up, and first down on the BMW. Does anyone know which way this one is going to shift? If I want to change that I'd rather know now, because if I build more, the engine and transmission will be buried into the model (but not too buried, this bike doesn't have 250 pieces of cowling to hide the lump) -
And about the stepper mechanism.
-
another option is the Gulf colors, we should have a good selection of blue and orange. I've had zero luck with stud.io, so maybe someone can whip up a pic.
-
Oh my....... https://www.steindrucker.com/42130-bike-1000-custom-package I really wanted the lithographed parts, but 210 Euro? That's a tough pill to swallow.
-
I really wish we could spend a little time on fixing mechanical problems with this build. Sure body work might be important, but it's polish on a cannon ball. IMHO function is just as important. If it is not body work, generally we seem to focus on complete rebuilds of the transmission. So far in this thread none of my requests for help have been responded to. It is hard to find motivation to share when you are ignored.
-
I sure would like a picture of what you are talking about. It sounds good, and I might like to give it a go for this build when I get to the stepper.
-
Still hoping someone has an answer to this. EDIT Nevermind. I solved my own @#$% problem. TLG never installed a shift block in the Sian, I must have and forgotten that I made my own modifications. With my Ferrari transmission built to step 116, I finally had all the gears to actually test my transmission. Or rather, one gear short, somehow I missed one gear, and only had odd gears in the transmission working. Fixed that, and I successfully performed the money shift, 8th to 1st, with the Ferrari transmission. TLG ARE YOU IDIOTS? NO CAR DESIGNER WOULD EVER ALLOW THIS TO HAPPEN! WHY DO YOU PERSIST IN DESIGNING TRANSMISSIONS THAT WOULD CAUSE THE ENGINE TO DETONATE AND THROW RODS EVERYWHERE? (end rant) That said, I realized that on the right side, there were 3 extra gears on the rear side of the transmission, causing the real sequence to be 1 to 8 to 1 to 8 and then to loop back to the original 1st gear. This is actually a 16 speed transmission. since many have lamented that the transmission was the same as the Sian, I brought my Sian over to my work bench and looked at it carefully. I realized that I removed those 3 unnecessary gears, and repurposed a couple parts and with 3 extra parts from my stores, I had built a shift block in that location. I easily have the parts to fix this myself, now I just need to find the time to disassemble the Ferrari engine (with lots of difficult to remove parts) and copy what I did to my Sian. P.S. We are not allowed to mock TLG's transmission idiocy in reviews of their products. I recall (for either the Bugatti or the Porsche) I wrote a nice review of the product, but in the review pointed out that the gearbox was poorly designed, and that fixes to TLG's mistakes were readily available on the internet. My review got deleted. Stupid Gestapo tactic.
-
This seems like the best place to ask. Does anyone know if there is a shift block to prevent a direct shift from 8th to 1st (AKA "the money shift") or will we have to engineer one? I was happy the Sian finally saw one implemented by TLG, but as of yet (step 110), I have not seen anything to block this on this car.
-
For those who have not completed the transmission already or are starting the model.... Use this as instruction errata to correct the shift sequence Step 47) replace the red bush with a red 16T clutch gear Step 55) replace the red 16T clutch gear with the red bush 0 extra parts and the transmission works correctly now. I've been recovering from COVID, and while you would think that would give me extra time to solve this... I've been so wiped out and short energy, I could not focus on it enough to solve it. Today, I had the energy to focus on it. Took me a bit though, I kept trying to figure out how to swap 1st and 3rd, but after about 15 minutes of thinking about it, I realized that was impossible to do simply and swapping 2nd and N would be much easier and would solve the issue without extra parts.
-
I only built my 42130 to step 133. I thought this was a good time to pause and solve the transmission issue. 2nd and N are on the left side of the transmission... so go after that side. 1st and 3rd are on the right and both use 12T and 20T gears. First is tricky because it move those gears away from the clutch. All I did was crack open the transmission, slip off the LBG 16T gears, swap the bush for the 16T clutch gear and put it all back together. I can't cram a 6 speed in there, but at least it shifts correctly. I have been stuck on this step for a week now. I just couldn't spend the time to focus enough to solve the problem until this morning.
-
I solved TLGs persistent transmission idiocy for this model. As a follow up, I will post pictures. In Milan's review on page 3 it is discussed in length that either a 1st up or 1st down shift pattern would be a "real world" pattern for this transmission as long as the pattern is 1-N-2-3. In no case is TLGs pattern of 1-2-N-3 ever realistic. I realize they do this deliberately so that the engine goes faster and faster as you upshift gears. This make the "play" factor better. THIS IS A 18 AND UP MODEL, REALISM SHOULD BE THE PRIORITY. For those of us who ACTUALLY know how transmissions and engines work, this just makes things worse. The simple solution is: 1) Identify the Red Bush used for N (It is installed in Step 47) 2) Identify the Red 16T Idler/Clutch Gear used for 2nd (installed in step 55) 3) Reverse them 4) Reassemble Your transmission will now shift up to 1st, 2 down to second, one more down to 3rd.... The Race transmission configuration for a BMW M 1000RR. Your welcome. -edit- Sorry, I do not think there will be pictures, there is no way I can figure out how to downsize the pictures to fit within the tight file constraints that have been allowed. If someone has a suggestion of how I can do that, I will get them uploaded. I have the files, but nothing I can do will get them under 1K and still be viewable (IMHO)
-
Yes, this is most likely normal. A lego differential is what is referred to as an "Open Diff." This means there is no limited slip, or other fancy stuff in there to ensure that both wheels spin together. Try this to test friction, spin the input. When only one wheel turns, or turns faster than the other, grab hold of that wheel and ensure that your slow one starts spinning. If the feel of the friction seems the same, you probably got it right. If it gets harder to spin that wheel, go looking for some friction.
-
Also you can look at my alternative (using what I feel are more common parts) https://www.bricksafe.com/files/jfb9301/42083/Rear%20Caliper%20mounts.lxf I built this alternative into my build, and it works with the stock calipers.
-
I have been working on a couple of ideas for minor improvements to the details of this model. I have already built a pair of rear caliper mounts, but I am just now getting to Bag 12, so I will soon see whether or not they will work. Here is the LXF for my mounts. https://www.bricksafe.com/files/jfb9301/42083/Rear%20Caliper%20mounts.lxf I got to thinking that I don't like the white behind the headlights. Cars don't have white there, they have chrome. and the rest of the headlight mount is white, where it should be black. I came up with a LXF of a plan to change both of these, but I lack the parts to build them and see what they look like. I'll link the LXF if anyone wants to have a go (and maybe post a picture). If nothing else I will get the parts on bricklink and try them out myself. https://www.bricksafe.com/files/jfb9301/42083/Headlights.lxf Once I finish the car I want do something similar to what others have done to bring the tubing around the door sill. I also want to tackle the annoying gap at the top of the front fenders. I am sure that I will find more things that I ant to work on, but those are just what I have spotted for now.
-
Just for clarification, "lag" is rather non-specific. Are we talking about "Backlash"? (there is a helpful definition here https://en.wikipedia.org/wiki/Gear#Backlash) This is evidenced by multiple rotations of the the tires before the engine starts to turn in the new gear. or Are we talking about "Friction"? Evidenced by the shafts being hard to rotate and excess force required to push the model along. Both of which can be reduced by having less gear meshes. In my build with the stock gearing, I do not seem to have issues with friction. To be clear, I invest a good deal of time on each step of a gear train to ensure that the gears are in their best alignment to reduce rubbing (friction). On the other hand, backlash can be a huge issue with the large pitch and loose clearances of Lego gears. Less meshes will always reduce backlash. Careful building and good support of axles on both sides of the gear is essential to any Lego build. Friction is easy to cope with. Backlash is essentially unavoidable in any Lego build, and can be a nightmare in a Lego transmission.
-
The lithographer Harald Günther has done it again. This time he has made printed parts (I hate stickers) for the Chiron. They don't come cheap, at 70 Euro for the set, and I noted while the shop displayed in my native language, the checkout process was in German (Deutsche). So, you may need your favorite translator, and definitely bring your wallet. http://www.steindrucker.com/printed-parts-for-buchi-420583 (Yes I know he made a typographical error in the set number, that is how it is listed, not my mistake)
-
I still cant quite follow how it was done, but I at least have a guess now. It helped a lot that I looked up the part you suggested. I had completely forgotten that they had made that part, and I don't think I have any in my spares. I am working on an alternative based on the parts I have, but I don't need the solution right away as I only work on the model a few minutes a day. I won't get to installing the calipers for another couple weeks. Thanks for the information. If you get the chance to take another picture, how about one that is not blocked by the break disk please.
-
How did you manage this?
-
I just got done building the "stock" gearbox with the gear block modification in the back. I based the design on the Didumos' renders. No collisions and seems to shift well. I am still debating if I want to go for minor improvements, or more of full blown mod. I ended up spending a lot of time and money getting my Porsche GT3RS just the way I wanted, and I'd rather do less than more on this model. The "stock" transmission seems to work great from the drive wheels to the output of the transmission, but if I try to use a M motor on the input from the DNR, bad things happen as soon as I grab second gear. I have not tried having the M motor off while I change gears. So this might be a product of the M motor applying torque and grabbing 2 gears at the same time. In a real car of course a clutch would prevent the motor from applying torque during the shift. Really I need to test out the play-ability of this setup, so I will finish box 2 and have a full drive train before making the decision about this transmission setup. I'm still wondering the purpose of the 20T idler in the back end of the differential. I cannot find a single purpose for it. Maybe the real car has the diff set up this way?
-
Does the blue idler gear in the rear differential serve any real purpose, or can I just not build it in there? On first glance (I'm only just beginning on building this) it looks like it does nothing, and can just induce more friction.
-
Once I saw this I knew I had to build one. I just took time away from my transmissions to build a single one of these, it worked perfect and I'm pretty thrilled with it. Thanks for submitting the idea. Now back to my transmissions.
-
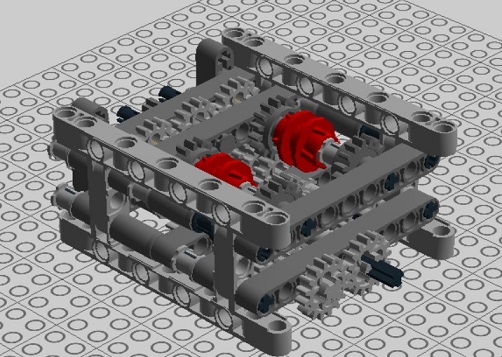
This is the 4 speed This is the 8 speed, the 4 speed is obviously to the left, and the high/low 2 speed is to the right. This is the ver 3 of the shifter new lxf https://www.bricksafe.com/files/jfb9301/Shifter ver 3.lxf
-
(Broke the link, new lxf below) More false shifting solved. I noted that the H/L transmission would find N when shifting above 8 or below 1 this was due to the 4 speed transmission being blocked, but not blocking the 2 speed transmission. The addition of the red lift arms will prevent the shifter from going below first or above eighth gear.
-
Ingenious. I had to read your post a couple of times to fully grasp what it was he had done. I kind of like mine, but I might just have to go back to the drawing board as this might work even better.