Gray_Mouser
-
Posts
90 -
Joined
-
Last visited
Content Type
Profiles
Forums
Gallery
Everything posted by Gray_Mouser
-
Yes, there is a slight misunderstanding: - I used 85941 (1/2 cylinder) + a round tile to cap it off - you suggest 20430 (aka 6259) + a turbine (presumably). This combination is a tad longer than the one I used, and I feel it was a bit too long already. - I'm currently playing with 24593 which is indeed much shorter. I'm trying to use one of these in combination with a turbine (because it looks so good) and 87081 (round brick). This combination is shorter (one stud shorter than the 3x3 engine actually, but round plates can be added to fine tune the length). The nice thing is that the 1/2 cylinder can be attached to the brick. And an axle can run from the brick to the turbine. I may have found a way to fix the slope with hinges. We'll see. About the canopy, I agree the gray hinge was a nice outline. But I needed room to attach the hook that holds the vertical "post". But I'm so not done with the canopy. :-)
-
Thank you so much for the LDD file. It will save me a lot of time. There is an actual window in there! Not just a hole where the window should be. Nice! And now I understand how you managed to level the hinge ;-) My only qualm with this build is that I think the pilot should sit lower so that he can look through the window. I dunno if this can be done, or if it is worth it for that matter. Now I should decide whether I will build Jerac's Tie or yours. His version is much rounder, but without a space to accomodate a pilot, it's a tie fighter shaped brick, not a spacecraft. Tough choice. :-/ Especially since I modified the rear of his version by borrowing the idea of the round tile from yours. Much, much better. I think my opinion on your moc is obvious but I didn't write it so... Very good job!
-
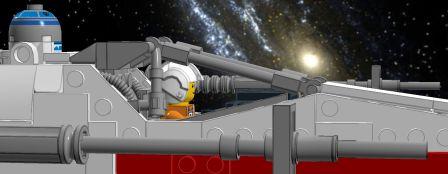
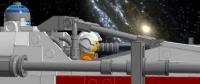
Interior greebling, yes! It will be visible when the wings are opened thanks to the half cylinder. And also through the turbine. I wanted to do it too but reckoned I had to solve the stability issues first. And I lack the skill to do it properly anyway. With the shorter half cylinders, because the 2 of them put together are still shorter than the longer one, you can use a 87081 4x4 round brick to hold them, and then use an axle to hold the brick. That's what I'm gonna try anyway. I thought I had read on your Flickr gallery that you prefered 3x3 engines... Had I known you would attempt it with 4x4, I wouldn't have bothered. I hope you don't mind my posting of my own ideas in your topic. :-/ I like your latest picture by the way. Nice staging. :-) I don't like the use of a different shade of gray for the barrels though (but the light gray ones are frigging expensive). But maybe you can make them look good, we'll see. About the pipes, there is nothing to it. Actually since I had to get rid of the taps in front of R2-D2 in order to fit the modified canopy, I replaced them with lamp holders and attached the pipes to them (and I attached the other ends to the interior of the spacecraft, through the gaps at the rear of the cockpit). Sadly I also had to remove the gray hinges too (because of the modified canopy). Anyway, I'm sure you could do it better. EDIT: Thank you for the extra shots of your Tie Figher! I had actually begun to replicate it. If I may, I think that the pilot should sit lower so that his eyes are level with the window. Easier said than done I know. Maybe it's not worth it. I have a question about this one... How did you manage to attach the brick that holds the hatch? When I attempt it, it is either too low or too high, so that the hatch doesn't work properly.
-
Thanks for your input. Sometimes, when one gets a "clever" idea, it can be difficult to let it go :-) After some research and measurements, I now think 3x3 engines are too small. Maybe 4x4 is a tad too big, but I think it's closer. Sooooooo... I'm now toying with the engines (and its slopes). First, I thought the way to go was to use jet engines (43121). But there was no way to attach them without redesigning pretty much everything. So, no, thank you. But then I realized that I could use half cylinders and a turbine (41531) or even a round 4x4 plate (11833) at the front. The nice thing about these parts is that neither the wings nor the body need to be heavily modified in order to fit them. And as an added bonus, roof tiles (60477) fit *just* underneath the half cylinder, so that their flat parts are hidden. As a result, the slope looks smooth, and there is no gap. I think 60477 is just the right size, but 4286 can be used as well. And in both cases, Inthert's trick can be used to make to slope protrude from the wing, and it lines up perfectly. Nice. There are still problems though: - the wings need to be lenghtened by 1/2 a stud at the center (otherwise the engines won't fit since they are bigger). I can do it with jumpers (obvisouly), but I worry the stress on these bricks will be too much and the build will not be sturdy enough - The half cylinder I use is a tad too long (85941). As a result, I didn't find a good way to attach it. For the moment it is only held by the front round plate, which is in turn only held by 2 studs. Not good. Furthermore, a turbine would look so much sleeker than a round plate, but it's even longer. I think I will have to replace the long 1/2 cylinder by 2 shorter ones. This will give me options, but it will screw the beautiful slopes up. Argh. The blue part (99206) is what holds the front plate. And this is placed correctly thanks to the yellow part (15573). Yeah... I know. Any ideas?
-
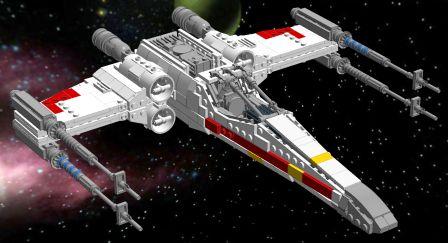
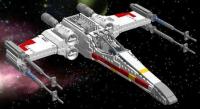
[MOC] My version of Luke's X-Wing T-65 in gray used look
Gray_Mouser replied to Florian_Wayne's topic in LEGO Star Wars
The xwing looks like a modified psiaki design. Nice. The brick canopy is so much better than the lego ones. Is the tie fighter your own design? -
Thanks :-) I've taken a look at the topic about the T-70. Impressive collaborative work. Pity that the roof tile that was used for its canopy won't work on the T-65. Or so I feel, because the hinge must be above the pilot's head, and the area behind the pilot's head is supposed to be empty. I've found another solution though. I think it looks marginally better but I doubt the canopy will open easily. But at least the slope roughly starts where I want it to. Moreover it's "transparent", as it should be, thanks to the use of the lunchbox (is that an accepted name for this brick?). And I've added pipes in the cockpit (I think a flex tube would look better, but LDD won't let me flex it as much as I'm sure it can). Because there should be some: So, here is the new canopy I suggest:
-
I worked a little on the canopy. I wanted a real flat top part, I wanted the rear part to be fixed, and I wanted it to look stable enough (this is a spacecraft after all). I'm relatively happy with the following solution. Pity lipsticks are so rare (and so not available in light bluish grey) because the shape was exactly what I needed . But I can use a nozzle or a screwdriver instead. I had to make minor modifications to bricks around the cockpit, and the grey slope should start closer to the pilot, but this is as good as I can make it. I think I'm gonna go with that one. What do you think? Maybe I should stop polluting Inthert's thread...

-
Don't mention it, I also did it to correct mine (and there were indeed major mistakes). I can probably guess how many hours you spent. :-) But I liked doing it actually, it was like a puzzle. The cheese slices in the nose in my file are not connected. They just happen to "float in the air" at the correct location (I did say I cheated in my file, didn't I?).
-
I've updated the lxf file in my previous post. For those who had dowloaded it already, please delete the old one. Sorry if you made mistakes because of me. I have added my name to the file for reference (because I'm not the only one who uploaded one), but I don't mean to claim any kind of credit. Making these instructions is a lot a work. I was not requesting anything... For the tie fighter I'll be grateful for whatever you were planning to publish (if anything). If I can make a LDD file out of your shots I may choose to offer your tie instead of Jerac's. And if not... not :-) Instructions for the Falcon are clearly out of the question though... It's much too big. As I said, I already have one at home... So I can easily make a LDD file and try to recreate some of your ideas for it. That's what I had in mind.
-
blbills, I've taken another look at your file, and I think the reason you can't attach the cockpit to the body is because the part behind the pilot should sit one stub lower. There is one 1x1 round tile too many actually. If you compare steps 16 and 20 from Inthert's instructions, you may notice the discrepancy. And I definitely made the following mistakes: - in the part in front of the cockpit, 3937 (x2) and 6134 (x2) should be above the black hinge, and not 3023 (x2) and 61409 (x2). Good luck closing the sides of the nose in LDD with these though. - behind the seat, there should be 2432 & 23969 and not 23969 & 3004 (this brick can help you align the cockpit though, providing you don't forget to replace it by the proper part later). This part of the MOC is a nice touch by the way. - I forgot to say earlier that 48729 (x2) behind the pilot's seat should be replaced by 2 minifig's hands, but this part doesn't exist in LDD - the bricks at the center of the wings (which allows them to fold) should be 47905, 6541 and 4733 and not 47905 (well, this one is correct), 4070 and 87087 - for some reasons I had added a 87994 bar inside the bricks I mentioned above... Please get rid of it. I wish we could have pooled our efforts earlier :-) Ah, and Inthert, I've seen your tie fighter... I was about to say I still like Jerac's version best, but looking at it again, I'm not so sure. From a casual glance his version looks better but it doesn't have an interior... And I'm very unhappy with the thruster whereas yours seems very good. From my very limited experience, the lure of these lego models are the small details. So I don't know... You know what? Don't post the instructions for your tie, and I'll be fine :-) EDIT: F*ck that, please post them if you were planning to do so. I'd love to see how fun it is to build, even in LDD. At least it will be easier to resist your Falcon, as my girlfriend have already bought the latest set... That's how I got into this mess actually. At first I grumbled a bit because I felt it was just an overpriced dust trap, but I've got to say it looks great sitting in the lower part of our glass coffee table. Hopefully after I'm done with the x-wing and the tie (be it your version or another, no pressure), and possibly some mods for the Falcon, I'll be able to stop :-/
-
I didn't really have more success... I cheated where it mattered. In order to get the center part attached and properly aligned, I had to remove some 1x1 round plates (there are 4 stacks of 2 such plates behind the pilot's seat). Thank you for your file. I see there are some discrepancies with mine. You used 6134 in the front part whereas I used 61409. This was ambiguous from the pictures... I tried the same part as you did, but I couldn't get the right angles because of it, without knowing if it was a flaw in the design, or because of LDD. Now I see that maybe that part is necessary to get a sturdy model. I'll add this part to my bricklist. I won't add much cost, but it may make a big difference.
-
Hmmmm... I feel the scale is not the same for the two designs. If you try those engines, please let us know how they fit.
-
My only experience in building a lego set dates back to my childhood... 25 or 30 years ago. So I have no idea if the canopy I modified would be sturdy or easy to open. I agree it would be better if the flat part was fixed, but I really don't know how that could be achieved without that part being too high and thus the angle too steep. As it is now I feel the angle is a tad too steep already. I have more than one version for the canopy by the way, and I'm relatively happy and unhappy with a few of them for different reasons (I would share pictures but eurobrick seems to limit the number of files I share for some reasons). About the slopes, Inthert sumed up the difficulties. The angle should be small enough, but the top of the slope shouldn't be too high either. So pick your poison; the flat part is mine. Two rows of slopes would be "roof like" as Inthert said... this is a no go in my opinion, but your mileage may vary. That being said, the flat part *is* bad, no discussion about it. I toyed with solutions with hinges, but they left gaps I didn't like. I considered using the 4x4 engines but there is no way you will be able to mount them "vertically" (otherwise I think the wings won't fold). I think there are a few designs out there where the engines are rotated 90°, but that would require a huge modification of the wing design... and possibly of the body of the aircraft. As it is now, I already spent a lot of time on the LDD file. If I had known how much in advance, I probably wouldn't have done it, especially since I knew nothing about LDD... So I don't have the patience anymore. Especially since I don't own bricks to try it out "for real". But please feel free to have a go at it. Talking about the LDD file, I would feel bad sharing it without the author's consent, but since Inthert asked, here it is: EDIT: Final update (the file may not be perfect, but I won't work on it anymore) Inthert's_T-65_xwing_by_Gray_Mouser_v3.lxf Please be aware that: - If you use this file to generate a brick list, 2x 48729 should be replaced by 2 light bluish gray minifig hands, and that 2 extra minifig hand are missing in the nose (so colour is not important) - I chose the red and yellow according to what look best to me, but I'm colour blind, so you shouldn't trust me on these. Furthermore, I suspect the colours look different in LDD too. But please be aware that I had to cheat in order to complete it. Some bricks are not connected, some are missing altogether, and where hinges are involved I often could not "go" all the way. And of course I may have made some mistakes (and even some intentional adjustements when I felt Inthert's pictures where not consistent with one another). That being said, I daresay it should help building the design. And I left the bricks I couldn't connect in the file, so the brick list should be correct (except for two hands that are needed in the nose... because this part does not exist in LDD). The change of color was not intentional :-) I'm pretty sure the colors in LDD are different from real bricks, and I'm mildly color blind (different shades of the same color often look more similar to me than to a "normal" person). I'll try dark red. For the yellow, I think the right one is "tan", but LDD uses different names and there is no way I'll find the right one in LDD (for the reasons mentioned above). Since I implied there were flaws in Inthert's design, let me finish this longish post by saying again that I think this MOC is amazing. It's because it's so good I'm willing to take time to smooth off the few rough edges. I'll probably not manage to supply the bricks in time for my girlfriend's birthday, but I spent so much time that I will definitely have it built... I'm not sure that's an honor, but it's certainly praise! EDIT: I will try to shorten the wings, but I'll wait and see if anyone comes up with other suggestions. Maybe I won't choose the slopes I have shown earlier.
-
Thanks for the part number Inthert. I was looking for a pin with a flat bottom... I could have looked for a long time. With this part out of the way I was able to finish my LDD file, but before I order the parts, I wanted to tweak your design a little. In order to do that I compared it to visuals from the movies. It increased my respect for your MOC, but I feel there are a few areas that are a little off... I think the canopy should not be straight, and the slopes near the engines may be too big. So here are the results of my efforts... Lemme know what you think.

-
Hi Inthert, Thank you for posting the instructions. I plan to offer the parts necessary to replicate your MOC to my girlfriend for her birthday. I have already made a ldd version of your t-65 xwing. I learnt to use it for the occasion, and I have had a hard time, as you can imagine. A dozen parts won't fit (not quite correctly or not at all), but I can tell this is a shortcoming of ldd, and that it will turn out to be ok once it is built "for real". However I cannot figure out what are the rear parts of the canons... Some sort of pins I guess, but I can't find them. If you could tell me the part number I would appreciate it. I can find a way, but I'm reluctant to modify your design, lest it is not sturdy enough. In the end, I may tweak the color a bit (white nose?), and maybe modify the canons front parts so that I can mount transparent darts in them... I will also offer the parts for Jared's tie fighter, and it would be great if it could look like the xwing is firing at it. Anyway, thank you for your creation. I think it's obvious by now but I love it. Nice work!