Barahir1401
-
Posts
16 -
Joined
-
Last visited
Content Type
Profiles
Forums
Gallery
Everything posted by Barahir1401
-
Thank you, that is a real honor :-) Yep, I've tried to get the octagon in lbg, but my used lego shop had one in dbg (for 5 cent), and I was like "what the heck, I'll just take this one :-)" I will fiddle around with the extra plate thickness and see if it works. The double cut corners are a brilliant idea! (shame on me, I actually didnt know they existed in grey) Regarding the question about how I did it... actually I left the front side roughly as it is with the front side snots jutting out and just put some wedges there and afterwards the octagon. Since the canopy does not hold fast enough on its own, I used the drop-down HUD in the cockpit to hold the canopy dish in the middle. I'll replace my dbg brick with a clear one do it'll be a bit less dark in there.
-
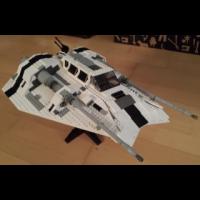
Alright guys and girls, Bricklink sourcing is finished, I'm proud to present the 10175 V2.0, I have tried to stick as close to the Original as possible, with a few minor deviations here and there. The cockpit has been heavily modified because I didnt want to pay ~80 € for one single piece. All in all the model cost me around 100 €, mostly used parts. Flickr link: https://flic.kr/s/aHskjsEmNx
-
Hahahaha cool!
-
Thankee
-
Thank you! I always try to combine parts that fit either by color, style or functionality.... or all together
-
Hi all, just a bit of fiddling with this and that. My son wanted to have a trike-like vehicle and so I started building. Hope you'll like it. Seems uploading fails every time atm... sorry. More pics on https://flic.kr/s/aHskhrQiRT
-
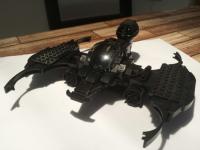
Hi all, I've tried to recreate a Batwing that has a bit of the gothic, industrial heavy duty look & feel just like the iconic '89 Batmobile or the Batwing of the same movie. You'll find large missile launchers under the wings, a heavy turbine that catapults the aircraft forward, and when viewed from above or below it gives us that shape we're all familiar with... More on https://flic.kr/s/aHskhpzBR3 Enjoy :-)
-
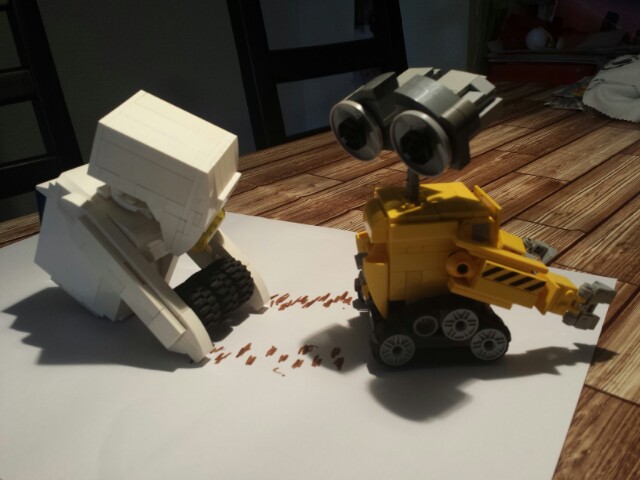
Hi everyone, thought I'd share with you what I put together for my kids :-) What WALL-E has a bit too much on the head-side, M-O missed... well, a tad bit. Kids are happy, thats what counts. One pic attached here, the rest can be found under the flickr link. https://flic.kr/s/aHskhm6jGY

-

Bricklinking and Building 10030 UCS Star Destroyer
Barahir1401 replied to Cjd223's topic in LEGO Star Wars
Not yet. I've heard from several different sources that the nose is usually sagging until some of the technic bars break from the strain - has not yet happened here... and thanks for reminding me, I wanted to add a little "nose holder" underneath, just to be on the safe side... -
Bricklinking and Building 10030 UCS Star Destroyer
Barahir1401 replied to Cjd223's topic in LEGO Star Wars
Photos! -
Bricklinking and Building 10030 UCS Star Destroyer
Barahir1401 replied to Cjd223's topic in LEGO Star Wars
Actually attaching the large plates with this method was quite easy and I had no issues whatsoever. It gets a bit fiddly when you need to choose the best fitting "arm" and the correct point to press the plate on - but since the "arm" holding the pin plate can be moved up and down and the pin plate can be rotated, it´s not a big issue. I used http://www.bricklink...tem.asp?P=32557 to fix the arm to the ship interior - quite the same as with the normal magnet holders. Then I used either http://www.bricklink...tem.asp?P=32068 or http://www.bricklink...tem.asp?P=32184 or http://www.bricklink...tem.asp?P=42003 for the "arm" (you´ll need to test out a bit which one to choose best, regarding the available slots to press the plate down unto on the large side panels). To attach the arm to the panels, you can choose from a variety of plates: either http://www.bricklink...Item.asp?P=2444 or http://www.bricklink...Item.asp?P=2476 (those were my standard ones) or two of those: http://www.bricklink...tem.asp?P=32529 (you´ll probably have to use http://www.bricklink...Item.asp?P=6558 with the arm for stability and good connection). You can see, there are a lot of possibilities of connecting the panels to the interior, if you think about it a bit. I´ve built the ISD about one year ago and until now, not one of the panels lost its hold. Oh, and what I really like about this method: You can use ANY color you have, resp. just buy the cheapest parts available, even if they are pink with green circles or whatever - since they will not be seen from the outside :-) -
My attempt at a 10179 UCS Millennium Falcon!
Barahir1401 replied to EddScott's topic in LEGO Star Wars
I wish you luck in your endeavors - bricklinking the 10179 from scratch is quite a task! -
Bricklinking and Building 10030 UCS Star Destroyer
Barahir1401 replied to Cjd223's topic in LEGO Star Wars
thanks for the kind words :-) thats why I went with the black large tires for the engine part of the Star Destroyer. The grey ones are just way too expensive. Also for the radar domes or whatever the balls are called, I used the dark grey ones for the bottom part because 1 € <<< 80 € :-) -
Bricklinking and Building 10030 UCS Star Destroyer
Barahir1401 replied to Cjd223's topic in LEGO Star Wars
Alright, now lets see if I can get this flickr account to work... By the way, with technic bars I do mean the small ones.... you'll see... all those parts I used are easy to get. https://flic.kr/s/aHskbnvZXy Oh and while we're at it... bricklinked the 10129 too with black stripes instead of orange, and a neat canopy solution (orange slopes and the black windshields are usually showstoppers, so changing that a bit saved me probably a couple hundred bucks: https://flic.kr/s/aHskbU9Fnu -
Bricklinking and Building 10030 UCS Star Destroyer
Barahir1401 replied to Cjd223's topic in LEGO Star Wars
Hi,I know it´s a bit too late, but maybe for future Bricklink projects- I´ve found a way to get rid of ALL those pesky magnets and use normal technic pins and bars to securely hold the large underside and upper side panels in position. Can make photos later today for those interested. -
Hi all, after Bricklink-sourcing the 10179, the 10030, the 10178 and the 10129 my next project will be the 10175 Tie Advanced. From checking the parts list on Bricklink, I see that the only real showstopper would be the octagonal canopy, since for the other rare parts there should somewhere be a good replacement solution available. For the entry hatch (that´s listed at more than 15 Euro a piece) I´ll take this one: http://www.bricklink.com/catalogItem.asp?P=18675pb01 For these lbley large Boat Bow Plates (about 10 bucks a piece I´ll just take black ones (which cost around one euro), and I´ll bet with a bit more greebling here and there no one would notice. Now for the cockpit canopy... the original one is 10x10 and octagonal: http://www.bricklink.com/catalogItem.asp?P=2598pb01 I thought of using this 8x8 dish http://www.bricklink.com/catalogItem.asp?P=3961pb06 together with this one http://www.bricklink.com/catalogItem.asp?P=6063 (in lbley) and a few slopes. Does anyone have maybe a better idea or thoughts? Would be much appreciated! Cheers, Seb