
LvdH
-
Posts
2,266 -
Joined
-
Last visited
Content Type
Profiles
Forums
Gallery
Everything posted by LvdH
-
General Part Discussion
LvdH replied to Polo-Freak's topic in LEGO Technic, Mindstorms, Model Team and Scale Modeling
Well, it only took 4 and half months. Time to order some parts 3x19 frames are also back. -
[CADA] CADA General Discussion Topic
LvdH replied to Milan's topic in LEGO Technic, Mindstorms, Model Team and Scale Modeling
Found these online. So they got an Aventador SVJ rear and print on the arches, a Huracan (?) front with Aventador lights and a V10. -
General Part Discussion
LvdH replied to Polo-Freak's topic in LEGO Technic, Mindstorms, Model Team and Scale Modeling
That part was available when I first looked. Then the site crashed (well done LEGO), and they were out of stock. Better luck next time I guess. -
General Part Discussion
LvdH replied to Polo-Freak's topic in LEGO Technic, Mindstorms, Model Team and Scale Modeling
A bunch of new parts have just appeared on PaB, including the "new" 12t and 20t gears. -
[CADA] CADA General Discussion Topic
LvdH replied to Milan's topic in LEGO Technic, Mindstorms, Model Team and Scale Modeling
There are quite a few normal connectors used that don’t exist in dark azure. Also some liftarms on the roof. And no if I remember correctly I just ended up cutting off the ends of a 16 long hose. -
[CADA] CADA General Discussion Topic
LvdH replied to Milan's topic in LEGO Technic, Mindstorms, Model Team and Scale Modeling
They have been for a while You will need to make some very very small changes to build it with original LEGO and even more to build it in dark azure. -
General Part Discussion
LvdH replied to Polo-Freak's topic in LEGO Technic, Mindstorms, Model Team and Scale Modeling
Guessing you mean these? https://www.steindrucker.com/42130-bike-1000-custom-package -
General Part Discussion
LvdH replied to Polo-Freak's topic in LEGO Technic, Mindstorms, Model Team and Scale Modeling
This appears to be true, as neither are available to order for me. -
General Part Discussion
LvdH replied to Polo-Freak's topic in LEGO Technic, Mindstorms, Model Team and Scale Modeling
None of the new orange (well, new in March) parts from the McLaren are available and neither is the 3x19 frame. Which parts specifically do you mean? -
Technic 2023 Set Discussion
LvdH replied to Dami's topic in LEGO Technic, Mindstorms, Model Team and Scale Modeling
At first I thought the Peugeot was black but it’s clearly a lighter shade. So there’s a pretty good chance we will get a nice selection of DBG panels. Hopefully the “Osprey” panels will be returning in that case. -
[CADA] CADA General Discussion Topic
LvdH replied to Milan's topic in LEGO Technic, Mindstorms, Model Team and Scale Modeling
I don’t think it goes any quicker than the Regera but it does feel like it. It seems to go much smoother. My Regera has been built for 3 years (almost) so it isn’t really apples to apples comparison. So whether this is a time where CaDA pieces work smoother, dust accumulated over the last 3 years, more optimised design or just an error on my part in the Regera (doubtful) will remain a mystery. Interesting. I wasn’t aware of that. It sure does look like it might fit though. -
[CADA] CADA General Discussion Topic
LvdH replied to Milan's topic in LEGO Technic, Mindstorms, Model Team and Scale Modeling
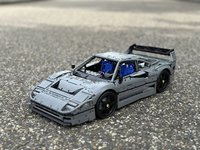
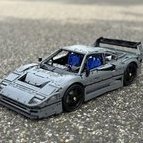
And done. I might take some outdoor pictures with proper light. In the meantime, short thoughts: The build quality is excellent for the most part. There are a few panels that only attach at a single point but you usually won't break anything by lifting it the wrong way. There is a very stiff frame and most of the panels are fixed in at least 2 points. The functions are hit or miss. The doors work surprisingly, despite my fully LEGO Regera's doors not working very well. The axle lift works. The opening engine cover and frunk works. I thought the roof was supposed to be able to be stored in the frunk, but apparently not. Or I did something wrong. The CVT works, shifting and driving the engine from the wheels. The rear wheel steering does NOT work. This is due to several reasons: Too much backlash due to the driving ring and 15 gears or so (out of the top of my head) from the HOG to the rear wheels. Too much weight: this car has 4300 parts and they are definitely not all connectors or little plates. The return to center mechanism: there is a rubber band to make sure the wheels stay straight while not in the higher or lower gears. The low quality of the wheels (or the hubs). This might sound weird but let me explain: I have had several times where the wheels would just pop off the hubs. Not good. When pushing the car straight while steered they will pop off and they’re quite a bit more difficult to reattach. The part quality is very mediocre. Pins feel either very stiff or very loose. The DBG 3L pin is a pain to push in all the way, and the outer end with the pin doesn't have any friction. LBG half pins are basically all with friction which I actually don't really mind for the finished car, but they were less enjoyable to insert during the build. A bunch of parts came "stained" or scratched. This was able to be removed with an eraser but I've never had this with my LEGO sets or even used parts. As mentioned, the wheels pop off from the wheel hubs very easily. The proportions are not quite right. Some lines are not quite right. I don't think it's an ugly car however. The instructions were challenging but usually quite clear. As far as I (and Dugald) have noticed, there were 5 errors in the instructions: A57: incorrect orientation for the limiter, as mentioned somewhere on a previous page. C35 & C53, incorrect orientation of a liftarm required for the axle lift, also mentioned somewhere on a previous page. G12 & G55, #21/#22 panels swapped places. This was one I already spotted on the photos. These are the two vertical panels where the B pillars would be. If anyone is curious about anything or if I might have missed something, let me know. -
[MOC] Koenigsegg Jesko
LvdH replied to Pvdb's topic in LEGO Technic, Mindstorms, Model Team and Scale Modeling
That sounds like something to look forward to. Can't wait. If you need anyone to test the instructions, I will gladly volunteer By the way, if you're interested in seeing more on that 1:8 scale Jesko from CaDA, check the CaDA topic. I have been semi-reviewing the set over there. -
[CADA] CADA General Discussion Topic
LvdH replied to Milan's topic in LEGO Technic, Mindstorms, Model Team and Scale Modeling
They should work as a replacement. The only major difference is that you need a 5 stud long space instead of a 3 stud space, so you cannot put a clutch gear on the axle of the wave selector without a driving ring extension. I’ll see if I can see explain it better with a Studio render later today. The LEGO selector can be used in the place of the CaDA selector. Just put the wave selector on a 3L axle with two 2L axle connectors and you have the exact same part, just in a different shape. -
[CADA] CADA General Discussion Topic
LvdH replied to Milan's topic in LEGO Technic, Mindstorms, Model Team and Scale Modeling
So I just finished the bags numbered 2, 3 and 4. Number 2 finished off the rear axle and the gearbox mechanism. Like I said in my previous post, the new gear selector is used here as well. Speaking of which, there is an error in the instructions which I've confirmed with Dugald. On step A57 you install the limiter connected to the new gear selector. This limiter will stop your gear shifts going to 1 -> 9 and 9 -> 1. The gear in the instructions is the 9th gear, so logically the limiter should be at one of the ends. But it's not. It's facing down, right in the middle. This is easily fixed up until you add the gear selector. After that, you're out of luck. This is the step in question: And this is what it should be: Apart from that, everything went together smoothly. There is another error in the instructions which I will get to in a bit. The quality remains inconsistent. Here are two thin liftarms where the axle hole in one (or both) of them are not "straight". Here is a 2L axle that looks like it was fried. Thankfully I have plenty of extras that came with my set. Speaking of which, I'm not really keeping track of them any more. I've had a few times where I need to pull parts from the spare pile because they're missing from my current bags. On to bags 3. This builds the front axle and part of the door mechanism. Step C contains another error according to Dugald. This build has an axle lifter setup similar to his Regera. Step C35 and step C53: you need to rotate the 1x2 liftarms otherwise the axle lift will not work. No further issues, although the axle lift setup isn't built yet so these springs are just not attached to anything which might cause some issues when I get to that part. Step D: Pretty much finishing off the chassis. The seats and door mechanism, and the chassis finally gets some rigidity near the end. The door mechanism works, for now. We'll see when there's actually a door built. The range of motion isn't quite authentic though. It's supposed to go completely vertical, but whatever. The 4 wheel steering mechanism is also completed here. I have my doubts about it working though. There is a lot of play in the whole mechanism from the HOG gear, through 15 gears of various sizes, to the driving ring, to the U-joints and finally to the gear rack. The rear axle is kept centered with a rubber band, aka the classic mechanism used for a return to center steering, before servo motors. -
[CADA] CADA General Discussion Topic
LvdH replied to Milan's topic in LEGO Technic, Mindstorms, Model Team and Scale Modeling
So a few hours later. Bags numbered 1 are finished. So far? Quality is still inconsistent. The axle holes in the 1x13 gear rack are off center. The 9L steering links have quite a lot of friction, although that doesn't seem to be an issue.You might also see the "stop" of the 8L with stop has broken off slightly. The friction in the half beams with axle holes was quite high so while pushing it in, it just snapped off. Build quality is superb. So far there are a few CaDA exclusive parts used, but all of them could be replaced with a little bit of technical insight. There was however a step where you had to push an axle into a frame where it can't be removed without tools. Extra parts after bags numbered 1: Before starting on the second bags, I saw the new gear shifter. So I had a quick look to see how it works because it still wasn't clear to me. While only one of the red selectors are used, you get a full set of four which is nice. These have to be inserted manually. This is how it looks from the inside. It comes pre assembled minus the red selectors. With two screws you can open the white housing. So how does it work? As you can see there is one 5 long orange "worm gear". The orange plates are free to move. If you insert the red selector in the orange plate, the red bar shaped end slides into the orange worm gear and thus will start sliding back and forth as the worm gear rotates. Finally, apologies for the mediocre photos. These were just taken on my desk with no preparations to write a semi-review. Fortunately on Bruno's red one, there were no blue pins But yes, while his version was also originally designed with LEGO part like the Centenario, Bruno put a lot of effort into assuring every part is attached solidly so the inconsistent friction doesn't matter much there. -
[CADA] CADA General Discussion Topic
LvdH replied to Milan's topic in LEGO Technic, Mindstorms, Model Team and Scale Modeling
Absolutely. I'll share all my findings and opinions on this set here. I'm about halfway through the first bags and here's what I found so far. Starting with the most obvious: The quality... It's not really there. There is quite a lot of play between some parts, specially the brake rotors in the CVT. I hope this isn't an issue for the functionality, can't say definitively because I only just started an hour ago. Parts either have way too much friction or too little friction. So far this only affected the blue axle pins and DBG 3L axle pins. Sticking this part into this part did not go smoothly for instance. It's more like a click rather than sliding a connector onto an axle like usual. Some parts came awfully scratched or even "stained". So is the quality really better than LEGO? Some claim it is. As far as I can tell, CaDA has a long way to go to get the quality right. Since the doors are the same as the Regera, I'll just assume the same "problem" exists here. You cannot just put the parts together and expect it to work perfectly. The gears need to be aligned properly, otherwise the door will sag like in the video. That being said it's still quite likely that there is just too much play for the doors to function perfectly, but I will see for myself in a few days or so. -
General Part Discussion
LvdH replied to Polo-Freak's topic in LEGO Technic, Mindstorms, Model Team and Scale Modeling
It's not new. The pistons have been inconsistently colored for decades. -
[CADA] CADA General Discussion Topic
LvdH replied to Milan's topic in LEGO Technic, Mindstorms, Model Team and Scale Modeling
Ordered last week on September 1st, delivered today. From some warehouse in China to my house in the Netherlands. Now if only Lego could deliver your orders so quickly I’m not here to advertise any sellers (and I won’t in this thread), but if anyone is curious about where I got it from, send me a PM. -
General Part Discussion
LvdH replied to Polo-Freak's topic in LEGO Technic, Mindstorms, Model Team and Scale Modeling
Those are from sets released in March, specifically the 42140 and 42141. Noteworthy parts that are now available include the 2x5 elliptical liftarm “panel extender”, shock absorbers, wheel hubs and tires from 42130 BMW bike, friction 1/2 pin and the panel 5x7 parallelogram left and right. So unfortunately no 3x19 frame or non beveled 12 and 20 tooth gears… -
General Part Discussion
LvdH replied to Polo-Freak's topic in LEGO Technic, Mindstorms, Model Team and Scale Modeling
I’m sure this won’t surprise anyone, but after trying to order some new parts from the Ferrari Daytona they still say they cannot sell them. The whole “3 month” excuse they kept up for the entirety of 2022 is as expected: nonsense. -
Technic 2023 Set Discussion
LvdH replied to Dami's topic in LEGO Technic, Mindstorms, Model Team and Scale Modeling
That’s not a LEGO set, and the LEGO version will be yellow and black. Just an fyi: Ignore this guy and his channel. He’s doing everything for the clicks including blatantly misleading everyone. -
[CADA] CADA General Discussion Topic
LvdH replied to Milan's topic in LEGO Technic, Mindstorms, Model Team and Scale Modeling
Not that I am aware off. Aren’t they just disassembled shocks? It can’t be built with LEGO bricks btw. At least not without a lot of modifications or off brand pieces. Dugald took full advantage of Cada’s more extensive collection of liftarms: those with alternating holes in various lengths (not 11 and 15) and also liftarms with pins on the ends (think of 87082 but with more holes). -
[CADA] CADA General Discussion Topic
LvdH replied to Milan's topic in LEGO Technic, Mindstorms, Model Team and Scale Modeling
I'm not sure how the whole thing works. Given there is also a traditional driving ring connected to the CVT I think it's either a 3 speed CVT with 3 different "ranges", or a 5 speed CVT with 2 different "ranges" and one gear blocked. Anyway: I ordered the set. I just have to see it in person now -
[CADA] CADA General Discussion Topic
LvdH replied to Milan's topic in LEGO Technic, Mindstorms, Model Team and Scale Modeling
There is a 9 speed gearbox in the real car, so Dugald built a 9 speed gearbox in this model using a CVT.