
Legopold
-
Posts
52 -
Joined
-
Last visited
Content Type
Profiles
Forums
Gallery
Everything posted by Legopold
-
 @ALCO: I modified some more wheel holders today and noticed that the modification (using the "2L axle method" described in the original post of this topic) failed to work on a few of the wheel holders. Those were somewhat older wheel holders that I bought second hand. Obviously, LEGO has used different types of moulds for the wheel holder over time. On the older wheel holder, the cavity where you put the 2L axle piece had a different depth which resulted in friction between the metal axle and the two clips in the center of the holder. While both types of wheel holders look very similar, you can distinguish the old and the new mould by the style of the part number "2878". The number is notably bigger on the older inompatible mould: I assume that you tried the modification on an older type of wheel holder which looks like the one in the bottom picture. If this is not case, please let me know. Maybe even a third kind of mould exists. @Giottist: Apparently, there are different kinds of 3rd party metal axles available. I have bought axles here on four different occasions between 2016 and 2019, so it seems to be a reliable source to me.
 -
Hi Giottist, thank you very much for your feedback and for sharing your rest results. I bought ready made steel rods from Aliexpress and had no problems fitting them into the MR52ZZ bearings at all. The axles were advertised as "RC Toy Car Model Part Stainless Steel Round Rods Axles 40mm x 2mm ". Those had the right diameter and length. I can recommend them.
-
You can get these pieces in sand green for cheap on Aliexpress. It might be necessary to move this thread to the community forum since it touches clone brands which btw are explicitly allowed to discuss by forum rules.
-
I made a few pictures and put them into a Flickr album. Enjoy. :)
-
Did you make sure that the red axle pieces are rotated into the right position as indicated in the picture? Once they are seated in the holder, you usually need to rotate them inside the holder (!) to reach their final orientation as depicted. If orientated correctly, the 2L axle is a fraction of a millimeter thinner than in the wrong orientation and this does the trick. You might need a tool for rotating the axle. Afterwards, place the assembled bearings with axle and wheels on top and press on the bearings firmly. If this does not work, then obviously there is something wrong. Maybe there are different kinds of 2L axles or bearings with slightly different widths available? It might help to test some more 2L axles and bearings.
-
Hello, I'd like to show a short video of a train consisting of one loco and 24 mixed waggons. All cars (80 axles in total) have been customized with ball bearings. In the beginning of the video, the train is pulled by a passenger loco powered by one LEGO train motor. Afterwards, the same train is pulled by a freight train powered by two LEGO train motors. The freight train has no problems pulling all cars, while the passenger train is visibly slowed down but still manages to pull all cars. Credits go to my daughter for compiling the temporary city layout. :)
-
It certainly is sturdier now but unfortunately it cannot be used. Try to move a car over these rail pieces and you will see why: the second L-shaped piece blocks the cars. Edit: Try to rotate both of the L-shaped pieces by 90 degrees. Replace the 4L axle in the upper left corner by a 3L axle. It should work and might be sufficiently strong then.
-
Thanks for sharing your pictures, 1963maniac. The bottom technic pieces look good. You have probably already noticed that the gray 2x2 corner brick wil be a problem. The upper part of the piece is located too close to the inner rail. The cars will not be able to ride the coaster in this configuration. I suggest to replace the 2x2 corner brick with a 2x2 corner plate or a 2x2 slope. Againg, the technic bottom looks good. Same problem here with the blue 2x2 brick that is too close to the inner rail. I suggest to use a 2x2 slope instead. Interesting solution. I have not tried that one. You got the geometry right but I assume the joint will be too flexible to withstand the centrifugal force of the coaster cars at full speed.
-
Hi, thanks for your interest. I am pleased to read that I inspired you. Here is a picture that shows the connection used for the big loop. Please note that both of the two halves shown below are completely identical (except the 3L axle). I just added several more pictures to my flickr album that should clear up most questions. Regarding the big loop, it took me a while to figure out the connection between the rails. The solution I came up with is quite sturdy and durable, which is a necessity for prolonged coaster sessions. There may be smaller and more elegant solutions but those tend to be too unstable. I am looking forward to see pictures of the roller coaster you are working on.
-
Hi Ray, you can use the original axles but you may have a hard time fitting them into the the ball bearings from Aliexpress as they will fit very tightly. The inner diameter of the bearings has some variance and some of them can be applied with little effort. Others require a lot of force, e.g. by using a hammer (see this thread). The steel rods from aliexpress are a fraction of a millimeter thinner than the LEGO axles and fit into the bearings easily. I use both types of axles with the ball bearings but mostly the ones from aliexpress. I'd like to add that on flickr someone commented that the bearings may move towards the center of the wheel holder after prolonged use, e.g. if used for several hours at an exhibition. If this happens, you lose the power of the bearing and end up with the friction of the standard wheel holder. This behaviour was noted when the old type of modification was applied, i.e. the one that required cutting of the clamps in the center of the wheel holder. I expect that movement of the bearings inside ot the wheel holder will be less of a problem with the new type of modification. It certainly will not be a problem, if you hammer the bearings onto the axle as shown in the thread mentioned above.
-
Hello, last year I presented here on Eurobricks a method to equip the LEGO train wheel holder with ball bearings. A disadvantage of that method (see here) was that it required to cut a small part of the wheel holder, thus you had to damage the rather expensive wheel holder. Even worse, removing the ball bearings after modification left you with a more or less useless LEGO piece, thus making it very difficult to sell these LEGO pieces in the future. Furthermore, the modification slightly added to the height of the wheel holder, i.e. the resulting holder was approximately half a plate higher than without modification. I came up with an improvement that does not require cutting the wheel holder and does not notably add to the height of the holder. It does require cutting of a 2L technic axle though, which I do not consider a big thing since these axles are really cheap: When inserting the red axle pieces into the holder, it is important to align them exactly as shown in the picture. When the assembly is complete, it is crucial to prevent the axle from touching the two clamps in the center of the holder. For some additional information, click on the picture above . For a comparison of the wheel holder with and without modification, see this video:
-
It can be overwhelming how much space the storage of train track needs, if you have lots of it. I'd like to share how I store my LEGO train track. I have been using this technique for a very long time and I was amazed that I could not find anything about this simple stacking improvement, when I searched here or on Google. The trick is to turn around every 2nd piece when you stack the straight track. This way you need approximately 33% less space which is not a bad improvement: I suppose some of you also use this technique since it is quite obvious.
-
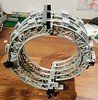
Roller Coaster Looping (10261 modification)
Legopold replied to Donald's topic in General LEGO Discussion
Hi Donald, you will need to bend the circle so you end up with a shape resembling a spiral. This is only possible by putting some stress on the elements. For various reasons, this type of building cannot be realized in studio. So I suggest to just buy the parts and start building it with your hands. I am sure there are many solutions how to build a full looping. You can find my take on building a double looping in this thread. More pictures are available in my flickr album. Have fun! Arnold -
Awesome! Thanks for sharing, zagdima.
-
Hi zagdima, these part designs are very interesting, especially the loops. Thanks for sharing. To be able to put four of the 90-degree pieces in a row, it will be beneficial to insert a small twist into each section. Just enough, so that the beginning and the end of the loop will be parallel. Without that twist, you will need to put some serious stress onto the pieces which is difficult to achieve with clutch power alone. Also, if the standard lego cars cannot handle the 90-degree-pieces, I suggest to increase the radius of the loop. Lowering the bars will probably not be sufficient because most likely you will also need to lower the 1x2 studs at the beginning and the end of each section (which will carry a 2x2 tile!). And it is not clear to me, what exactly you plan to do with the twisted short straight piece (the second pic in your last post). Do you have something special in mind, e.g. to use several of those in a row? The latter would only be of limited use because the cars do not work too well when driving sideways or upside down. I am looking forward to see some photos of your first working loop. :)
-
Thanks for your reply, zagdima. So you are printing the bent track? There are also people out there who bend LEGO railway tracks using a heat gun.
-
The car looks interesting. I suppose it is not easy to print a smooth surface suitable to take up the axle and wheels, so I wonder if you have any issues with increased friction. Do you also print the axle and wheels or do you use the ones from Lego? And do you bend straight track or (also) other track pieces? I'd like to see the bent track.
-
Hey, I was working on a roller coaster last year and finished most of the ride. Since I somehow lost interest in it, I decided to show you the progress so far before I dismantle everything. I'd like to point out that I cut some coaster track pieces for this MOC, see here! Poor LEGO pieces, I hope you can enjoy the coaster nevertheless. The whole coaster is built on two 48x48 baseplates. The coaster is 76 bricks high. To cramp everything onto two baseplates, I used a very steep ramp using customised pieces. Click for a VIDEO For the dive, I used two curved pieces as proposed by others. The big looping consists of unmodified lower ramp pieces, while the steep curve was built of modified ramp pieces (see above): The white platform was decorated with some shiny pieces by my 5-year-old daughter. ^^ For the two smaller loops, I used standard curves, a technique similar to the dive section depicted previously. The chains used for the ramp had to be diverted to work. Still, the chains do not run as smoothly as desirable but most of the time they are doing their job. For the upper part of the ramp, I again used modified parts. Obviously, I did not achieve optimum results but it works. Also, I'd like to share a 100% legal version of the double looping which was not depicted in the previous pictures. It reminds me of the large hadron collider: You can find more photos in the flickr album. I hope you enjoyed it.
-
I customised the LEGO roller coaster piece Ramp Large Lower Part, 6 Bricks Elevation (26559) by a single cut. The resulting two pieces can be used to form long ramps or steeper ramps than possible by the initial piece. First, you use some of your old pieces to fit prepare the rail for cutting. You need some plates, bricks and clips: Use some sandpaper to smoothen the cut. For the steep ramp, you need first these pieces: Add the rails to obtain the steep ramp: The resulting curve is smooth. It can be used to create a steep curve. If you want to create a looping, be aware that it does not form the complete quarter of a circle, so creating a complete loop will be somewhat difficult (although not impossible). You can combine the new pieces with straight pieces to obtain long (standard) ramps, something which is not possible at the moment for the grey rail pieces, as the pieces needed for the ramp are only available in red. First, you need these pieces: Add the rails to obtain this: If necessary, the two pieces you obtained after cutting can be put together to obtain the initial ramp. Use these pieces: resulting in: Of course, the resulting piece is not as sturdy as before but can still do the job. I hope, you found these instructions useful. You can find more pictures in my flickr album.
-
Hi EZ, you can get cheap track with very decent quality from Aliexpress, e.g. here: Link I have bought there twice and was very happy with the quality of the track and the delivery as well. I'd like to note that from my understanding bulk bricks/tracks like these do not infringe the IP of Lego.
-
BrickTracks: different curves, PF/9V compatible
Legopold replied to JopieK's topic in LEGO Train Tech
I bought 5 packs of straight tracks from that seller and found the quality to be remarkably good. The only differences to LEGO track I observed was a slightly different color (barely noticable) and a somewhat lower clutch power between the track segments. The latter is no problem at all, the track is just not as tightly connected as the LEGO ones. Some customers on Aliexpress complained about bad packaging and broken or warped pieces being delivered. I had no problem at all. All pieces were intact and perfectly flat. -
@dr_spock: Good work. I once tried to make my own train axles, too, because I found the original LEGO ones quite expensive. I ended up buying axles for a good price from this seller from AliExpress. The axles fit perfectly into the LEGO wheel holder. The axles have quite good quality (correct dimensions, straight and even). The only difference from the original LEGO ones I noticed are slightly uneven endings but that did not affect the function of the axles. I had no problems to fit them into the MR52ZZ (2x5x2.5mm) ball bearings which I bought from another seller at AliExpress. 60 axles including shipping cost only 5.20$, which I consider a really good offer.
-
Vehicle Dynamics Laboratory investigates the Castering Effect
Legopold replied to Hod Carrier's topic in LEGO Train Tech
@Hod CarrierI believe designing the pivot points to carry the weight will be a major challenge. Maybe the small technic turntables can do the trick? I am looking forward to see your solution. Good luck! -
Vehicle Dynamics Laboratory investigates the Castering Effect
Legopold replied to Hod Carrier's topic in LEGO Train Tech
@Hod Carrier Thanks for your elaborate answer. Interesting, I had expected that increasing the distance between center beam and wheel axle would make the bunching less a problem. After thinking through your setup for a while I am concerned about something else. If you start building something on top of the centre beam, the whole weight will last on top of the two pivot points located at both ends of that beam. Since the axle cannot take the weight directly, the pins will suffer some serious stress and increased friction with increasing weight. I wonder, if your setup will be suitable for bigger (heavier) cars. -
Vehicle Dynamics Laboratory investigates the Castering Effect
Legopold replied to Hod Carrier's topic in LEGO Train Tech
Hello, thanks again for sharing your work in such detail. I noticed that you actually have two pivot points. One is connected to the buffer section and one is connected to the center beam. I suppose that the distance between the axle and both of the pivot points will have a big influence on how well the system works, including "bunching". Did you consider to change those distances?